
Give Your Kitchen Cabinets a Built-In Look with Crown Molding
Add Crown Molding to Cabinets for a Built-In Finish
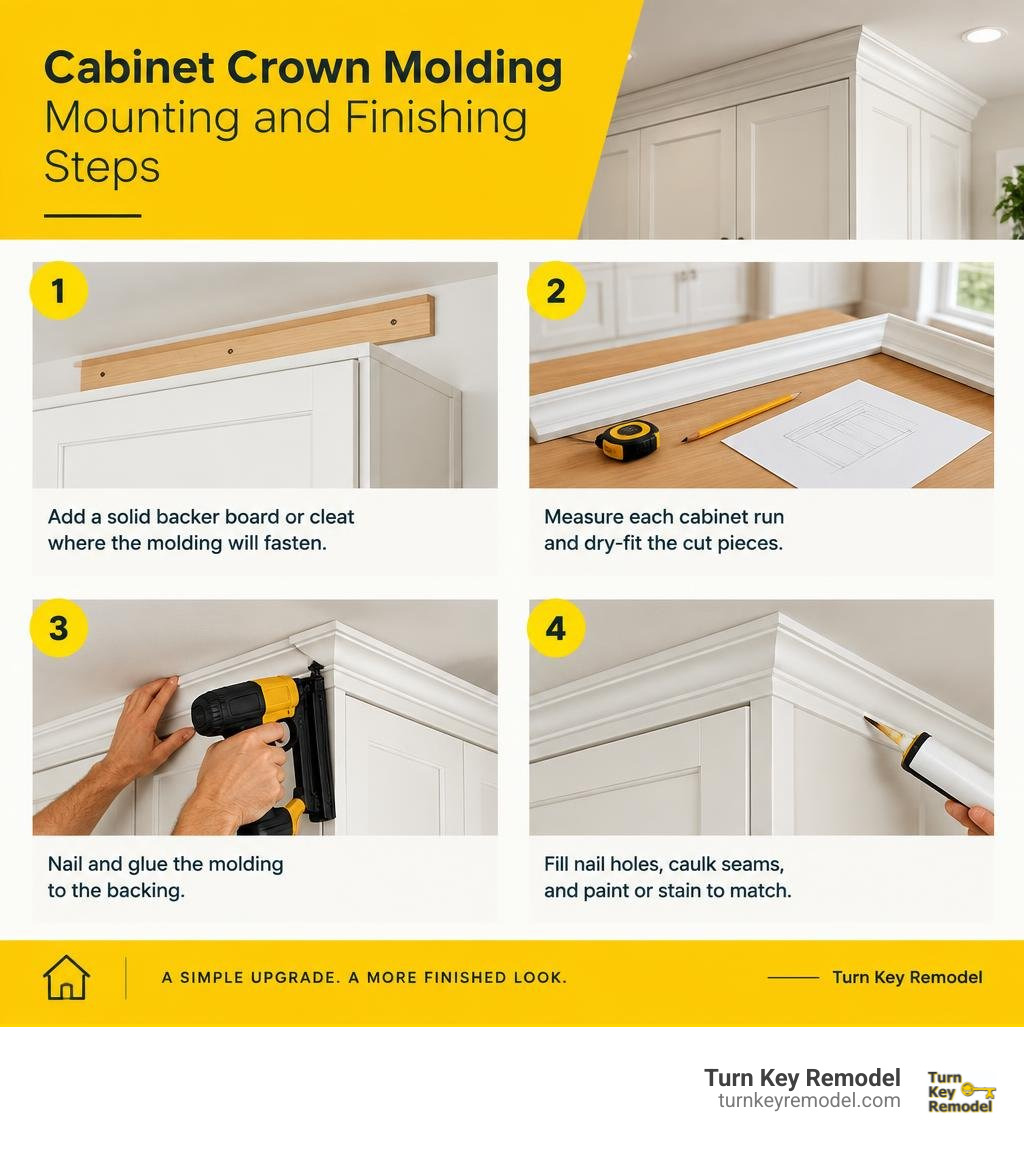
Adding crown molding to cabinets is a practical way to make standard upper cabinets look taller, more finished, and closer to a custom built-in. The basic process is simple:
- Add a solid backer board or cleat where the molding will fasten.
- Measure each cabinet run and dry-fit the cut pieces.
- Nail and glue the molding to the backing.
- Fill nail holes, caulk seams, and paint or stain to match.
For full-overlay cabinet doors, the backer is the key detail. A 3/4-inch wood strip creates a secure nailing surface and positions the crown so its lower edge aligns neatly with the cabinet faces. Crown molding can also help soften small ceiling gaps and create a cleaner transition at the top of the room.
I’m Mark Apicella, Owner and President of Turn Key Remodel in Orange County, CA. With more than eight years in remodeling and a team backed by a 20-year record of craftsmanship, I have seen how adding crown molding to cabinets can turn an ordinary kitchen into a more polished, intentional space.
Key terms for adding crown molding to cabinets:
- best kitchen cabinet installers near me
- building a kitchen island with ikea cabinets
- farmhouse sink in existing cabinet
Planning and Preparing Your Cabinet Molding Project
Before picking up a saw, we always start by inspecting the physical framework of the upper cabinets and their relationship to the ceiling. Crown molding acts as the visual bridge between the cabinet carcass and the rest of the room. Skipping the prep stage is why many DIY projects end up with binding doors or crooked sightlines.
You must account for three primary factors:
- Ceiling Gap: Determine whether your molding will terminate against the ceiling or float open as a decorative cap.
- Door Clearance: Full-overlay and frameless doors swing within 3/16 inch to 1/4 inch of the cabinet top, leaving zero margin for low-hanging molding profiles.
- Vertical Reveal: The visible flat space above the door needs to remain uniform across every cabinet box in the run.
Selecting the right trim material ensures your finished work survives everyday kitchen humidity and temperature shifts:
| Material Type | Best Application | Pros | Cons |
|---|---|---|---|
| Primed MDF | Painted cabinets | Ultra-smooth finish, budget-friendly, highly stable | Vulnerable to direct water saturation |
| Solid Hardwood (Poplar/Maple) | Stained or high-end painted cabinets | Extremely durable, holds sharp profiles, crisp miter joints | Higher material cost, reacts to seasonal humidity |
| Polyurethane / Composite | High-moisture kitchens | Completely waterproof, flexible along wavy walls | Can feel softer under fasteners, requires specialized paint |
Profile Selection and Sizing Ratios
Proportion dictates whether your kitchen feels balanced or top-heavy. As a standard rule of thumb for 36-inch upper cabinets, we look for a molding rise between 2 inches and 3-7/16 inches. Taller 42-inch uppers can easily carry 4-inch to 6-inch profiles.
- Cove Profile: Features a concave, inward-sweeping curve. Ideal for Craftsman, modern, and transitional spaces.
- Ogee Molding: Traditional profile boasting an S-shaped curve (a classic “belly and scoop”) that complements raised-panel doors.
- Shaker Trim / Stepped Crown: Crisp, flat-faced, geometric steps that suit clean contemporary kitchens.
Every traditional crown molding features a spring angle—the angle at which the molding sits between the cabinet face and the ceiling (commonly 38°/52° or 45°/45°). Knowing your trim’s spring angle is critical for setting up cuts properly on your miter saw.
Essential Tools and Materials for Adding Crown Molding to Cabinets
Achieving crisp, tight joints requires the right set of tools:
- Compound Miter Saw: Equipped with a sharp 60- or 80-tooth fine-finish blade.
- 18-Gauge Brad Nailer: A pneumatic or cordless nailer driving 1-1/4″ to 2″ brad nails.
- Coping Saw: For undercutting and shaping precise inside corner joints.
- Digital Angle Finder / Protractor: To measure actual corner angles rather than assuming 90 degrees.
- Wood Glue & CA Adhesive: Titebond wood glue for wood-to-wood bonds, paired with fast-setting CA glue for outside corner miters.
- 320-Grit Sanding Sponge & Wood Filler: For filling fasteners and feathering edges smooth.
- Paintable Caulk: Fast-drying acrylic latex caulk to conceal minor wall and ceiling hairline gaps.
If you are new to complex compound angle setups, watching a video tutorial on cutting cabinet crown molding will give you a clear visual reference before making your first cuts.
Creating a Solid Nailing Surface on Full-Overlay Boxes
Modern frameless boxes and modern styles like custom cabinet doors for IKEA cabinets feature doors that extend almost entirely to the top edge of the box. Nailing molding directly to the top edge will either split the thin cabinet substrate or pin your doors shut.
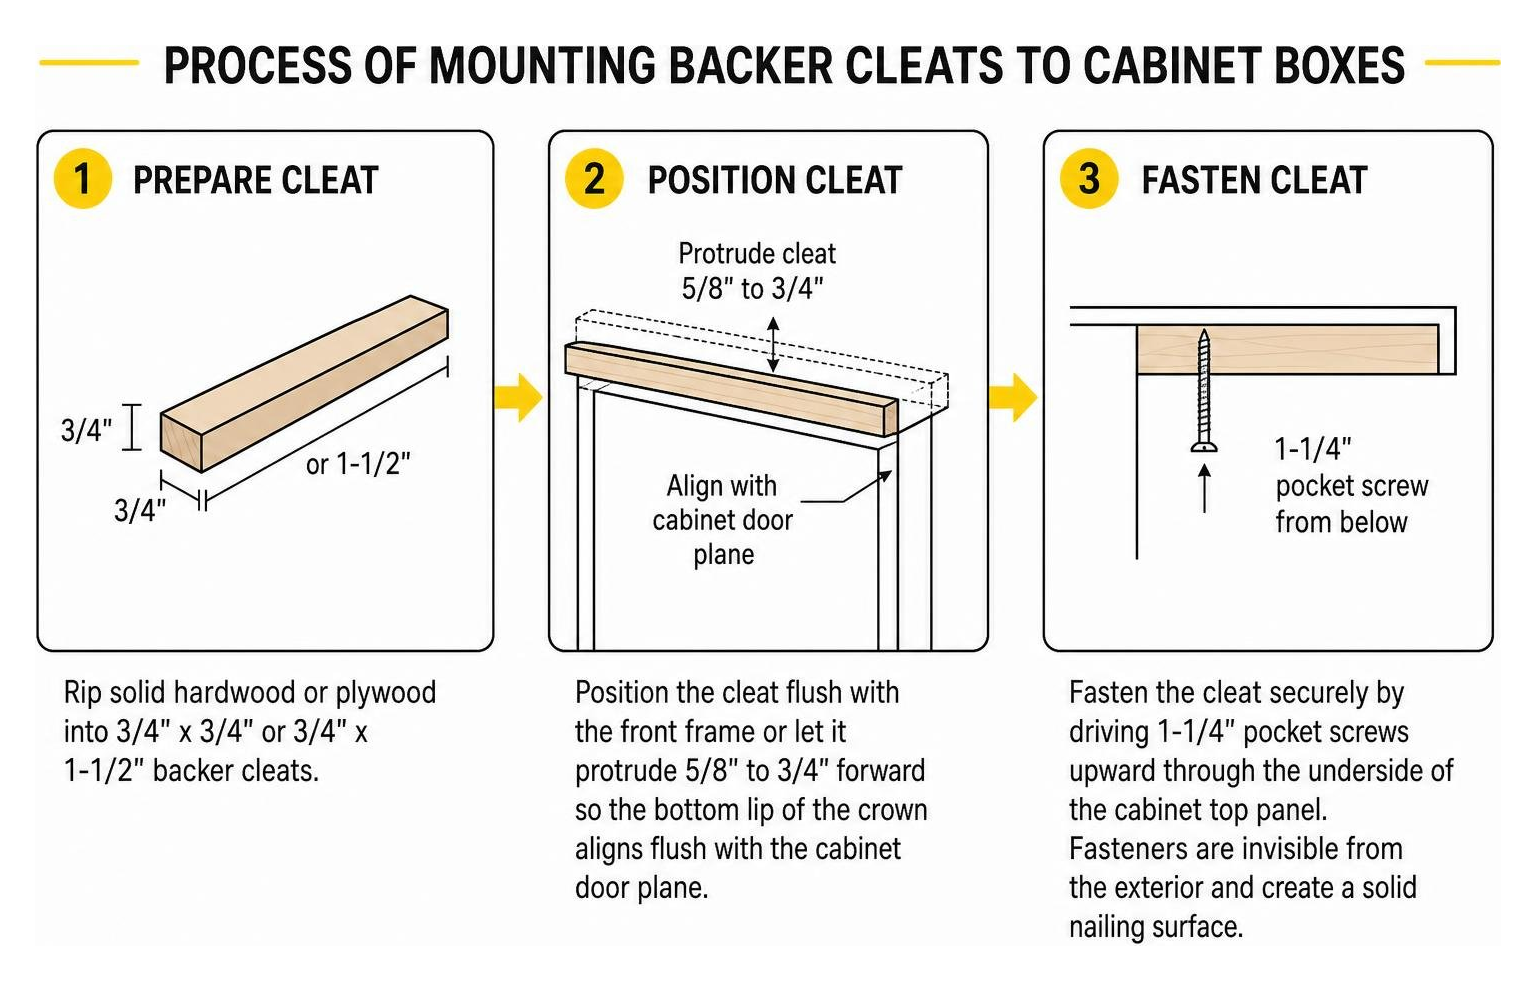
To build a secure nailer:
- Rip solid hardwood or plywood into 3/4″ x 3/4″ or 3/4″ x 1-1/2″ backer cleats.
- Position the cleat flush with the front frame or let it protrude 5/8″ to 3/4″ forward so the bottom lip of the crown aligns flush with the cabinet door plane.
- Fasten the cleat securely by driving 1-1/4″ pocket screws upward through the underside of the cabinet top panel. This keeps all fasteners completely invisible from the exterior while creating a continuous, rock-solid wooden foundation to receive your finish nails.
Step-by-Step Guide: Adding Crown Molding to Cabinets

With our mounting cleats firmly locked in place, we move into the installation phase. Taking time to dry-fit every single component prevents costly material waste.
Step 1: Measuring Cabinet Perimeter and Calculating Waste
- Map the layout of your upper cabinet run starting from an inside corner or a wall junction and moving outward toward open finished ends.
- Measure each straight run twice using a tape measure or a marked “story stick” (a straight 1×2 scrap board you hold directly against the cabinet to physically mark exact corner points without reading numbers).
- Add a 15-percent waste factor to your total linear footage calculation to accommodate miter cut drop-offs, testing scraps, and scarf joints.
- If you are tackling a comprehensive pantry wall or standalone cabinet bank, you can reference Young House Love’s DIY cabinet pantry guide for practical layout workflows.
Step 2: Cutting Miters, Bevels, and Coping Inside Corners
The easiest and most reliable cutting method for DIYers is the nested cutting method:
- Place the crown molding upside-down and backwards in your miter saw bed. The top edge of the molding rests flat on the saw base, while the bottom edge rests against the saw fence at its natural spring angle.
For a standard 90° outside corner, swing your saw blade to 45° left or right without tilting the bevel.
Inside Corners: While you can miter inside corners, wall corners in homes across Orange County, Tustin, and Anaheim Hills are rarely a crisp 90 degrees. Coping is the gold-standard method. Cut the first piece flat at a 90° square butt into the wall. Cut the mating piece at a 45° inside miter, then use your coping saw to cut along the exposed contour line, slightly back-beveling the blade. The coped profile will slide cleanly over the face of the first board with zero visible gap.
- Long Runs: On cabinet runs exceeding 8 feet, avoid butt joints. Instead, cut a 45-degree overlapping scarf joint centered over a mounting backer block.
Step 3: Fastening Molding and Securing Outside Corners
- Dry-fit the cut pieces atop the cabinets to check joint tightness.
- Apply a thin bead of wood glue to the back of the molding and the meeting surfaces of corner miters.
- Tack the crown molding into the backer cleats using 18-gauge brad nails spaced every 12 to 16 inches.
- For outside corner miters, use painter’s tape to pull the joint tight while the glue sets. Pre-gluing the outside miter with CA glue and activator before lifting it onto the cabinets guarantees the point never separates over time.
Step 4: Seamless Finishing with Wood Filler, Caulk, and Paint

Finishing separates an amateur DIY job from master craftsmanship:
- Fill Fasteners: Press stainable wood filler or painter’s putty into every nail hole. Overfill slightly, let cure, and sand flush with a 220-grit to 320-grit sanding block.
- Caulk Seams: Run a thin bead of paintable acrylic latex caulk along inside corners and the joint where the trim meets the ceiling or wall. Smooth immediately with a damp lint-free cloth or a gloved finger.
- Paint & Touch-Up: Apply a matching coat of primer and finish paint. When planning a total kitchen refresh, matching your crown to factory finishes is vital; review our guide on kitchen cabinet painting costs to understand how factory-smooth finishes are achieved.
Advanced Techniques for Uneven Ceilings and Depth Variations
Kitchen ceilings can dip, bow, and slope, especially across older homes in Yorba Linda and Placentia. A gap that measures 2 inches on one side of a cabinet run might taper down to 1-1/2 inches on the other.
Bridging Gaps with Frieze Boards and Built-Up Assemblies
When ceiling variations are too dramatic for a single piece of molding, we build a two-piece or three-piece built-up assembly:

- Frieze Board (Base Trim): Install a flat, vertical 1×3 or 1×4 filler board directly to the top edge of the cabinets.
- Sliding Crown: Mount your crown molding over the frieze board. Rather than keeping the crown fixed to the cabinet top, slide the crown upward along the face of the frieze board until it kisses the ceiling line across the entire run. The frieze board absorbs the ceiling slope, while the crown remains continuous and level to the eye.
This layered carpentry strategy is part of the master approach detailed in our comprehensive kitchen remodeling playbook.
Handling Stepped Heights and Wall Irregularities
Kitchen designs often feature staggered heights, such as a tall 96-inch pantry cabinet or a deep refrigerator surround sitting adjacent to standard 36-inch upper boxes.
When molding hits an abrupt depth change, use a 90-degree return (also known as an end-cap miter). Cut the molding at an outside 45-degree angle, then cut a tiny triangular wedge mitered in reverse to return the molding cleanly back into the side panel of the cabinet. This creates a crisp, self-terminating architectural finish.
Cost and Value Analysis of Cabinet Upgrades
Adding crown molding is one of the highest-ROI cosmetic improvements you can make to your kitchen. It transforms basic builder-grade boxes into tailored, furniture-grade cabinetry for a fraction of the cost of full cabinet replacement.
Cost Breakdown of Adding Crown Molding to Cabinets
| Expense Item | DIY Installation Cost | Professional Installation Cost |
|---|---|---|
| Molding Material (MDF) | $1.50 – $3.50 per linear foot | Included in project estimate |
| Molding Material (Solid Hardwood) | $4.00 – $9.00 per linear foot | Included in project estimate |
| Mounting Cleats & Fasteners | $20 – $40 total | Included in project estimate |
| Adhesives, Caulk & Fillers | $15 – $30 total | Included in project estimate |
| Specialty Tool Rentals / Blades | $40 – $100 (if not owned) | Contractor-provided |
| Total Linear Foot Cost (Finished) | $3 – $8 per linear foot | $15 – $35 per linear foot |
For a standard kitchen with 30 linear feet of upper cabinets, material expenses for a DIY install can run under $150 to $250, while professional design-build installation typically ranges between $450 and $1,050, depending on ceiling complexity and finish-matching requirements.
Professional Craftsmanship vs. DIY Installation
A straightforward, single-run DIY molding project can easily be completed over a weekend. However, complex kitchens with multiple inside/outside corners, vaulted ceilings, custom stain matching, or staggered cabinet bump-outs can quickly become frustrating. If you prefer a flawless finish with zero guesswork, consult our resource on hiring experienced cabinet installers to understand what to look for in a qualified finish carpenter.
Frequently Asked Questions About Cabinet Crown Molding
How do you attach crown molding to frameless or full-overlay cabinets?
Attach a 3/4-inch wood mounting cleat to the top edge of the cabinet box, secured by driving screws upward from inside the cabinet carcass. Position the cleat so it extends 5/8″ to 3/4″ past the front frame. This provides a solid nailing surface while keeping the bottom profile of the crown molding flush with the closed cabinet doors.
Is it better to cope or miter inside corners on kitchen cabinets?
Coping inside corners is significantly better than simple mitering. Coping allows the joint to remain tight and seamless even if the intersecting walls are out of square, and it accommodates natural seasonal expansion and contraction of wood much better than mitered joints.
What is the ideal crown molding height for 36-inch or 42-inch cabinets?
For standard 36-inch tall upper cabinets, choose a molding profile with an installed rise between 2-1/2 inches and 3-1/2 inches. For taller 42-inch cabinets, a 4-inch to 6-inch crown molding provides ideal visual balance and architectural proportion.
Conclusion
Upgrading your kitchen doesn’t always require tearing out walls or spending tens of thousands on brand-new cabinetry. Adding crown molding to your existing upper cabinets elevates the entire room, giving standard boxes an architectural, custom built-in presence that improves daily enjoyment and overall home value.
At Turn Key Remodel, we take pride in delivering master-level craftsmanship across Orange County—from Brea and Yorba Linda to Anaheim Hills and Tustin. Whether you need a simple trim upgrade, custom cabinetry, or a comprehensive whole-home renovation, explore our expert custom cabinetry services today to bring your dream kitchen to life.