
Step-by-Step Guide to Building a Kitchen Island with IKEA Cabinets
Planning and Designing Your Custom Kitchen Island Layout
Building a kitchen island with IKEA cabinets involves constructing a level 2×4 floor-anchored base frame, joining modular SEKTION cabinet boxes together, reinforcing countertop overhang supports, and finishing with custom cover panels and trim.
Designing an island also requires mapping out walkways, clearances, and ergonomic zones so your kitchen functions smoothly. In our experience handling small space big savings realistic budgets for small kitchen renovations, proper layout planning prevents costly mistakes before spending money on materials.
Start by mapping your floor layout using blue painter’s tape or a flattened cardboard template. Outline the exact footprint of the cabinet boxes as well as the outer edge of your proposed countertop overhang. Walk the perimeter, simulate opening the oven door, pull out an imaginary dishwasher rack, and check if two people can comfortably squeeze past each other.
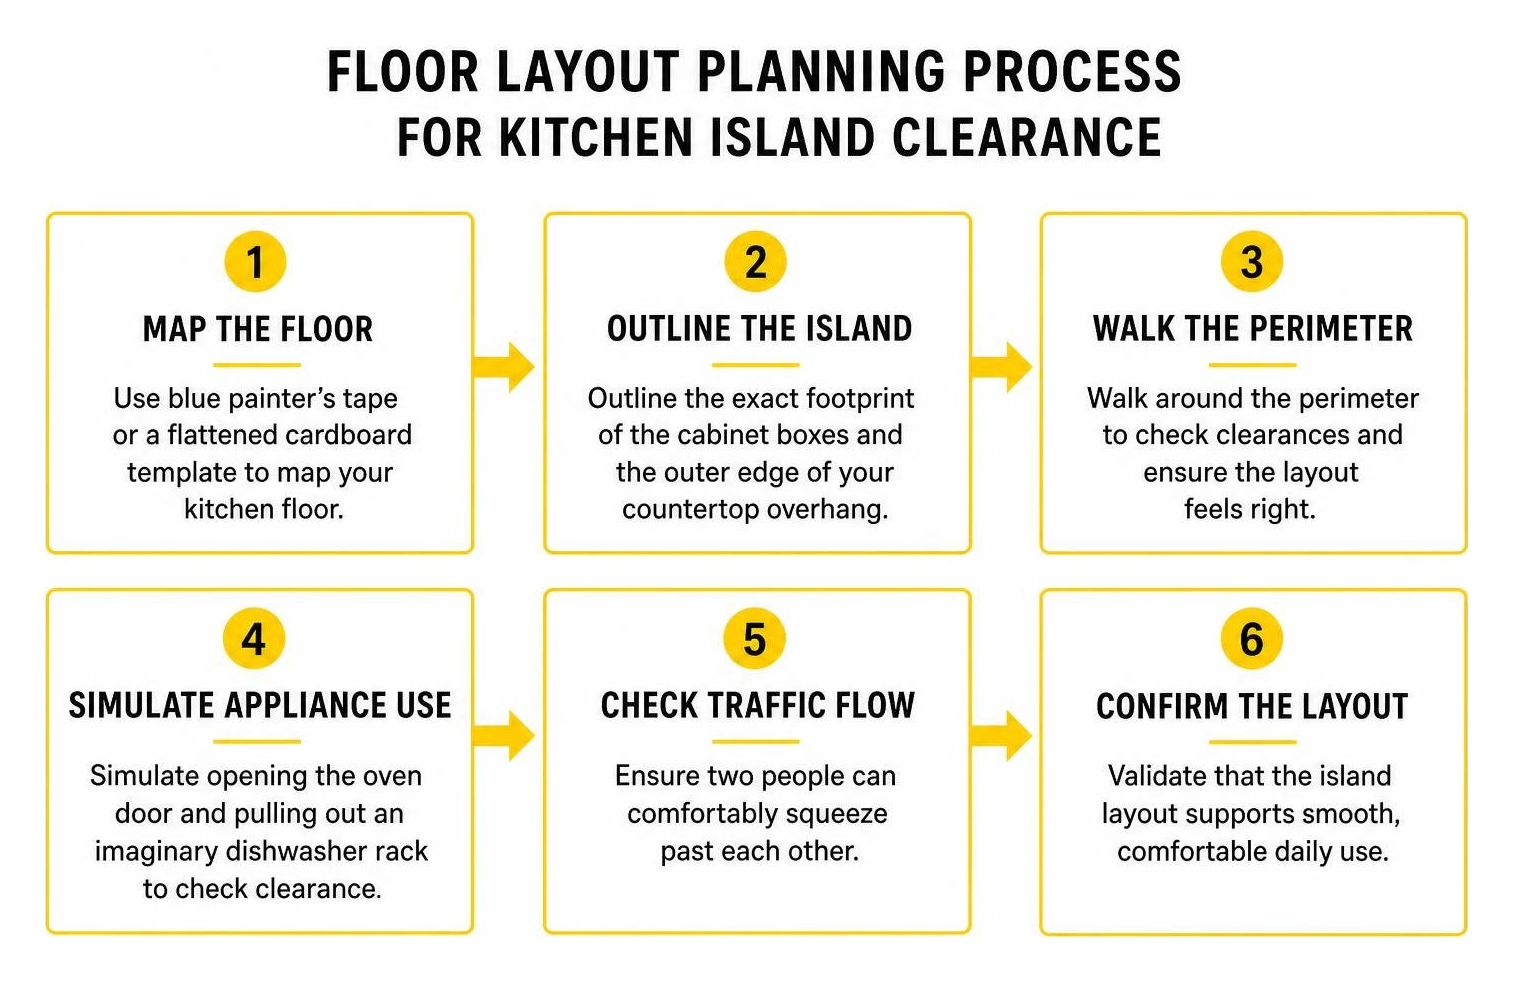
Key Clearance Dimensions and Workflow Sizing
To keep traffic moving freely, follow established industry clearances:
- Single-Cook Aisles: Maintain a minimum of 36 inches of clearance, though 42 inches is ideal for comfortable meal preparation.
- Multi-Cook Kitchens: Aim for 48 inches between the island edge and surrounding perimeter counters or appliances.
- Appliance Clearance: Leave at least 36 to 40 inches in front of dishwashers, ranges, and refrigerators so doors can swing fully open without hitting the island.
- Island Height: Aim for a finished height of 36 to 37 inches from the floor to the top of your countertop to match standard kitchen counters.
Preserve the classic kitchen work triangle: keep clear, unobstructed paths between the primary sink, the cooking surface, and the refrigerator.
Essential Pre-Planning for Building a Kitchen Island with IKEA Cabinets
Standard IKEA SEKTION base cabinets are 24.75 inches deep (including door fronts), while shallow wall cabinets measure 15.5 inches deep. Combining these modular units gives you several layout possibilities depending on your floor plan.
For additional layout inspiration, review this IKEA kitchen planning guide to see how different cabinet depths assemble.
| Configuration Type | Cabinet Depth Combination | Countertop Overhang | Total Island Depth | Best Suited For |
|---|---|---|---|---|
| Single Row (Prep Only) | 1x 24″ Base Cabinet | 1.5″ Standard Edge | ~26 inches | Narrow galley kitchens |
| Single Row + Seating | 1x 24″ Base Cabinet | 12″ to 15″ Overhang | 37.5″ to 40.5″ | Compact open-concept spaces |
| Dual Depth Combo | 1x 24″ Base + 1x 15″ Wall (Back-to-Back) | 1.5″ Standard Edge | ~41 inches | Medium kitchens needing deep prep space |
| Double Base Row | 2x 24″ Base Cabinets (Back-to-Back) | 1.5″ Standard Edge | ~51 inches | Large kitchens with maximum storage needs |
| Double Base + Seating | 2x 24″ Base Cabinets (Back-to-Back) | 12″ to 15″ Overhang | 63″ to 66″ | Expansive great rooms and open floor plans |
Opting for deep pull-out drawers over standard cabinet doors significantly improves accessibility for pots, pans, and small appliances.
Step-by-Step Process for Building a Kitchen Island with IKEA Cabinets
Because freestanding kitchen islands cannot use the standard IKEA wall-suspension rail system, they need a dedicated, level foundation anchored to your floor. When providing expert kitchen remodeling services, we build a solid dimensional lumber platform to ensure total structural stability.
Constructing the Solid 2×4 Subfloor Base Frame
Build a wooden plinth using 2×4 dimensional lumber to match the combined footprint of your IKEA cabinet boxes.
- Cut the outer 2×4 frame so the exterior dimensions match the bottom dimensions of your cabinet run (excluding door overlays and toe kicks).
- Add interior cross-braces directly underneath the vertical side seams where two adjacent cabinet boxes meet. This distributes weight evenly across the structure.
- Set the frame in place and check for level across all corners and diagonals. Use composite carpenter shims beneath low spots until the frame is completely level.
- Fasten the frame to the subfloor. For wood subfloors, drive 3-inch construction screws through the frame into the floor joists. For concrete slab foundations, pre-drill holes with a hammer drill and secure the frame using heavy-duty 3-1/4-inch Tapcon masonry anchors.
For a detailed walkthrough on base-level framing, explore this practical tutorial on making base cabinet islands.
Joining and Anchoring the SEKTION Base Cabinets
Assemble your IKEA SEKTION cabinet boxes according to the manufacturer instructions using wood glue on the dowel joints for extra strength. Leave the doors, pull-out drawers, and interior shelves out for now to keep the boxes lightweight and easy to maneuver.
- Place the cabinet boxes onto the leveled 2×4 platform.
- Clamp adjoining cabinet frames tightly together using standard cabinet maker’s bar clamps.
- Drill pilot holes through the factory shelf pin holes or directly through cabinet sidewalls. Connect the boxes using connector sleeve bolts or 1-1/4-inch cabinet screws to pull the side panels completely flush.
- Fasten the cabinet boxes down into the 2×4 wooden base frame using 2-1/2-inch wood screws driven through the bottom corners, reinforced with heavy-duty steel L-brackets along the back interior walls.
Routing Electrical Outlets and Utility Rough-Ins
Under modern building codes, permanent kitchen islands require electrical outlets. Running power prevents you from stretching extension cords across open walkways to plug in blenders or mixers.
- Concealed Chases: When placing cabinets back-to-back, leave a small interior gap between rows to act as a hidden conduit chase for wiring.
- Filler Strips & Posts: Incorporate 2- to 3-inch front filler strips or custom vertical corner posts to house recessed electrical boxes without cutting into your interior drawer storage space.
- Plumbing Lines: If adding a prep sink or dishwasher, rough in supply lines and drain pipes through the subfloor into a dedicated sink base cabinet before securing your base frame. Use an Air Admittance Valve (AAV) where permitted by local code to handle island sink venting cleanly.
Overhang Support and Countertop Installation
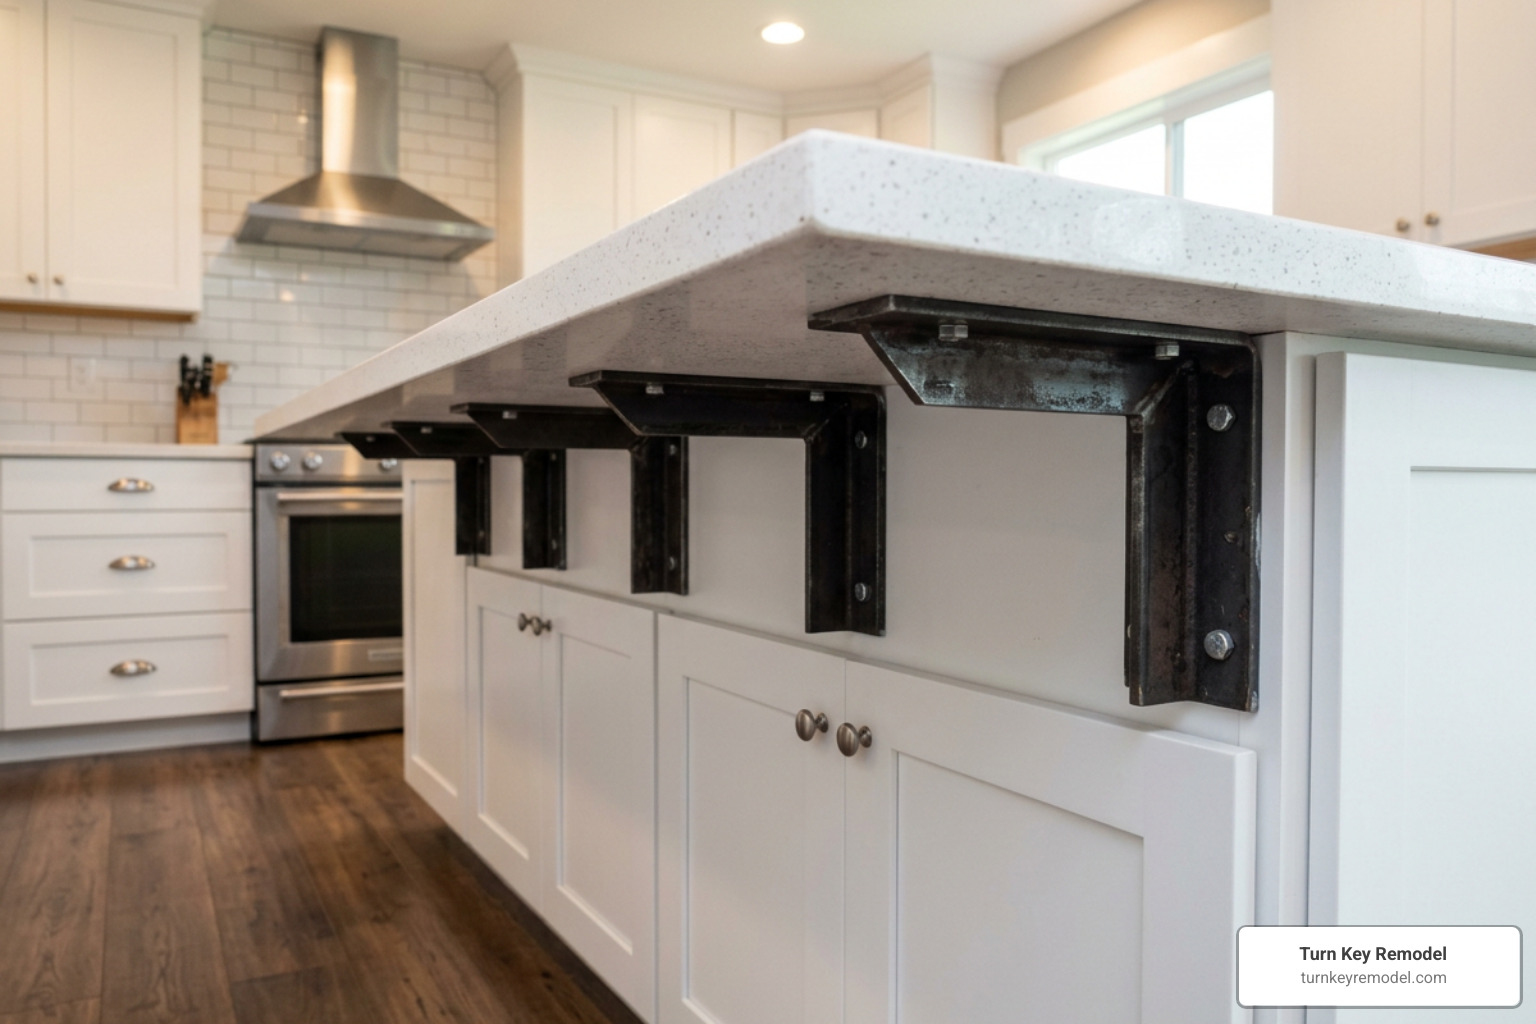
A functional island often doubles as a casual breakfast bar or entertainment hub. To safely accommodate counter stools, you need an adequate overhang with proper load-bearing structural support.
Structural Support Requirements for Island Seating Overhangs
A standard, comfortable seating overhang requires 12 to 15 inches of clear knee space. However, heavy countertop surfaces like quartz, granite, or solid marble cannot support their own cantilevered weight beyond 10 inches without cracking or tipping under pressure.
- Hidden Steel Support Brackets: Mount 1/4-inch or 1/2-inch thick flat steel support plates directly across the top frame of your base cabinets before installing the countertop. Route shallow channels into the top cabinet rails so the steel plates sit flush.
- Structural Stub Walls: Build a 2×4 half-wall anchored to the floor behind single-row cabinets. This carries the downward load of deep stone slabs while concealing wiring and plumbing.
- Decorative Legs and Corbels: For overhangs exceeding 15 inches, incorporate matching wooden posts or decorative end legs anchored to the floor.
While planning the layout of your island seating, consider your overhead lighting. Coordinate fixture placement using our guide on kitchen island pendant lighting ideas to upgrade your home.
Installing Stone vs. Wood Countertops
- Butcher Block Countertops: Solid wood or maple butcher block tops can be cut to size and installed using standard DIY woodworking tools. Secure the wood top from underneath by driving 1-1/4-inch screws up through the cabinet’s pre-drilled metal top rails. Treat food-prep wood surfaces regularly with food-grade mineral oil.
- Quartz and Natural Stone: Due to slab weight and precision requirements, have a professional stone fabricator laser-template the island once your base cabinets are fully leveled and anchored. Stone slabs are bonded to the cabinet perimeter using beads of neutral-cure 100% silicone adhesive.
Customizing Trim, Panels, and Hardware for a Built-In Look
The difference between basic flat-pack furniture and a true custom island comes down to finish carpentry. Selecting the right materials and trim styles helps blend your island seamlessly into the rest of your kitchen. If you are debating between wood veneers, painted MDF, and solid hardwood, check out our insights on how to choose the best materials for your custom cabinets.
Advanced Finishing Hacks for Building a Kitchen Island with IKEA Cabinets
Exposed cabinet sides and raw backs need cover panels to hide seam lines and fastener heads.
- Oversized Panels: Instead of using standard base cover panels that leave seams on larger islands, purchase oversized refrigerator cover panels and cut them down with a track saw to wrap entire island backs seamlessly.
- 5/16-Inch Offset: Install side cover panels so they project roughly 5/16-inch beyond the front edge of the cabinet box. This aligns the panel flush with the closed door and drawer faces.
- Shiplap and Beadboard Cladding: Add architectural texture to the back and sides by applying pre-painted vertical MDF shiplap using construction adhesive and 1-1/4-inch pin nails.
- MDF Corner Posts: Fabricate vertical trim posts at the corners to give the island substantial visual weight, resembling heavy handcrafted furniture.
Upgrading Door Fronts, Baseboards, and Custom Hardware
- Custom Baseboards: Replace standard plastic snap-on IKEA toe kicks with painted 1×4 MDF boards or profile baseboards nailed directly into your 2×4 base frame.
- Designer Hardware: Install heavy solid-metal handles, knobs, or bar pulls using an adjustable hardware drill template to ensure uniform alignment across every drawer face.
- Design Cohesion: Explore our completed projects in the Turn Key Remodel kitchen and bath design gallery to see how custom paneling, tailored color palettes, and balanced hardware transform modern kitchen islands.
Frequently Asked Questions about Building an IKEA Kitchen Island
For more general remodeling guidance, check our full collection of frequently asked questions.
How much does it cost to build a DIY IKEA kitchen island?
A DIY kitchen island built with IKEA SEKTION cabinets typically costs between $1,500 and $2,000 for standard configurations. This budget covers 2 to 3 base cabinets, drawer boxes, standard cover panels, hardware, framing lumber, and a solid butcher block top. Upgrading to custom third-party designer doors or premium quartz stone slabs will increase the total cost to roughly $3,000 to $4,500.
How do you secure an IKEA kitchen island to a concrete slab or heated floor?
- Concrete Slab Floors: Construct a 2×4 base frame and secure it into the concrete using 3-1/4-inch Tapcon masonry screws driven into pre-drilled holes.
- Radiant Heated Floors: Where drilling into the floor risks puncturing hydronic pipes or electric heating cables, secure a wide plywood base plate using high-strength polyurethane construction adhesive or commercial-grade epoxy. Let the adhesive cure fully before setting and leveling your cabinets.
Do you need an electrical outlet on a kitchen island to meet code?
Yes. Under the National Electrical Code (NEC) and most local building jurisdictions, permanent kitchen islands require at least one code-compliant receptacle outlet. You can install standard outlets inside decorative end panels, mount them into cabinet filler voids, or install pop-up countertop electrical outlets with GFCI protection on a dedicated 20-amp circuit.
Conclusion
Building a kitchen island with IKEA cabinets is an accessible, budget-friendly way to expand your kitchen’s storage, prep surface, and seating capacity. By taking the time to build a level 2×4 floor-anchored base, securely fastening your cabinet boxes, and finishing the exterior with custom panels and trim, you can achieve a high-end look at a fraction of the cost of custom millwork.
If you prefer a seamless, turnkey renovation with professional design-build management, our team at Turn Key Remodel is here to help. Serving Orange County, Yorba Linda, Placentia, Anaheim Hills, Tustin, and Brea, we handle everything from spatial planning and structural framing to custom utility routing and premium stone fabrication.
Ready to transform your kitchen with expert craftsmanship? Explore our professional custom cabinetry installation services today and schedule a design consultation with our experienced team.