
Step-by-Step Delta Monitor 1400 Series Replacement Cartridge Installation
Replacing a Delta Monitor 1400 Series Cartridge
For a Delta Monitor 1400 Series replacement cartridge in a shower installed before 2006, use the Delta RP19804. Shut off the water, remove the handle and bonnet nut, and pull the old cartridge straight out. Seat the new cartridge in the same orientation, reassemble the faucet, then check for leaks and test the hot-water temperature. Do not substitute the RP46074; it fits a different valve.
I’m Mark Apicella, owner of Turn Key Remodel in Orange County. My more than eight years leading bathroom renovations inform this guide to choosing and installing a Delta Monitor 1400 Series replacement cartridge.
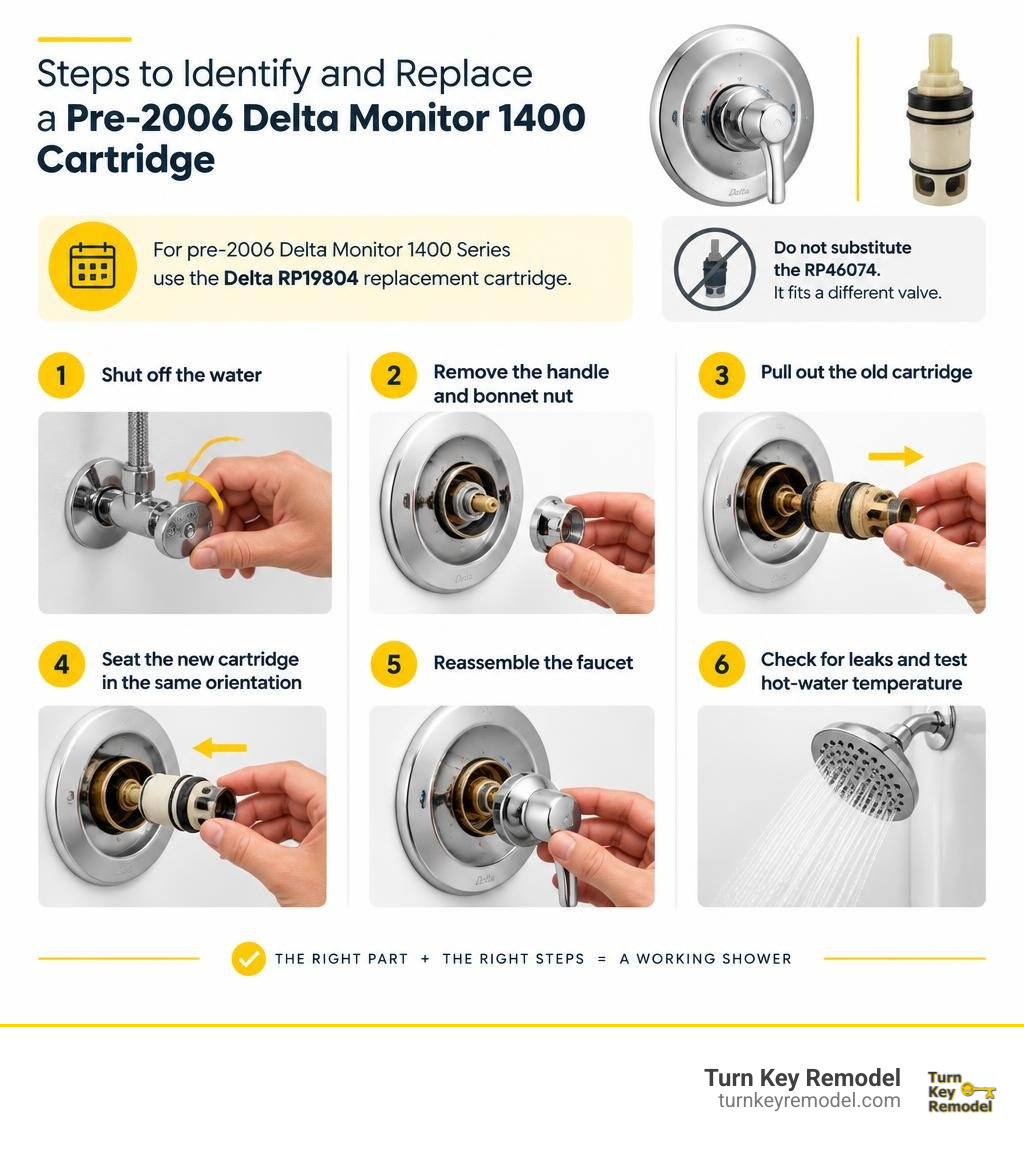
Basic delta monitor 1400 series replacement cartridge terms:
A dripping showerhead or sudden blasts of scalding water whenever someone flushes a toilet are clear signs that your internal pressure-balance mechanism has reached the end of its lifespan. In this guide, we walk you through selecting the correct replacement part, tackling the physical installation, setting the rotational safety stop, and resolving everyday performance issues.
Choosing the Correct Delta Monitor 1400 Series Replacement Cartridge
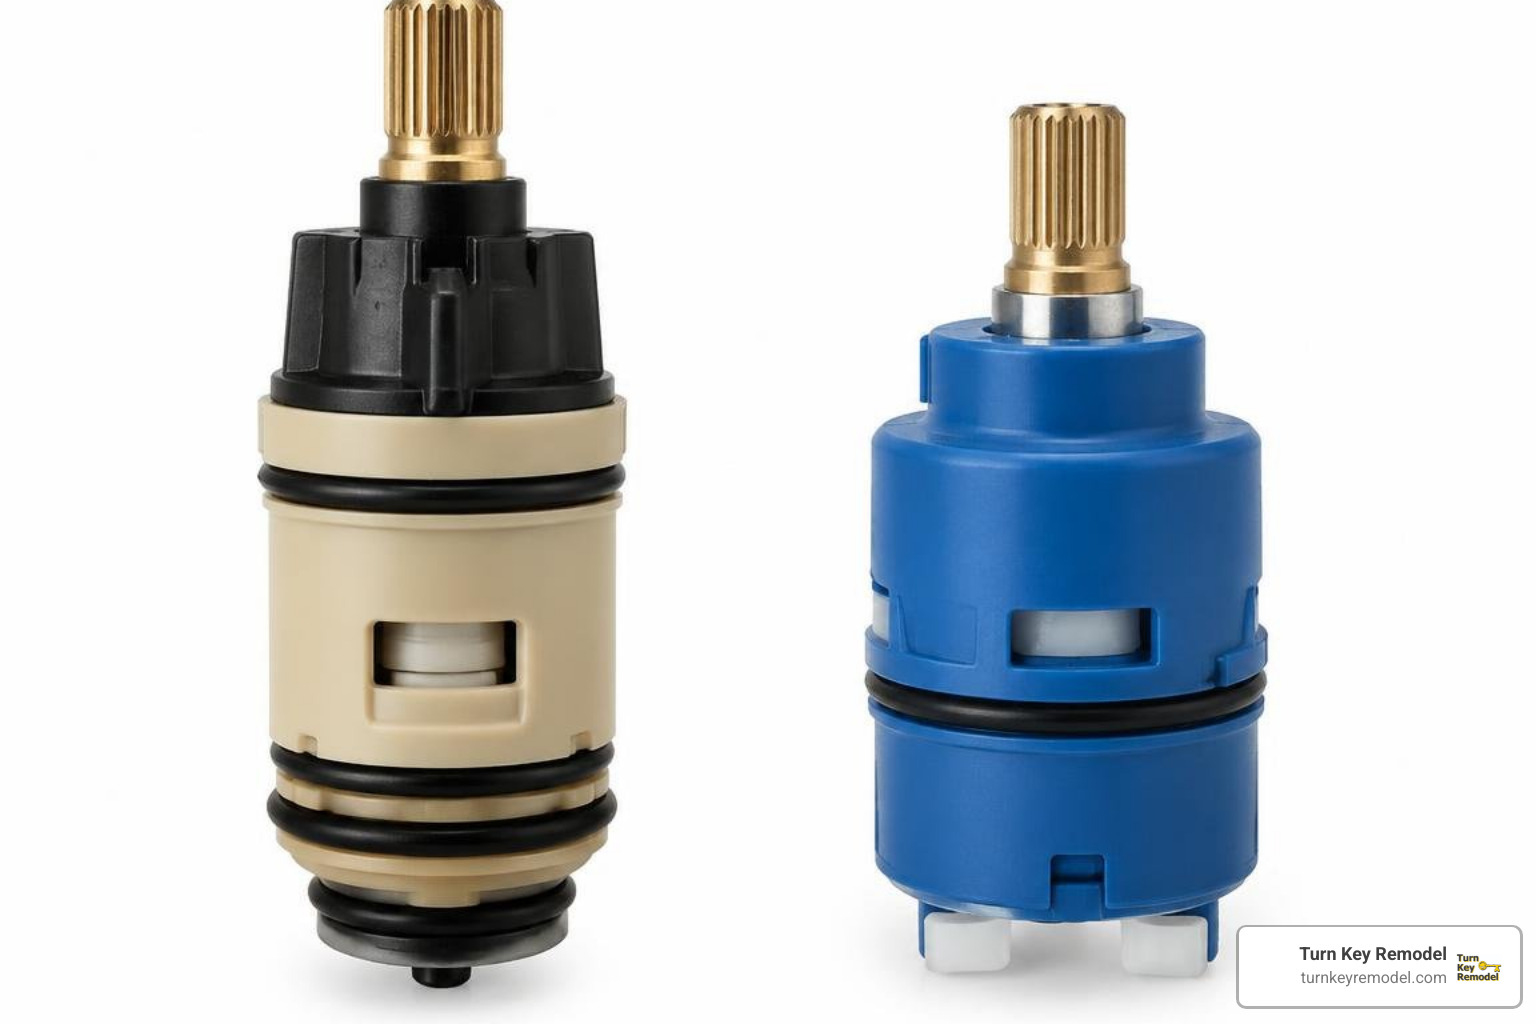
Selecting the right replacement part is the most critical step in fixing your shower. Delta has engineered several iterations of its pressure-balancing valves over the decades. Purchasing the wrong part number will leave you with an open wall, a disassembled shower, and a cartridge that simply refuses to seat inside the rough-in brass body.
For showers installed before March 2006, the genuine Original Equipment Manufacturer (OEM) part you need is the Delta RP19804. If you are ever unsure of your specific trim or valve model, you can consult Delta’s official Shower Cartridge Identifier to cross-reference your fixture before heading to the hardware store.
| Feature / Metric | OEM Delta RP19804 | OEM Delta RP46074 | Generic / Danco Aftermarket |
|---|---|---|---|
| Compatible Valve Body | Pre-March 2006 Monitor 1300/1400 | Post-March 2006 MultiChoice R10000 | Pre-2006 Monitor 1300/1400 (Claimed) |
| Lower Body / Leg Color | Blue Legs / White Lower Body | Gray or White Lower Body | Varies (Off-white / Blue) |
| Total Unit Height | ~8.00 Inches | ~4.12 Inches (Shorter body) | ~7.40 Inches |
| Temperature Control | Pressure-Balance Spool (±3.6° F) | Pressure-Balance Spool (±3.6° F) | Inconsistent Pressure Balance |
| Online Retail Pricing | ~$75.48 to $99.48 | ~$55.00 to $70.00 | ~$35.00 to $45.00 |
| Customer Satisfaction | 4.5 / 5 Stars (1,090+ reviews) | 4.6 / 5 Stars | 1.63 / 5 Stars (Fit/Flow complaints) |
| Warranty Protection | Lifetime Limited (Original Buyer) | Lifetime Limited (Original Buyer) | 1-Year Limited Manufacturer |
Identifying Your Valve Before Buying a Delta Monitor 1400 Series Replacement Cartridge
To verify that your shower requires the RP19804, examine your fixture’s design and production era:
- Installation Date: Homes built or bathrooms remodeled between 1993 and early 2006 almost exclusively used the original Monitor 1300/1400 series rough-in valve.
- Physical Appearance: The classic RP19804 features distinct blue extension legs on its lower base (earlier models from 1993 to 2001 featured opaque white legs, but all modern OEM replacements feature blue legs) and a white upper tower.
- Handle Operation: The Monitor 1400 is a single-handle, single-function control. You turn the lever counter-clockwise to initiate flow and simultaneously increase the water temperature from cold to hot. It does not pull straight out or lift upward like the older 600 series ball valves.
Delta RP19804 vs. RP46074: Differences and Compatibility
Homeowners often confuse the RP19804 with the newer Delta RP46074 cartridge. These two cartridges are not interchangeable.
In early 2006, Delta transitioned its rough-in platform to the MultiChoice Universal Valve system. Valves manufactured after March 2006 take the shorter RP46074 cartridge (identifiable by its gray body cap and shorter base profile). The internal brass ports inside a pre-2006 valve are deeper and require the extended leg assembly of the RP19804. Attempting to force an RP46074 into a pre-2006 rough-in will cause severe leaks and failure to engage with the brass bonnet ring. Always review the detailed Delta Faucet RP19804 specifications to make sure your valve matches the single-piece pre-2006 housing.
OEM Delta RP19804 vs. Aftermarket Brands and the RP4993 Rebuild Kit
While third-party manufacturers like Danco produce generic replacements, we strongly advise sticking with genuine Delta parts. Data shows that third-party alternatives have low consumer ratings (averaging just 1.63 out of 5 stars), with frequent reports of poor fitting, restricted flow, loud water hammering, and leaking within months of installation. OEM Delta cartridges are backed by a lifetime limited warranty and keep your water temperature within a safe range of ±3.6° F (±1.7° C).
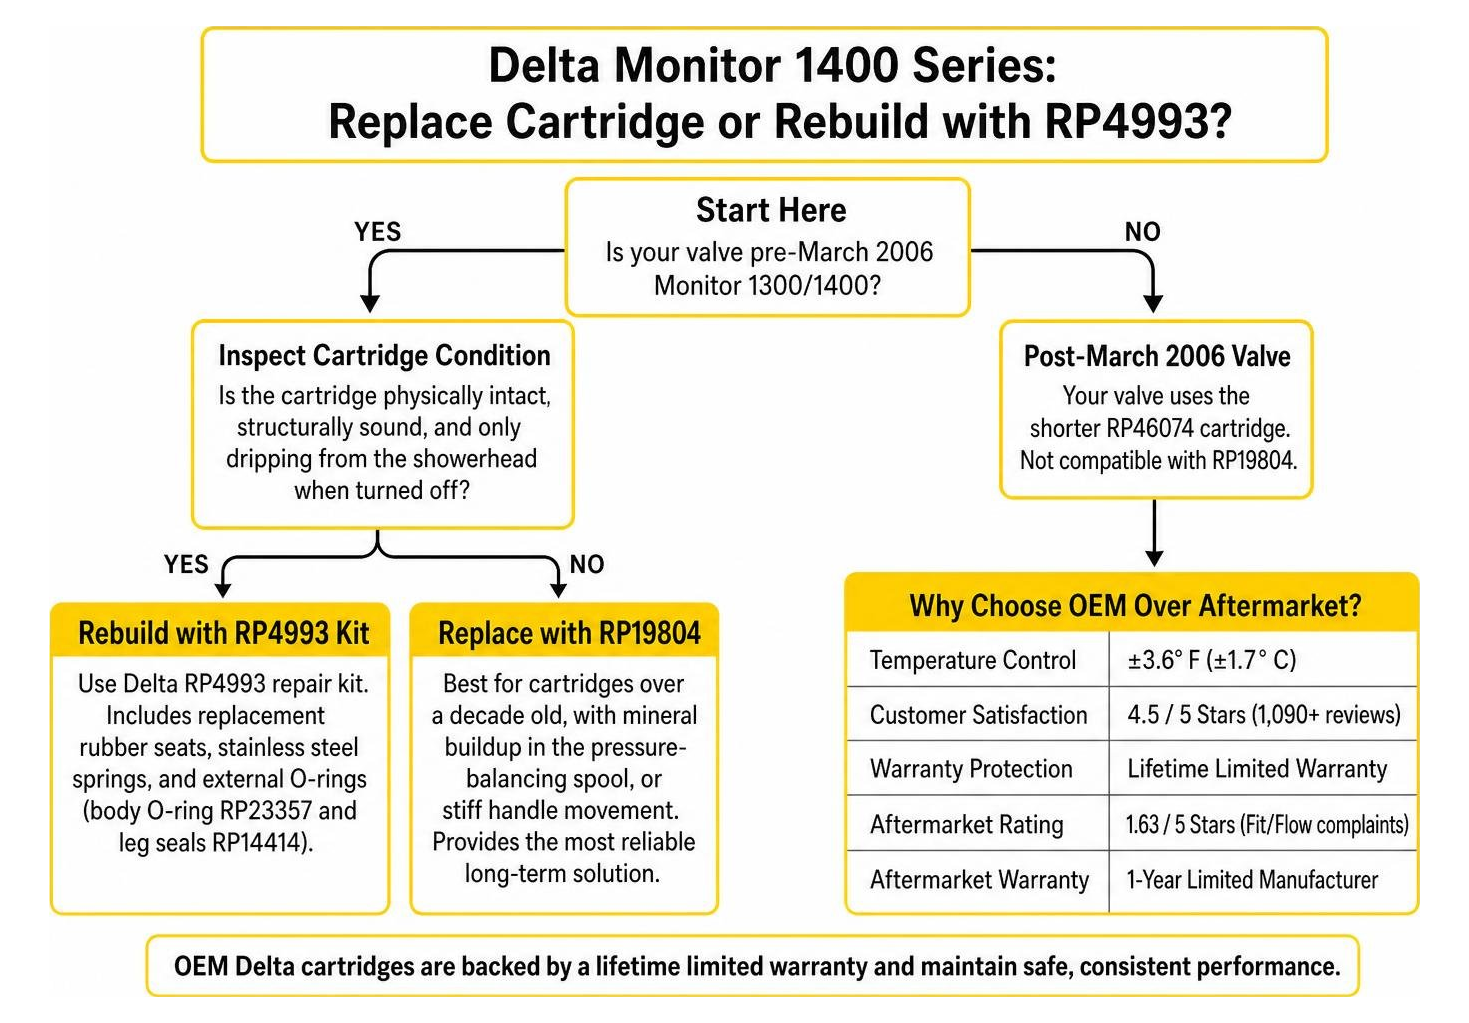
If your cartridge is physically intact, structurally sound, and simply dripping from the showerhead when turned off, you may not need an entirely new cartridge assembly. You can often rebuild the unit using the Delta RP4993 repair kit. This kit contains replacement rubber seats, stainless steel springs, and external O-rings (body O-ring RP23357 and leg seals RP14414). However, if your faucet is over a decade old, has mineral buildup inside the pressure-balancing spool, or exhibits stiff handle movement, replacing the complete RP19804 assembly is the most reliable long-term solution.
Step-by-Step Delta Monitor 1400 Series Replacement Cartridge Installation Process
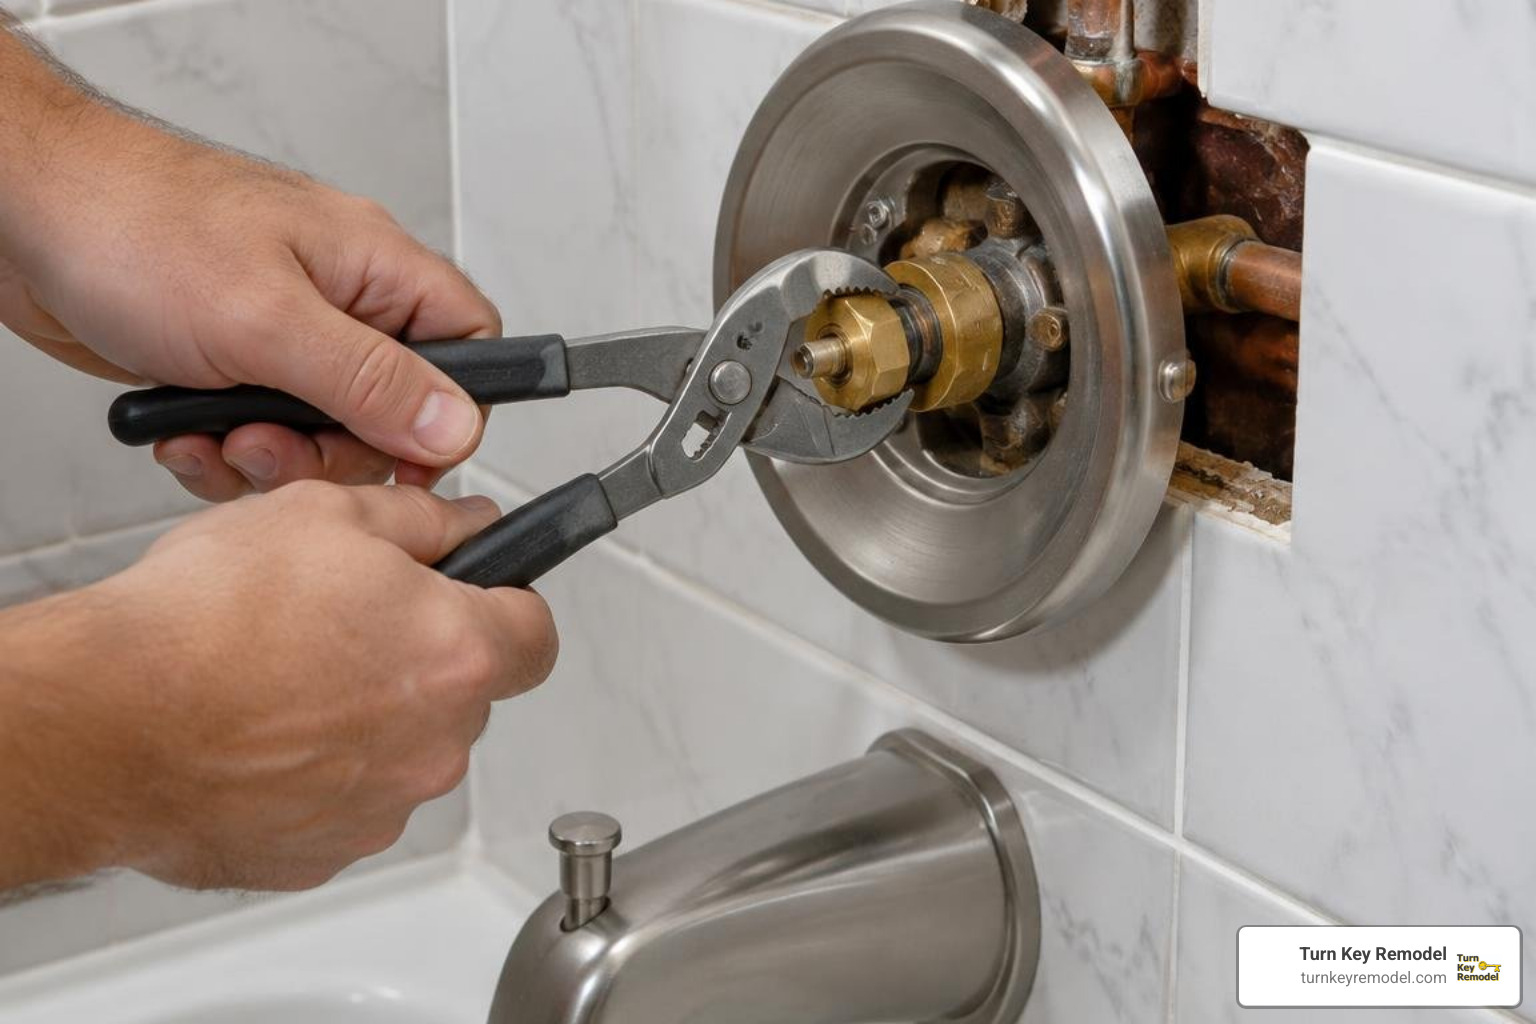
Replacing your shower cartridge is a straightforward DIY project that typically takes between 30 and 60 minutes.
Required Tools and Materials:
- Phillips-head screwdriver
- Allen wrench (1/8-inch or 3/32-inch depending on handle style)
- Adjustable channel-lock pliers or strap wrench
- Plumber’s silicone grease (pure silicone, non-petroleum)
- White distilled vinegar and an old toothbrush (for mineral removal)
- Replacement Delta RP19804 cartridge (or RP4993 rebuild kit)
- Flashlight and clean shop rags
Step 1: Water Supply Shutoff and Trim Disassembly
- Shut Off the Water: Turn off the main water supply to your home, or close the local isolation shutoff valves if your bathroom is equipped with dedicated access stops.
- Relieve Line Pressure: Open the shower handle and another low-level sink faucet to drain residual water and relieve standing pressure in the plumbing lines. Cover the shower drain with a washcloth to prevent screws from falling down the pipe.
- Remove the Handle: If your handle has an ornamental index button on the front, pry it off gently with a flathead screwdriver to reveal the screw. For lever handles, loosen the set screw located on the bottom or side using your Allen wrench. Pull the handle off the brass stem.
- Remove the Trim Sleeve: Slide the decorative metal sleeve (the stop tube) off the valve body by pulling it straight toward you.
- Unscrew the Brass Bonnet Nut: Using channel-lock pliers, grip the circular brass bonnet nut (part number RP22734) and rotate it counter-clockwise. Pro tip: In older installations, galvanic corrosion and hard-water scale can lock this nut in place. If it resists, soak a rag in warm white vinegar, wrap it around the brass bonnet for 15 minutes, and tap the nut gently with a tool handle to break the mineral bond. Avoid applying excessive torque that could twist the underlying copper supply lines inside the wall.
Step 2: Extracting the Old Cartridge and Flushing Mineral Buildup
- Remove the Old Cartridge: Grasp the plastic stem of the RP19804 and pull firmly straight out. If it is stuck, rock it slightly up and down while pulling. Avoid twisting forcefully, as you do not want to snap the plastic locating tabs inside the brass valve body.
- Inspect the Valve Cavity: Shine a flashlight inside the brass rough-in valve. Check that no old rubber seats or fragments of broken O-rings remain lodged in the back water ports.
- Clean Away Scale: Use an old toothbrush dipped in white vinegar to scrub away calcium deposits, scale, and grit from the inner walls of the brass body.
- Perform a System Flush: Place an inverted plastic cup or bucket over the open valve body and have an assistant turn on the main water supply for 10–15 seconds. This flushes dislodged sediment and pipe debris out of the hot and cold supply lines before you install your new cartridge.
Installing Your Delta Monitor 1400 Series Replacement Cartridge Step-by-Step
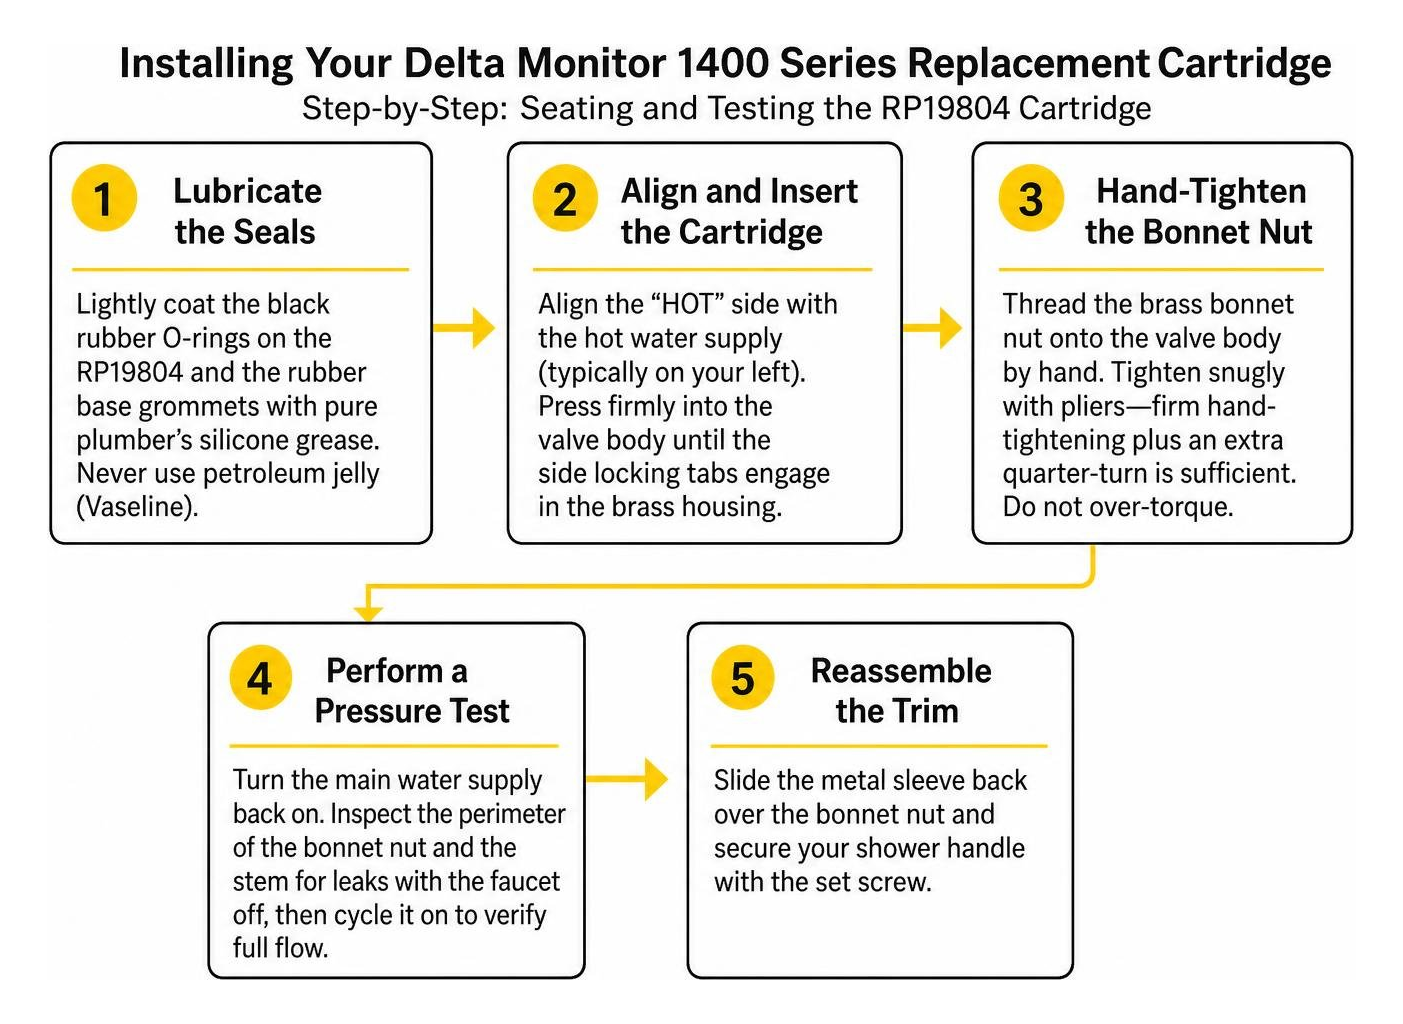
- Lubricate the Seals: Lightly coat the black rubber O-rings on the exterior of the new RP19804 and the rubber base grommets with pure plumber’s silicone grease. Never use petroleum jelly (Vaseline), as petroleum deteriorates rubber over time.
- Align and Insert the Cartridge: Look at the body of the RP19804. You will see alignment notches on the sides and the letters “HOTTER” / “COLDER” molded into the plastic. Position the cartridge so the “HOT” side aligns with the hot water supply pipe (typically on your left). Press the cartridge firmly into the valve body until the side locking tabs slip squarely into the matching slots on the brass housing.
- Hand-Tighten the Bonnet Nut: Thread the brass bonnet nut back onto the valve body by hand to prevent cross-threading. Once threaded, tighten it snugly with your channel-lock pliers. Do not over-torque the nut; firm hand-tightening plus an extra quarter-turn with pliers is sufficient to compress the O-rings.
- Perform a Pressure Test: Before reinstalling the decorative trim plates, turn the main water supply back on. Inspect the perimeter of the bonnet nut and the stem for leaks while the faucet is turned off, and then cycle it on to verify full flow.
- Reassemble the Trim: Slide the metal sleeve back over the bonnet nut and secure your shower handle with the set screw. If you are updating fixtures during complete bathroom remodeling services, this is also the ideal time to pair your fresh valve internals with modern T13 or T14 trim kits.
Adjusting Water Temperature and Troubleshooting Common Issues
Once your new cartridge is installed, you might notice that your shower is only lukewarm, or that the unit produces unusual whistling sounds. These issues are easy to correct with a few quick adjustments.
How to Adjust the Rotational Limit Stop for Hotter Water
To comply with anti-scald safety regulations, every new Delta RP19804 cartridge ships from the factory with its Rotational Limit Stop set to a conservative, low-temperature position. This mechanism physically limits how far you can turn the handle toward the hot side.
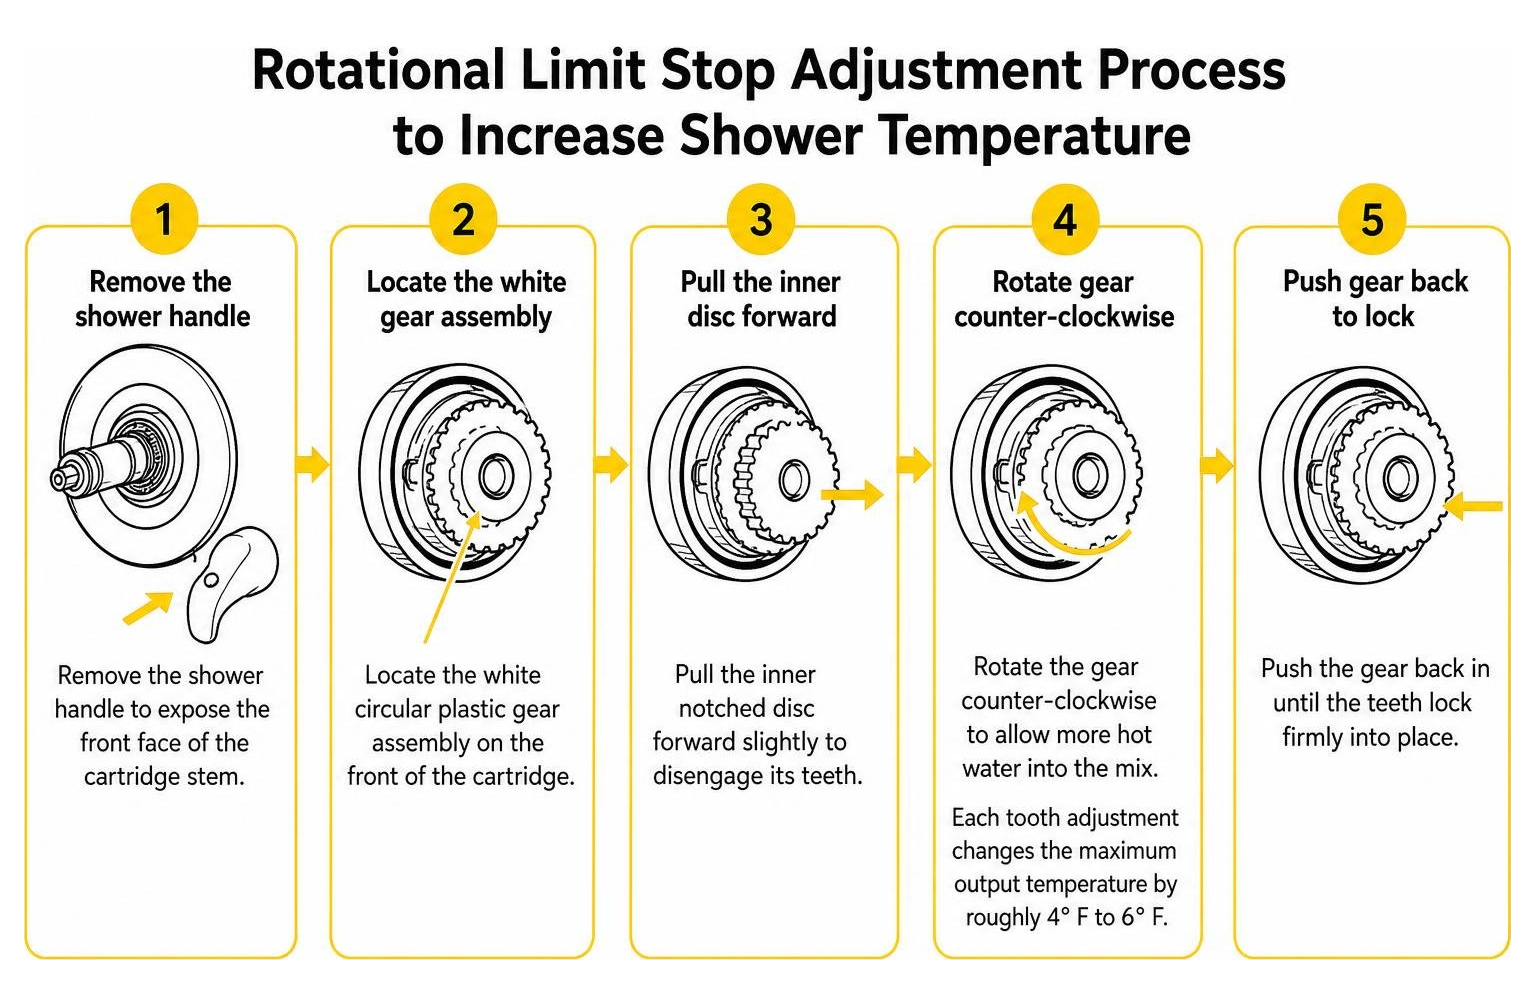
- Remove the shower handle to expose the front face of the cartridge stem.
- Locate the white circular plastic gear assembly on the front of the cartridge.
- Pull the inner notched disc forward slightly to disengage its teeth.
- Rotate the gear counter-clockwise to allow more hot water into the mix. Each tooth adjustment changes the maximum output temperature by roughly 4° F to 6° F.
- Push the gear back in until the teeth lock firmly into place.
- Temporarily slip the handle on, run the shower on full hot for two minutes, and measure the water temperature with a thermometer. The output temperature should not exceed 120° F (49° C) to avoid accidental scalding. When planning major plumbing updates, accounting for minor component adjustments is a standard part of managing bathroom remodel costs.
Fixing Post-Installation Leaks, Whistling, and Low Pressure
- Whistling or Screeching Sounds: A high-pitched whistle is usually caused by air pockets trapped inside the internal pressure-balance spool or tiny debris vibrating inside the internal chambers. Remove the cartridge, shake it to ensure the internal spool rattles freely, flush the rough-in valve lines thoroughly, and reinstall.
- Low Water Pressure: The RP19804 relies on balanced incoming pressure from both hot and cold lines. If an upstream isolation shutoff valve is partially closed, or if sediment from your water heater clogs the hot-water intake screen, the internal spool will slide over and throttle overall volume to prevent scalding. Ensure both hot and cold feed lines are fully open and clear of silt.
- Water Will Not Turn Completely Off: If water continuously trickles from the tub spout or showerhead with a brand-new cartridge, check that the brass bonnet nut is tightened down completely. If the nut is loose, the base rubber seals cannot form a tight compression seal against the back wall of the brass valve body.
Frequently Asked Questions About Delta Monitor 1400 Cartridges
Does the RP19804 cartridge come with a new bonnet nut?
No, the Delta RP19804 cartridge assembly does not include a replacement brass bonnet nut. You must reuse your existing bonnet ring. If your current bonnet nut is stripped, cracked, or severely corroded from mineral scale, you will need to purchase the replacement bonnet nut separately under Delta part number RP22734.
What is the warranty coverage on the Delta RP19804 cartridge?
Delta Faucet covers all parts and finishes with a Lifetime Limited Warranty for the original consumer purchaser. If you are the original homeowner who purchased the faucet or cartridge and it begins leaking or fails due to a manufacturing defect, you can contact Delta’s customer service line or submit a claim online to receive a free replacement part.
Can I upgrade to a Delta 17 series dual-handle trim with this existing valve?
No. If you have an older Monitor 1400 series rough-in valve, you are limited to installing T13 or T14 single-handle trim series. Upgrading to a Delta 17 series trim (which features dual independent dials for separate volume and temperature control) requires replacing the rough-in brass valve inside the wall with a modern MultiChoice R10000 valve. When planning an upgrade of this scale, hiring experienced, vetted bathroom remodel contractors ensures your rough-in plumbing and tile waterproofing meet strict local building standards.
Conclusion
Restoring comfort and steady temperature control to your pre-2006 shower doesn’t require tearing out walls or replacing your entire plumbing setup. By selecting the genuine OEM Delta RP19804 cartridge, clearing out mineral debris, and properly adjusting the rotational limit stop, you can eliminate leaks and enjoy consistent water pressure for years to come.
If you encounter stuck bonnet nuts, corroded behind-the-wall supply lines, or are weighing the decision between a quick DIY repair and a comprehensive bathroom refresh, check out our guide comparing plumber rates vs. DIY faucet replacement costs. For complete shower renovations, custom master baths, and structural plumbing improvements across Orange County, Tustin, Yorba Linda, Placentia, Anaheim Hills, and Brea, our team at Turn Key Remodel delivers end-to-end design-build craftsmanship you can trust.