
Replace Your Bathtub Water Spout Without Calling a Plumber
How to Replace a Bathtub Spout
To replace a bathtub spout, first look underneath it for a small set screw. If you find one, loosen it and slide the spout off. If there is no screw, the spout usually unscrews counterclockwise. Match the new spout to the pipe connection and its length from the wall, then install it without forcing the pipe. Turn on the water and check for leaks before calling the job done.
I’m Mark Apicella, owner of Turn Key Remodel. My team’s bathroom remodeling work has given me hands-on experience with bathroom spout replacement and the pipe problems that can turn a simple swap into a larger repair.
Identifying Your Spout: Slip-On vs. Threaded Bathroom Spout Replacement
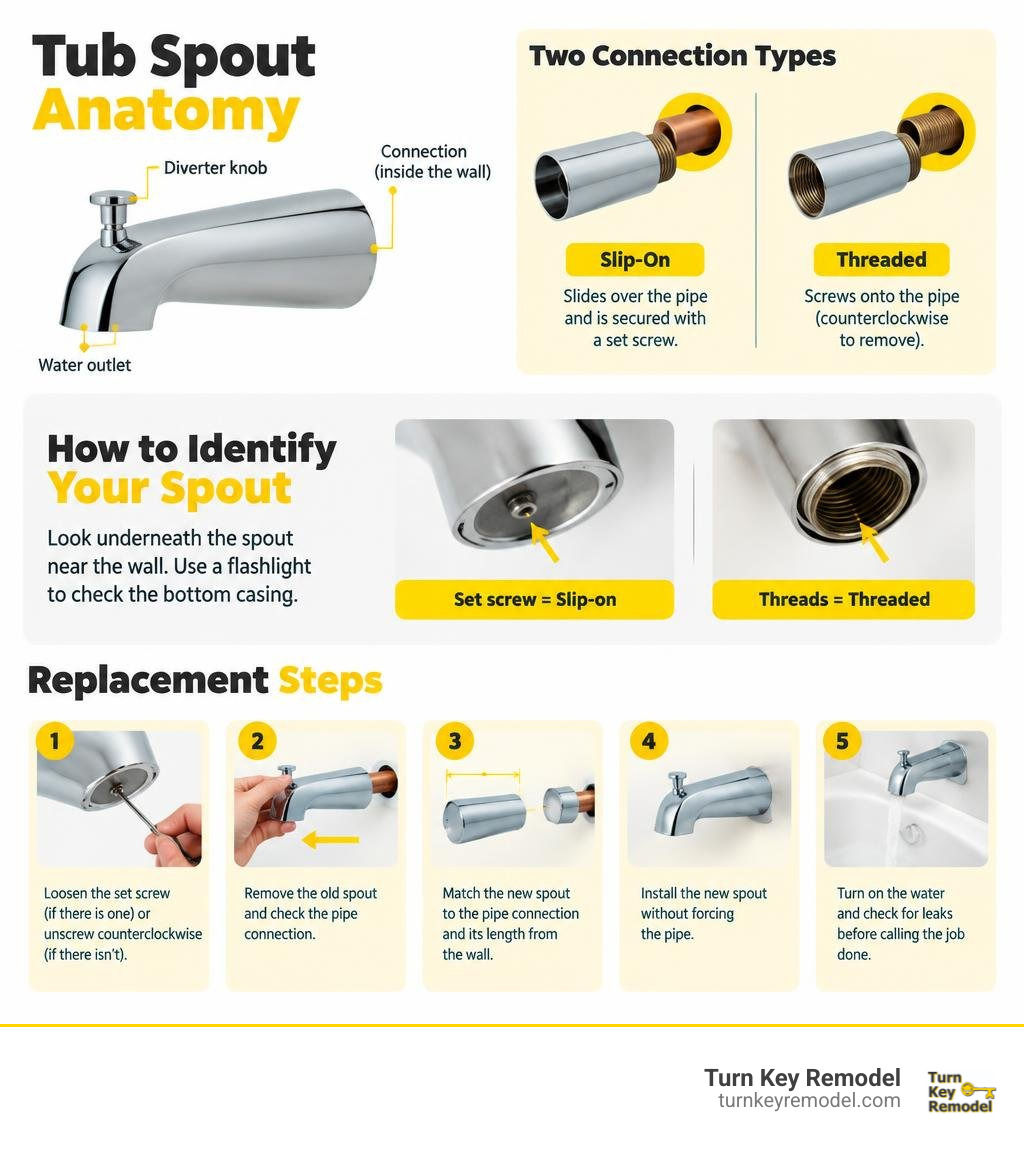
Before buying a replacement fixture or grabbing your tool kit, you must know what kind of connection hides behind your bathtub wall. The two standard mounting styles used in residential plumbing are slip-on (also called slip-fit) and threaded (often called Iron Pipe Size or IPS).
The easiest way to tell the difference without taking anything apart is to look at the underside of your existing spout near the wall. Grab a flashlight and inspect the bottom casing:
- Slip-on spouts: Feature a small notch or cutout with an exposed hex head (Allen) set screw. This screw tightens against bare, smooth copper pipe to lock the fixture in place.
- Threaded spouts: Have a smooth underside with no visible screws. The entire fixture screws directly onto a threaded pipe nipple extending outward from the wall fitting.
| Feature | Slip-On (Slip-Fit) Spout | Threaded (IPS) Spout |
|---|---|---|
| Securing Method | Internal hex set screw clamped onto smooth pipe | Screwed directly onto male pipe threads |
| Pipe Type Needed | Smooth, unthreaded 1/2″ copper tubing | 1/2″ or 3/4″ threaded brass, copper, or steel nipple |
| Sealing Mechanism | Internal rubber O-ring compressed on the pipe | Clockwise PTFE plumber’s tape over pipe threads |
| Common Home Era | Predominant in modern builds & post-1990s homes | Typical in older homes built before the 1980s |
| Typical Tools | 5/32″ or 1/8″ Allen wrench / hex key | Strap wrench, adjustable pipe wrench, rag |
Diverter vs. Non-Diverter Configurations
Tub spouts come in two primary operational styles: diverter and non-diverter models.
A diverter spout features a small lift gate knob on top of the nose or a pull-down ring on the water exit rim. When you pull this knob, an internal gate drops down, blocking water from exiting the spout mouth and forcing it upward to your showerhead. You need a diverter spout if your shower and tub share a single valve and your wall has no separate selector knob.
A non-diverter spout is simply a hollow channel designed solely to fill the tub. If your shower system uses a multi-handle valve setup or an independent wall diverter handle, you will need a non-diverter spout. Installing a diverter spout when your plumbing valve already controls shower water flow is redundant and can cause improper system backpressure.
Determining Pipe Diameter and Wall Clearance for Bathroom Spout Replacement
Precision matters when matching a new fixture to your existing pipe stub out. Most residential homes utilize standard 1/2-inch or 3/4-inch nominal pipe lines. While 1/2-inch copper tube size (CTS) is the modern standard, older plumbing often features 3/4-inch iron or brass lines.
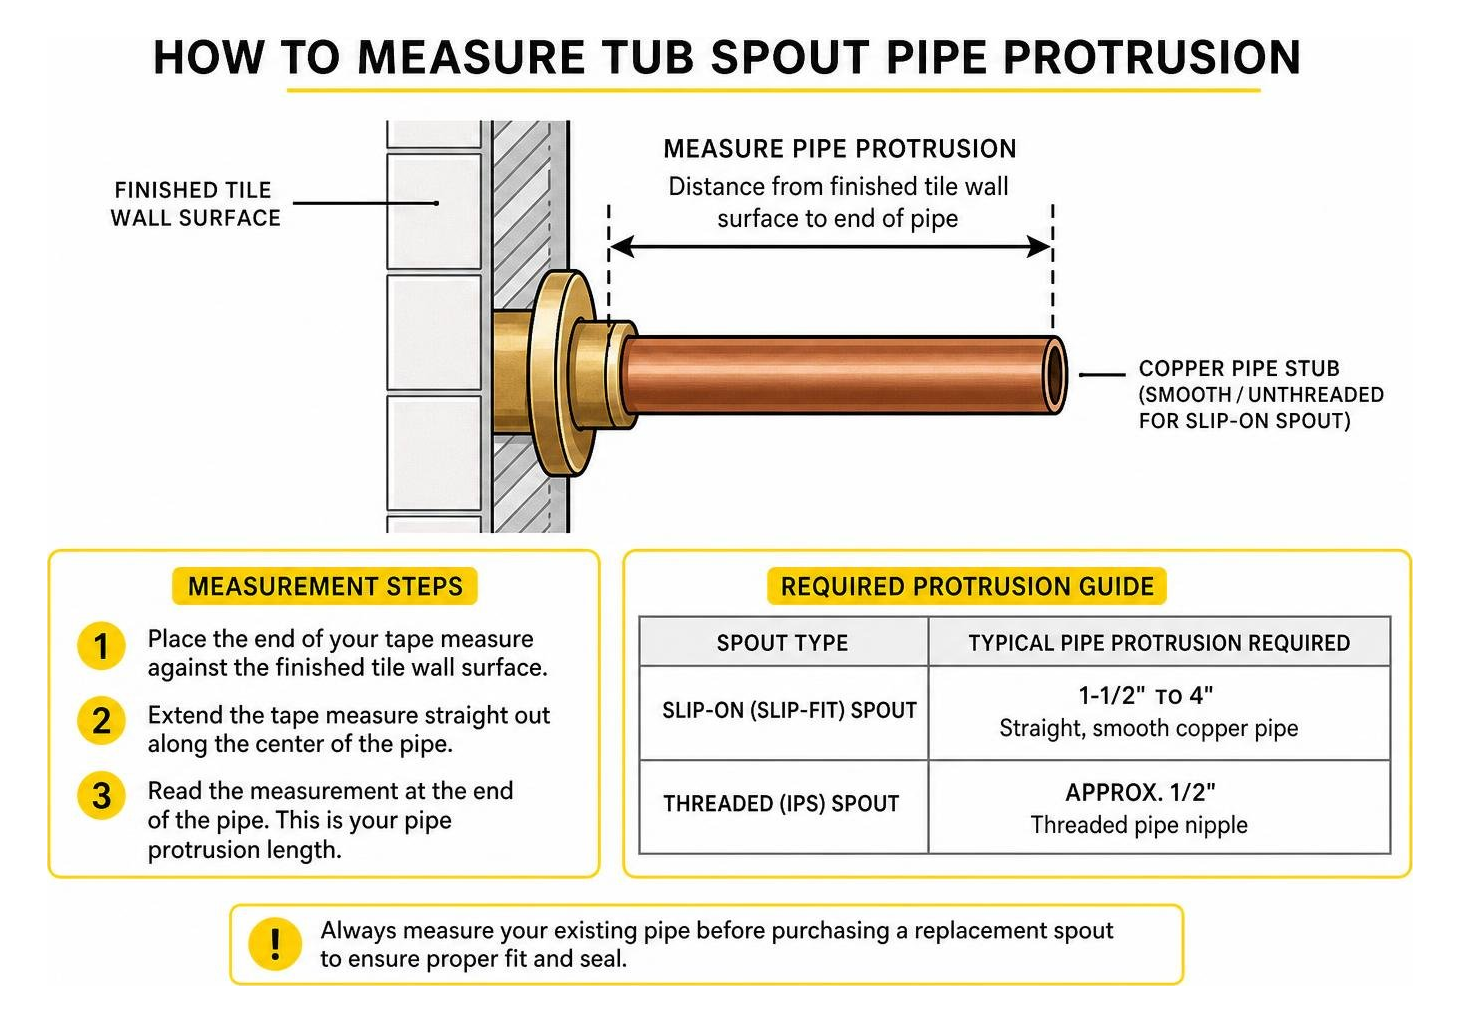
You also need to measure how far the pipe protrudes from the finished tile surface. As outlined in Kohler technical specifications for bath spout installation, different spout designs require specific pipe stub lengths—some models need a tight 1/2-inch clearance, while slip-on designs frequently require 1-1/2 to 4 inches of straight copper pipe to engage the internal O-ring properly.
Taking accurate measurements saves you unexpected return trips to the hardware store and protects your plumbing infrastructure. If you find your entire bathroom fixtures and layout are aging out, planning ahead and estimating full remodel expenses can help you decide whether a simple hardware update or a broader upgrade makes the most financial sense.
Essential Tools and Preparation for a Tub Spout Swap
Replacing a bathtub spout is a beginner-friendly DIY project that typically takes under 30 minutes, requires only $10 to $40 in basic materials, and saves you between $100 and $200 compared to calling a service technician.

Gather the following tools and supplies before starting:
- Hex key set (Allen wrench): Essential for loosening the set screw on slip-on spouts (typically 1/8″ or 5/32″).
- Strap wrench or adjustable wrench: For turning threaded spouts without scratching decorative metal coatings.
- PTFE plumber’s tape: Required for sealing threaded IPS fittings.
- Silicone bath and kitchen caulk: 100% waterproof caulk to create a seal against your tile wall.
- Utility knife: To slice old caulk beads cleanly away from the tile.
- Fine emery cloth or steel wool: To clean oxidation and scale off copper stub pipes.
- Clean microfiber towels or rags: To drape over tub surfaces and protect finishes from tool marks.
Step-by-Step Bathtub Spout Installation Guide
Before starting any plumbing job, shut off the water supply to the bathroom or the home’s main line, and place a rag over your tub drain to catch dropped screws.
Carefully use your utility knife to score and cut away the old bead of silicone sealant sealing the base of the spout against your wall tile. Slicing this seal prevents the old caulk from pulling pieces of tile glaze or grout off the wall when you turn the fixture.
Removing Stuck or Corroded Old Spouts
Old spouts frequently become frozen in place due to hard water deposits and mineral crust.
For slip-on spouts, insert your hex wrench into the underside set screw and turn counterclockwise. If the screw feels stuck, spray a small burst of penetrating oil into the opening, wait five minutes, and try again. Once loose, pull the spout straight away from the wall with a gentle twisting motion.
For threaded spouts, grip the body with a strap wrench and turn counterclockwise. If using metal pliers, wrap the spout in a thick rag first to preserve the surface. You can also follow the practical removal techniques outlined in the iFixit step-by-step diverter repair guide to safely detach stuck internal assemblies without putting torque stress on the in-wall drop ear elbow.
Installing a Slip-On Tub Spout
- Clean the copper: Use a fine emery cloth to scrub mineral residue, old caulk, and tarnish off the bare copper pipe stub until it is clean and smooth.
- Inspect the internal O-ring: Ensure the rubber O-ring inside the new spout is seated squarely in its internal groove. You can apply a tiny dab of silicone grease to the ring to help it slide easily.
- Slide the spout into place: Push the new spout straight onto the pipe until the back rim sits flush against your wall tile.
- Tighten the set screw: Use your Allen wrench to tighten the underside hex screw firmly against the copper pipe. Do not overtighten, which can crush or dimple the copper line.
Installing a Threaded Tub Spout
- Clean the threads: Use a wire brush or clean cloth to remove old tape residue and debris from the wall nipple threads.
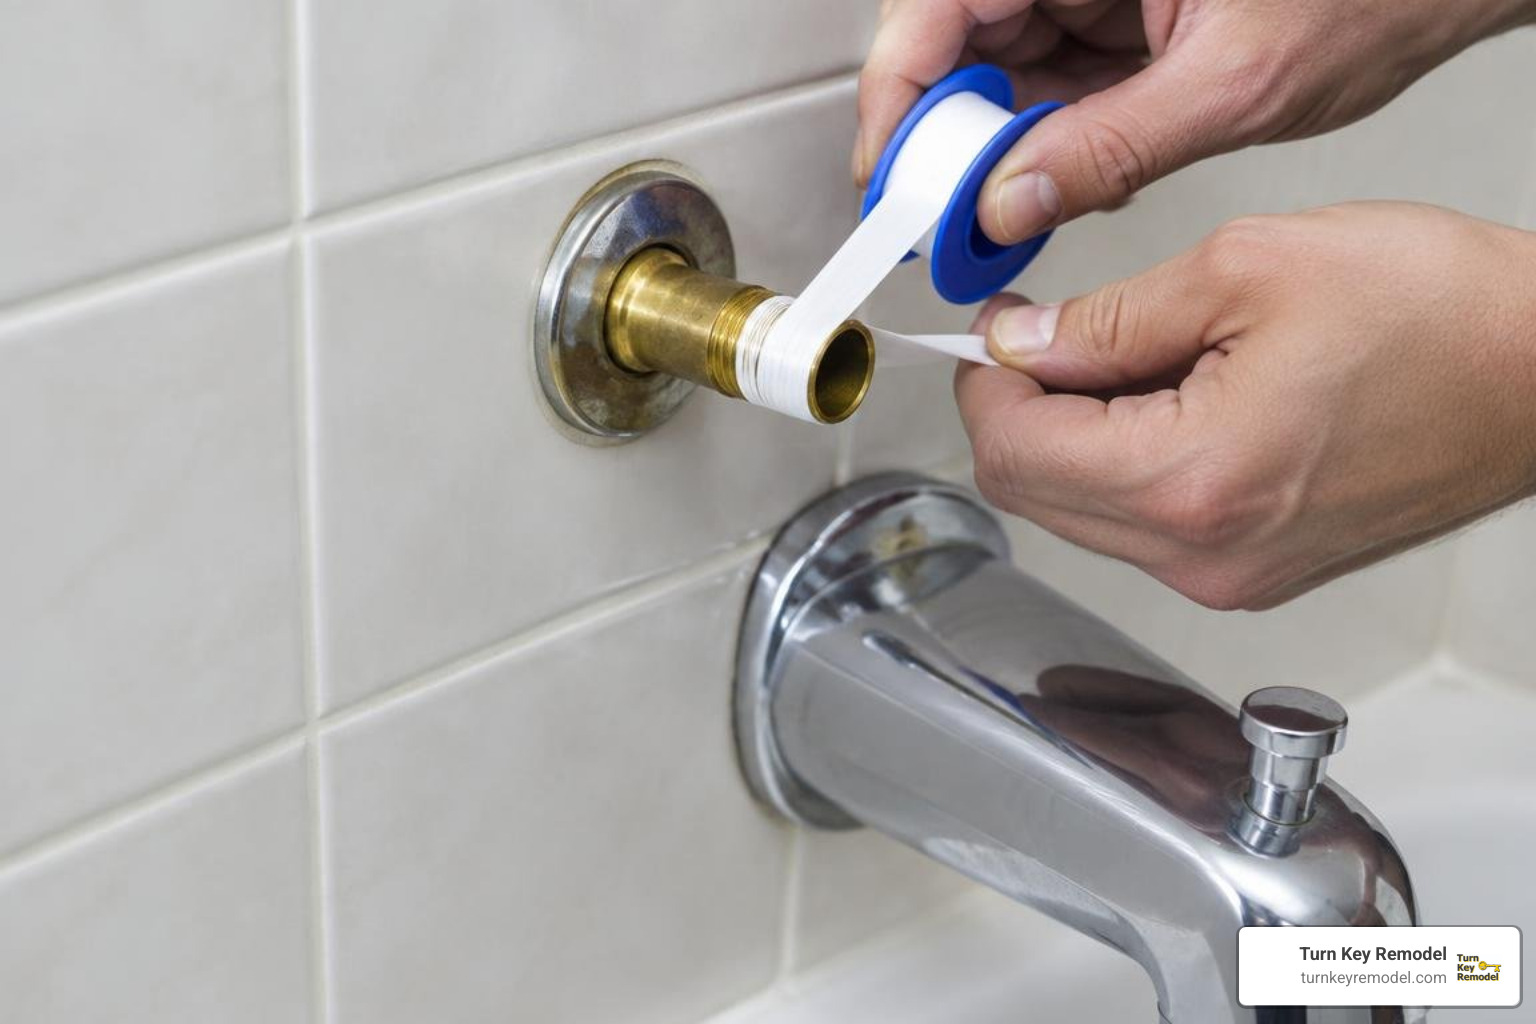
- Apply PTFE plumber’s tape: Wrap the male pipe threads with 3 to 4 wraps of PTFE tape, winding tightly in a clockwise direction. Wrapping clockwise prevents the tape from unravelling when you screw on the spout.
- Thread the spout on by hand: Align the new spout squarely onto the pipe and turn clockwise by hand.
- Snug down without over-torquing: Continue hand-tightening until the spout approaches the wall. Use a strap wrench for the final 1/4 to 1/2 turn until the spout points straight down into the tub basin. Never over-tighten, as excess torque can easily split the die-cast spout housing or snap the pipe elbow inside your wall.
Applying Sealant and Testing for Leaks
Once the spout is positioned straight down, test your work before sealing:
- Turn the water supply back on.
- Run hot and cold water through the spout for one full minute to flush internal manufacturing debris and inspect the wall joint for drips.
- If you installed a diverter model, pull the diverter rod up to confirm water transfers completely to the showerhead without spraying behind the wall.
After verifying there are no leaks, run a smooth bead of 100% silicone bath caulk around the top and side edges where the spout meets the wall. Always leave a small 1/4-inch gap open on the very bottom of the spout. This small weep opening ensures that if an internal connection ever weeps in the future, water drains forward into the tub rather than trapping moisture behind your finished wallboard.
Troubleshooting Stub Pipe Problems and When to Hire a Pro
Plumbing swaps rarely go wrong if the existing rough-in pipe matches standard sizing. However, you might encounter hidden challenges once the old fixture comes off.
If your pipe stub has corroded through, if the threads snap off inside the wall fitting, or if you discover water damage behind old tile, you may be facing more than a simple fixture swap. In older bathrooms, these repairs often serve as an ideal transition point for larger upgrades, such as converting tub to walk-in shower layouts that eliminate difficult-to-maintain tub plumbing altogether.
Addressing Broken Threads or Improper Stub Lengths in Bathroom Spout Replacement
- The pipe is too long: If a copper slip-on stub protrudes too far from the wall, your new spout will leave an ugly gap between the fixture base and tile. Mark the excess length according to the manufacturer’s manual and trim the copper cleanly using a close-quarters mini tubing cutter, deburring the inside edge afterward.
- The pipe is too short: If a threaded nipple does not extend far enough out of the wall for the spout threads to grab, you will need to unscrew the old nipple from the wall elbow and thread in a longer brass nipple.
- Damaged or stripped pipe: When copper pipes have heavy set-screw gouges or threaded nipples have rusted through, soldering on a new copper stub or replacing the internal nipple is mandatory to prevent hidden leaks.
Frequently Asked Questions About Tub Spouts
Do I need plumber’s tape on a slip-on tub spout?
No. You should never apply PTFE plumber’s tape to the pipe stub when installing a slip-on (slip-fit) tub spout. Slip-on spouts rely entirely on an internal rubber O-ring to form a watertight seal around the smooth outside surface of the copper pipe. Adding tape over the copper will prevent the O-ring from seating properly and cause water to spray backward out of the set screw notch.
Why is water leaking behind the wall after installing a new spout?
Water leaking behind the wall usually points to one of three issues:
- The threaded pipe nipple was not wrapped with sufficient PTFE tape, or the tape was wrapped counterclockwise and unraveled during installation.
- A slip-on spout’s internal O-ring was pinched, torn, or pushed past the end of a copper stub that was cut too short.
- The spout was over-tightened, which cracked the brass drop ear elbow mounted inside the wall studs.
How do I know if my diverter gate is failing instead of the spout?
If water continuously pours out of the tub spout while your showerhead is running, the internal diverter gate seal or pull rod has worn out. If the exterior metal casing of your spout is in pristine condition, you can often fix the issue with a universal diverter replacement gate kit. However, because new replacement spouts are relatively inexpensive, replacing the entire spout assembly is usually the fastest and most reliable fix.
Conclusion
Upgrading a worn, chalky, or leaking tub spout is one of the most cost-effective DIY projects you can tackle in your home. By taking a few minutes to identify your pipe connection, prepping your lines with clean cuts and proper sealing tape, and tightening carefully, you can complete this repair cleanly in an afternoon.
When simple fixture replacements uncover hidden pipe rot, broken wall fittings, or widespread tile damage, our team at Turn Key Remodel is here to assist homeowners across Orange County, Yorba Linda, Placentia, Anaheim Hills, Tustin, and Brea. When you are deciding between completing small repairs yourself or investing in a full system refresh, evaluating DIY costs versus professional rates helps ensure your home stays protected, functional, and beautifully updated for years to come.