
DIY Built In Cabinets with Doors from Planning to Final Trim
Plan Built In Cabinets with Doors That Look Custom
Built in cabinets with doors can turn an unused wall into organized, tailored storage without requiring every cabinet box to be built from scratch. Start by measuring the wall, locating studs and outlets, selecting cabinet depth, and deciding what should stay hidden behind doors versus displayed on open shelves. Then install level base cabinets, anchor the upper units or bookcase framing to studs, and use filler strips, trim, caulk, and paint to make the full wall look permanent.
Stock or ready-to-assemble cabinets are often a practical DIY starting point. Shallow upper cabinets are typically 12 inches deep, versus about 24 inches for standard base cabinets, so they can create useful storage without taking over a living room, office, or hallway. Doors keep cords, games, office supplies, and everyday clutter out of sight; open shelves add room for books and decor.
The details create the built-in effect: align face frames, use consistent door styles, run baseboard and crown molding into the cabinetry, and paint every joined surface as one composition. Shaker doors suit most homes, while glass or mullion doors lighten a display area, and solid doors work best for concealed storage.
I am Mark Apicella, Owner and President of Turn Key Remodel in Orange County, with more than eight years of remodeling experience and a team that manages cabinetry design and installation from plan through finish. In this guide, I will show you how to plan and build built in cabinets with doors while avoiding the fit, fastening, and finishing mistakes that make a project look less than seamless.
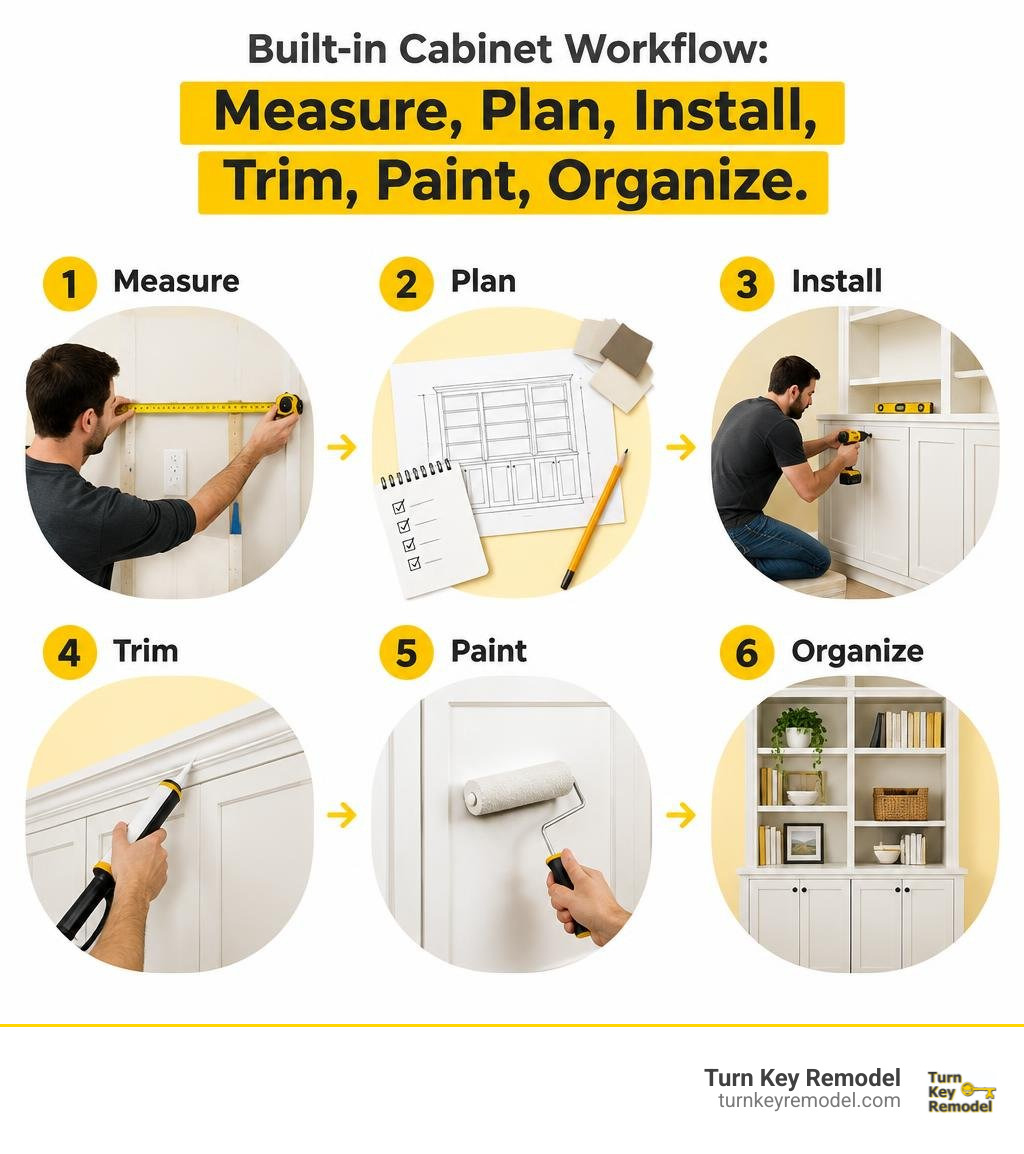
Key built in cabinets with doors vocabulary:
Designing and Planning Built In Cabinets with Doors for Any Room
Planning a built-in storage wall begins with assessing your room layout and establishing precise dimensions. Measure the total wall width at three heights (floor, middle, and ceiling) and the vertical height at multiple points across the span. Drywall and framing are rarely plumb, and floors frequently dip. Mapping your wall studs with a reliable stud finder is critical before purchasing materials, as every cabinet carcass must anchor firmly into solid structural framing.
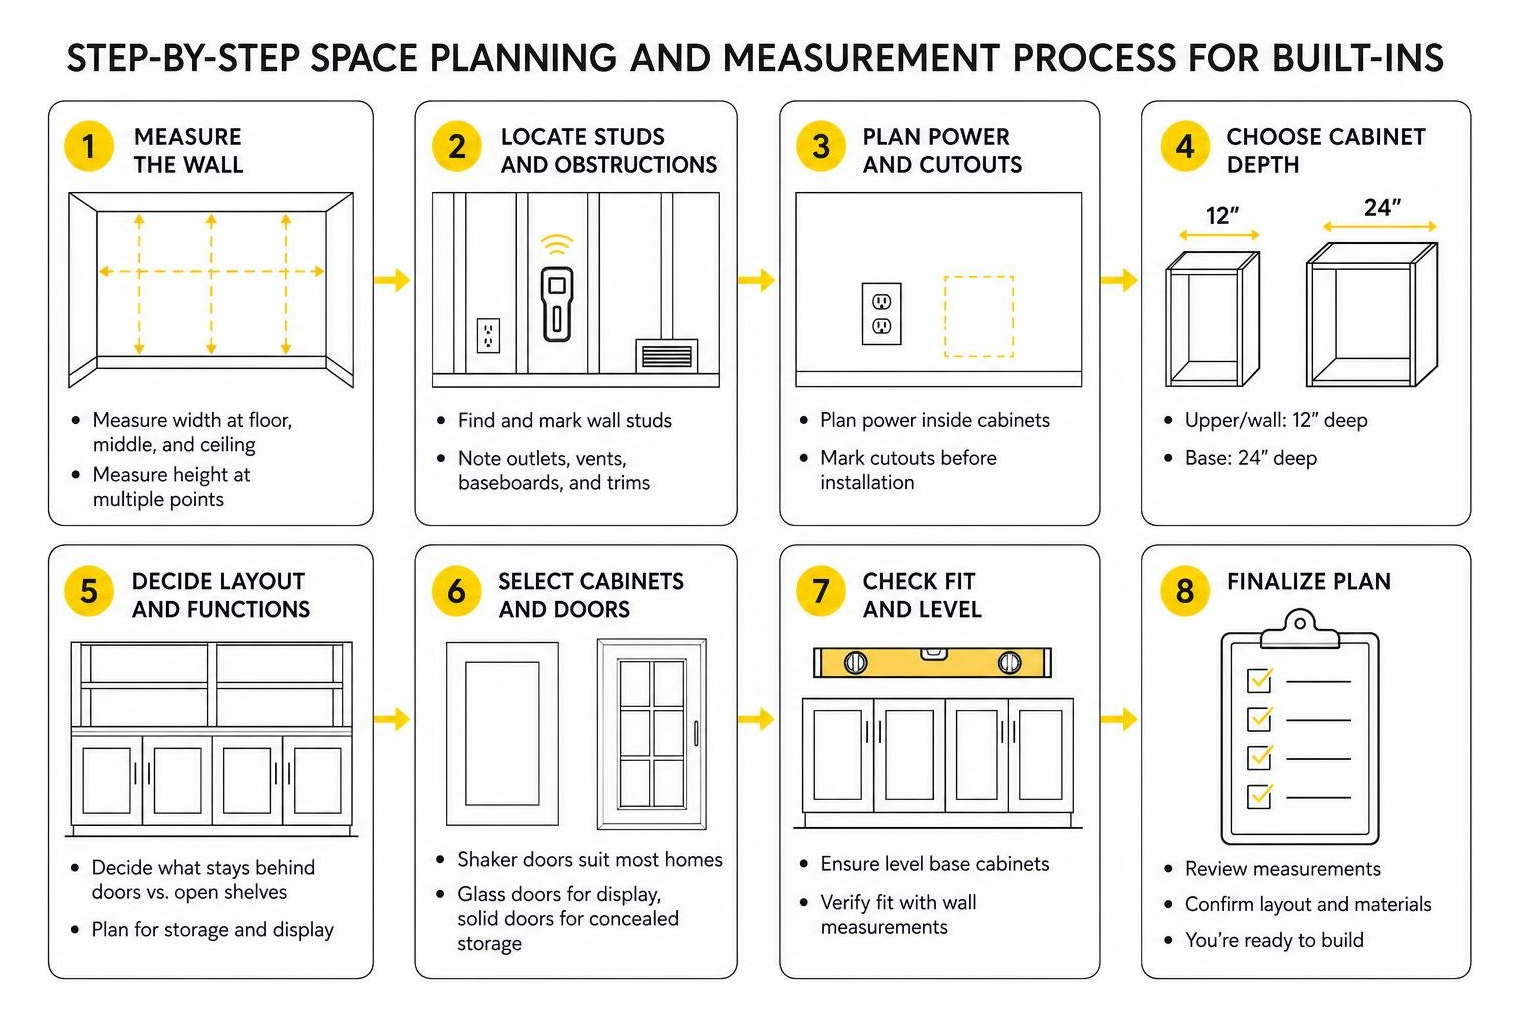
Take note of all obstructions including baseboards, heating vents, window trims, and electrical receptacles. If you want power inside lower cabinets for charging stations or media equipment, plan your box cutouts before setting anything in place. Baseboards along the installation span should be removed cleanly with a pry bar and utility knife so your cabinet framing sits flush against the drywall.
Deciding between custom-built cabinet carcasses and stock or ready-to-assemble (RTA) units comes down to budget, depth, and time. Standard kitchen base cabinets are 24 inches deep, which can overwhelm smaller living rooms, hallways, or home offices. In contrast, standard upper/wall cabinets are 12 inches deep, making them an exceptional option for low-profile bases that conserve floor space while delivering ample storage. Reviewing detailed woodworking plans for large built-in cabinets or browsing our custom cabinetry project gallery can help you visualize how differing box depths anchor a room.
Choosing the Best Styles of Built In Cabinets with Doors
The door profile defines the architectural personality of your built-ins. Selecting the right door style ensures the unit looks native to your home’s era and decor:
- Shaker Profile: Features a timeless recessed center panel with clean rails and stiles. It complements modern, transitional, and traditional spaces alike.
- Mullion Doors: Incorporate decorative wood grid bars over glass inserts, adding visual lightness and furniture-grade elegance to display areas.
- Mirrored Mullion Doors: Introduce depth, light reflection, and a touch of luxury, making them ideal for built-in dry bars, wine storage, or formal dining rooms.
- Slab Fronts: Offer flat, minimalist surfaces suited for contemporary or Scandinavian aesthetics.
Beyond aesthetics, choose between inset and overlay doors. Inset doors sit flush within the face frame and require 1/16-inch to 1/8-inch perimeter reveals, demanding high woodworking precision. Full-overlay doors sit in front of the frame, covering almost the entire face and offering maximum interior accessibility while forgiving slight carcass variations. You can easily adapt off-the-shelf bases by upgrading cabinet doors for modular boxes using high-grade prefinished panels or paint-ready MDF. Always equip doors with quality concealed cup hinges with integrated soft-close dampers to ensure quiet, long-term durability.
Essential Tools, Hardware, and Material Cut Lists
Cabinet longevity depends heavily on material selection. Plywood remains the industry standard for stable cabinet carcasses, while medium-density fiberboard (MDF) provides an ultra-smooth substrate for painted doors and face trims.
| Material | Core Advantages | Considerations | Best Application |
|---|---|---|---|
| 3/4-Inch Cabinet Plywood | High strength-to-weight ratio, superior screw holding, resistant to sagging | Grain patterns require edge-banding or face frames | Cabinet carcasses, structural shelves, dividers |
| MDF (Medium-Density Fiberboard) | Perfectly flat, zero grain texture, paints flawlessly, affordable | Heavy, susceptible to moisture damage if unsealed | Cabinet doors, drawer fronts, painted trim details |
| Solid Hardwood (Poplar/Maple) | Exceptional dent resistance, rigid joinery, premium feel | Natural movement with seasonal humidity shifts | Face frames, door stiles and rails, edge moldings |
For an authentic DIY build, reference projects like the Houseful of Handmade DIY built-in storage project, which utilized 3/4-inch plywood (roughly two 4×8-foot sheets per cabinet unit) paired with solid poplar face frames. Essential tools include:
- Table saw or circular saw with a straight-edge guide track
- Miter saw for clean crosscuts and trim bevels
- Pocket-hole jig with 1-1/4-inch pocket screws
- Concealed hinge drilling jig (35mm)
- Shelf pin jig (1/4-inch or 5mm)
- 18-gauge brad nailer and pneumatic compressor
- 4-foot carpenter’s level and laser level
- Clamps (parallel bar clamps and right-angle face clamps)
- Dimensional 2×4 lumber for building a continuous base platform
Step-by-Step Construction and Installation Process
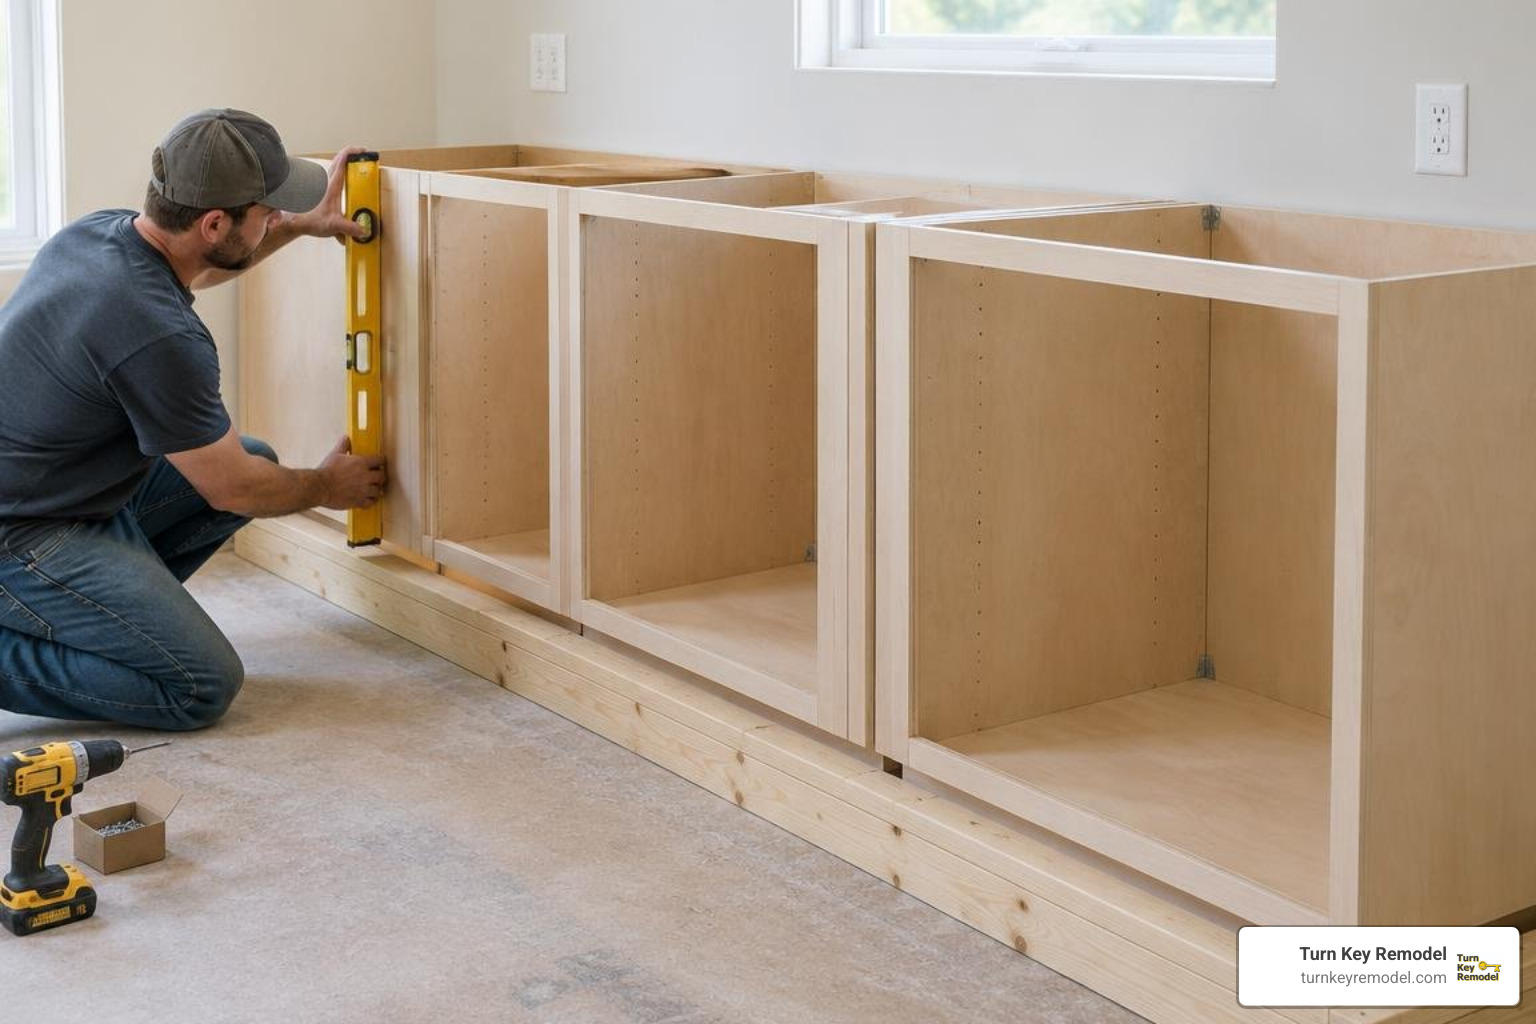
A professional built-in look requires a level foundation. Rather than leveling each cabinet box individually using integral legs, construct a continuous platform out of 2×4 lumber ripped down to your desired toe-kick height (typically 3-1/2 to 4 inches).
- Build and Level the Base Platform: Construct a 2×4 ladder frame sized to the total length and depth of your lower units. Secure it into the wall studs and floor plates. Use cedar shims underneath the frame until it is dead level across both axes.
- Mount the Base Cabinets: Place the base cabinet carcasses onto the platform. Clamp the face frames or side panels together using face clamps so the front edges sit completely flush.
- Join and Shim Carcasses: Drive 1-1/4-inch screws through the side stiles or pocket holes to lock adjacent boxes into a single monolithic unit. Shim behind the back panels wherever gaps exist against uneven drywall.
- Anchor to Wall Studs: Fasten the cabinet backs through their structural hanging rails into the marked wall studs using 3-inch cabinet screws with washer heads.
- Enclose Hidden Obstacles: If structural anomalies like steel posts or conduit run behind the units, notch out cabinet side panels and run full-height back panels in front of the obstacle to conceal it seamlessly.
If you find that structural alterations or intricate wall profiles require specialized craftsmanship beyond standard DIY methods, finding professional custom cabinet makers can ensure precise execution for challenging architectural layouts.
Assembling and Installing Base Built In Cabinets with Doors
If you are fabricating carcasses from scratch, cut your 3/4-inch plywood side panels, bottom deck, and top stretchers. Drill pocket holes along the exterior joints to conceal all fasteners once installed. Apply wood glue to all mating surfaces, clamp the carcass square by verifying equal diagonal measurements, and drive your pocket screws home.
Once your base carcasses are secured to the 2×4 platform, attach a unified countertop to serve as the visual transition between the lower closed storage and upper shelving. Butcher block tops (1-1/2-inch thickness) provide warmth, durability, and easy DIY cutting. Fasten the countertop from underneath by driving 1-1/4-inch screws upward through the corner stretchers of the base cabinets, allowing slotted clearance holes for natural wood expansion.
Constructing Upper Shelving and Integrating Specialized Storage
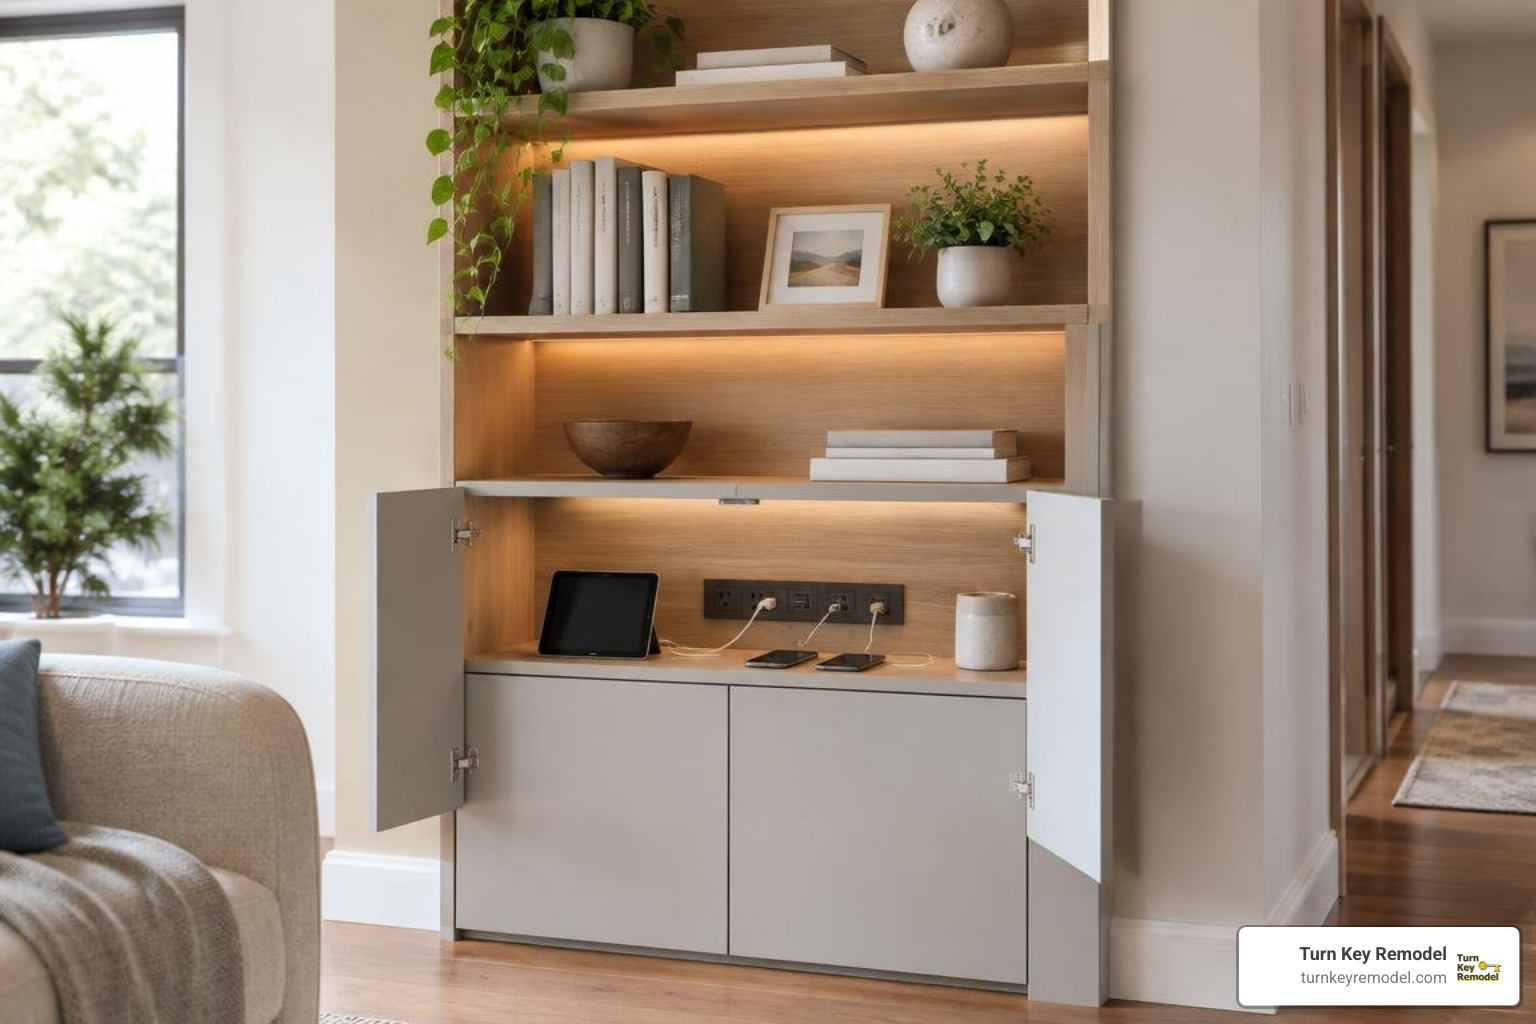
Upper open bookcases sit directly on the countertop, creating vertical display storage that contrasts beautifully with closed lower cabinets. Build upper side uprights from 3/4-inch plywood, setting their depth between 11-1/2 and 12 inches—recessed several inches behind the base cabinet countertop overhang.
Use a shelf pin jig to bore 1/4-inch holes every 1-1/4 inches along the inside faces before assembling the upper carcasses. This delivers flexible, adjustable shelving capable of handling evolving storage needs. For spans wider than 32 inches, attach a 1×2 solid wood nosing to the front edge of each shelf to eliminate visual deflection and prevent shelf sagging under heavy book loads.
Incorporate specialized organizational features inside your lower cabinet enclosures:
- Dedicated Tech Hubs: Drill 2-inch grommet holes through the countertop and internal dividers, mounting surge protectors inside a lower cabinet door to power laptops, cameras, or tool batteries out of sight.
- Integrated Wine Storage: Build modular crisscross or horizontal lattice dividers within lower compartments to store bottles horizontally.
- Media Ventilation: If housing receivers, gaming systems, or network hardware behind doors, cut discreet ventilation slots into the bottom platform and upper rear backings to prevent heat accumulation.
Custom Finishing: Trim, Molding, and Seamless Painting
The transformation from individual cabinet boxes to a luxury architectural installation happens during the trim and finishing phase.
- Filler Strips: Install color-matched filler strips between the outer cabinet sides and adjacent drywall walls, scribing each strip with a compass to match wavy plaster or drywall contours.
- Baseboards and Toe Kicks: Wrap the front of your 2×4 base platform with 1/4-inch skin panels, then reinstall your room’s baseboard molding continuously across the bottom of the cabinetry.
- Crown Molding: Bridge the gap between the top of the upper bookcases and the ceiling using a flat fascia board topped with decorative crown molding. This anchors the unit to the ceiling plane, eliminating dust catchers.
- Prep and Caulk: Counter-sink all brad nails and fill holes with sandable wood filler. Sand all hardwood and MDF edges smooth to 220-grit. Apply a continuous bead of paintable acrylic latex caulk along every joint where wood meets wood or drywall meets trim.
- Prime and Paint: Apply a high-adhesion bonding primer to seal bare wood and MDF edges. Finish with two coats of self-leveling cabinet-grade enamel paint using a fine-finish HVLP sprayer or high-density foam mini-roller. For detailed insights on application methods and material grades, explore understanding kitchen cabinet painting costs and techniques.
Common DIY Mistakes to Avoid When Building Storage Built-Ins
Even experienced builders can run into common pitfalls when constructing built-ins. Avoid these critical mistakes:
- Ignoring Floor Slope: Never set cabinet carcasses directly on an un-shimmed subfloor. Even an 1/8-inch slope across eight feet will cause upper shelving to misalign and doors to bind.
- Skipping Wall Plumb Checks: Drywall corners are rarely square. Always allow for 1-1/2-inch to 2-inch wide scribe/filler strips on each side rather than building carcasses to the exact theoretical wall width.
- Neglecting Hinge Clearance: When mounting doors near walls or face-frame corners, verify hinge cup setback (typically 3mm to 5mm from the door edge) to prevent door edges from scraping adjacent trim when opened past 90 degrees.
- Overextending Shelf Spans: Plywood shelves 3/4-inch thick span up to 36 inches under moderate load; unsupported spans beyond 36 inches will sag visibly over time without hardwood face stiffeners.
- Fastening Only into Drywall: Never rely on hollow-wall anchors for tall shelving. Carcasses must be fastened directly into structural studs using verified 3-inch cabinet screws.
- Rushing Paint Curing: Modern waterborne alkyd enamels feel dry to the touch in hours, but full chemical curing requires 14 to 30 days. Avoid mounting heavy decor or fully latching doors with rubber bumpers for the first week to prevent finish bonding.
Frequently Asked Questions about Built-In Cabinets
What is the ideal ratio of closed cabinet doors to open shelving?
The classic designer rule of thumb is the 60/40 visual weight balance. The lower 35% to 40% of the vertical height should consist of closed base cabinets with doors and drawers to ground the installation and conceal visual clutter. The upper 60% to 65% should feature open shelving or glass-front cabinets to keep the wall feeling open, bright, and spacious.
Can you use stock kitchen upper cabinets as base units for built-ins?
Yes, repurposing 12-inch or 14-inch deep upper kitchen cabinets as floor-level base units is an effective DIY technique. It preserves valuable walking clearance in narrow rooms while offering plenty of depth for board games, gaming consoles, linens, and office supplies. You simply construct a 2×4 toe-kick platform underneath to elevate the shallow cabinets to standard baseboard height.
How do you get a flawless finish on DIY built-in cabinets?
Achieving a professional-grade finish requires methodical surface preparation. Sand all woodwork progressively with 120-grit, 150-grit, and finish with 220-grit sandpaper. Fill all seams and micro-gaps with elastomeric paintable caulk, and seal end grains with high-solids primer. Apply two coats of premium waterborne urethane or alkyd enamel using a 4-inch high-density foam roller and angled sash brush, lightly scuffing with a fine sanding sponge between coats.
Conclusion
Building your own wall storage with integrated cabinetry elevates the functional capacity, organization, and market value of your home. By taking the time to properly level base platforms, securely tie carcasses into wall framing, balance open display shelving with concealed lower storage, and execute seamless trim work, you achieve the refined look of high-end millwork.
When whole-home renovations, custom media walls, or complex architectural layouts call for comprehensive project management, Turn Key Remodel brings over two decades of design-build expertise to homeowners across Orange County, Yorba Linda, Placentia, Anaheim Hills, Tustin, and Brea. Contact our team to explore our professional cabinetry design and installation services and bring your interior vision to life.