
Ultimate Checklist for Bathroom Design Inspiration
Bathroom Design Starts With a Layout That Works
Start with how you use the room. Place the vanity, toilet, and shower so people can move between them without bumping into doors or each other. Keep shower water away from dry areas, leave room in front of fixtures, and plan storage before choosing tile or a statement tub.
This checklist will help you turn inspiration into a practical plan, from layout and lighting to materials and spa features. For broader context on how these choices fit into a whole-home vision, the National Kitchen & Bath Association publishes widely used planning guidelines for residential bathrooms.
I’m Mark Apicella, owner and president of Turn Key Remodel in Orange County. With more than eight years in remodeling, I help homeowners connect bathroom design choices with the work needed to build them.
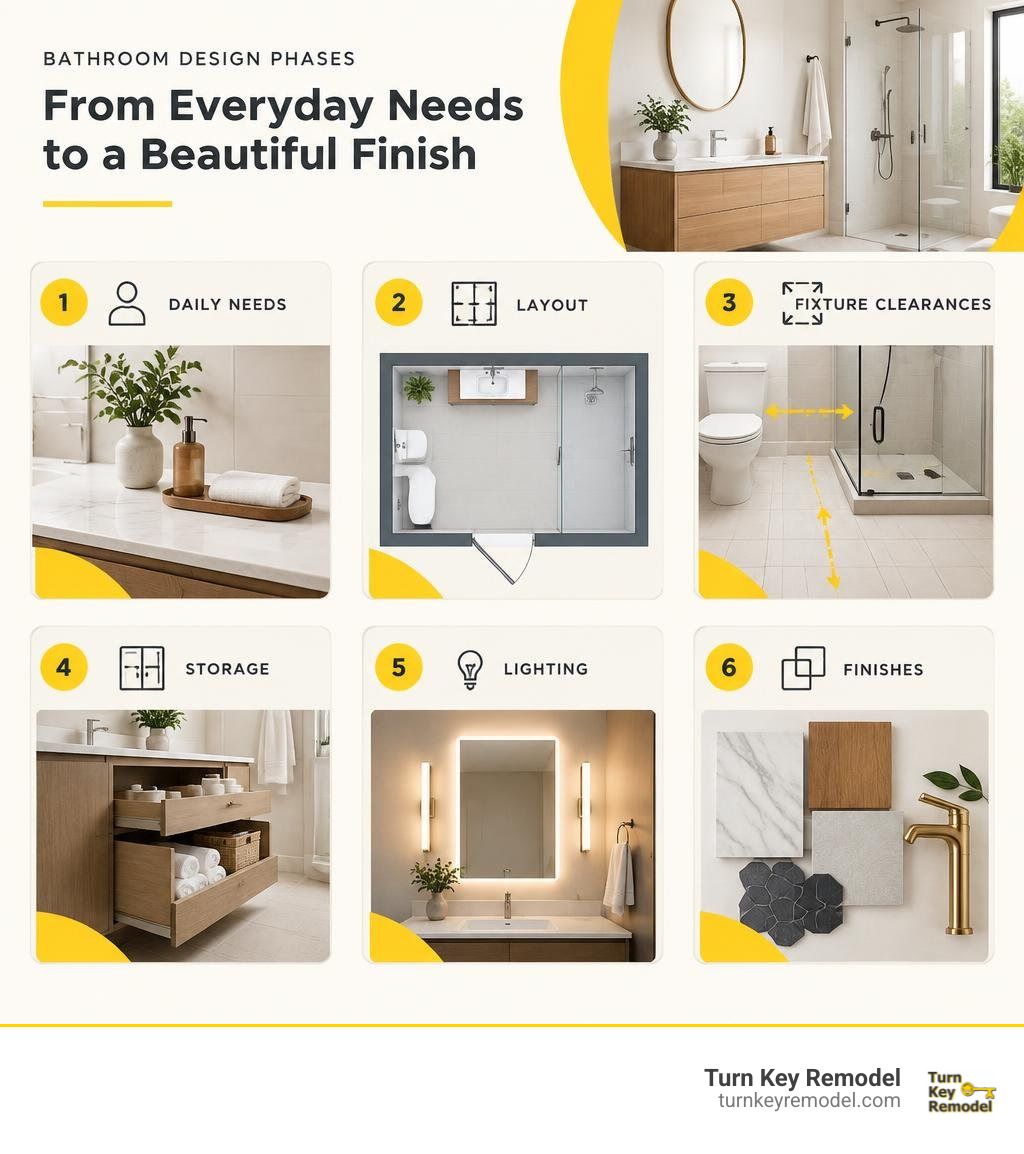
Foundational Principles of Modern Bathroom Design
A successful remodel bridges the gap between striking visual inspiration and effortless daily performance. When we approach a primary suite or powder room renovation, our focus centers on how space, materials, and light work together to support your morning and evening routines. Gaining a deeper understanding of A Comprehensive Guide to Interior Design for Inspiration and Ideas helps establish how foundational architecture dictates the final finish.
Core Tenets: Functionality, Negative Space, and Tactile Materials
The core of modern architectural planning is the belief that function informs form. A room that looks breathtaking in a photograph but lacks counter space for your morning routine or forces you to squeeze past a half-open door will quickly become frustrating.
We prioritize negative space—the intentional breathing room left around fixtures. Allowing sufficient open floor area makes the entire environment feel calm rather than cluttered. Combining this spatial generosity with tactile materials brings warmth to everyday use:
- Honed Natural Stone and Porcelain: Selecting soft, matte finishes on surfaces prevents harsh glare and provides secure footing underfoot.
- Warm Wood Accents: Introducing rift-sawn white oak, walnut, or teak balances cool stone and tile textures.
- Tactile Hardware: Solid forged brass or knurled metal plumbing controls create a pleasing, substantial feel with every use.
Modern vs. Contemporary Aesthetics in 2026
Homeowners often use the words “modern” and “contemporary” interchangeably, yet they represent distinctly different approaches:
- Modern Design: Grounded in functional minimalism, structural simplicity, geometric discipline, and deliberate negative space that remains timeless.
- Contemporary Design: Reflects what is currently evolving in the design world right now, adapting current fluid shapes, dynamic palettes, and emerging trends.
In current interior renovations, we see contemporary trends borrowing from modern discipline while introducing deep, rich contrast. For homeowners drawn to striking, dramatic aesthetics, exploring Why Moody Black Interiors Are Taking Over Modern Homes reveals how charcoal tones, dark slate, and deep bronze can coexist beautifully with clean minimalist lines.
Strategic Layout Planning and Fixture Clearances

Every successful renovation begins with rigorous space planning. Understanding How to Plan a Successful Home Remodeling Project ensures you establish your structural priorities and rough plumbing requirements before ordering custom materials.
Wet-Dry Separation and Traffic Flow Optimization
A well-ordered bathroom isolates water where it belongs, preserving floor longevity and simplifying daily maintenance. We organize layouts into three distinct performance zones:
- Dry Zone: Houses the vanity, personal grooming storage, linen cabinetry, and dressing area.
- Semi-Wet Zone: Encompasses the toilet and immediate transition walkways.
- Wet Zone: Dedicated entirely to the walk-in shower, soaking tub, or integrated wet room enclosure.
Arranging fixtures along a natural path of travel—moving logically from the vanity to the toilet and finally to the wet area—creates an intuitive flow. For tighter footprints, adopting smart Floor Plan Ideas to Make Your 7×10 Bathroom Feel Twice as Big helps optimize every square inch without compromising comfort.
Essential Clearance Guidelines for Fixtures and Doors
To maintain comfortable daily movement and pass building inspections, your floor plan must meet strict spatial guidelines established by local building codes and the National Kitchen & Bath Association (NKBA).
| Fixture / Element | Building Code Minimum | NKBA Recommended Standard | Best Practice Purpose |
|---|---|---|---|
| Front Clearance (Toilet/Vanity/Tub) | 21 Inches (53 cm) | 30 Inches (76 cm) | Allows comfortable standing, bending, and towel drying |
| Toilet Centerline to Side Wall | 15 Inches (38 cm) | 18 Inches (46 cm) | Prevents cramped elbow room against walls or cabinetry |
| Shower Enclosure Interior | 30 x 30 Inches | 36 x 36 Inches or larger | Ensures safe mobility and arm clearance while washing |
| Double Vanity Sink Spacing | 30 Inches Center-to-Center | 36 Inches Center-to-Center | Enables two people to use the vanity simultaneously |
| Entry Door Walkway Clearance | 32 Inches Width | 34 to 36 Inches Width | Accommodates wider access and unobstructed door swings |
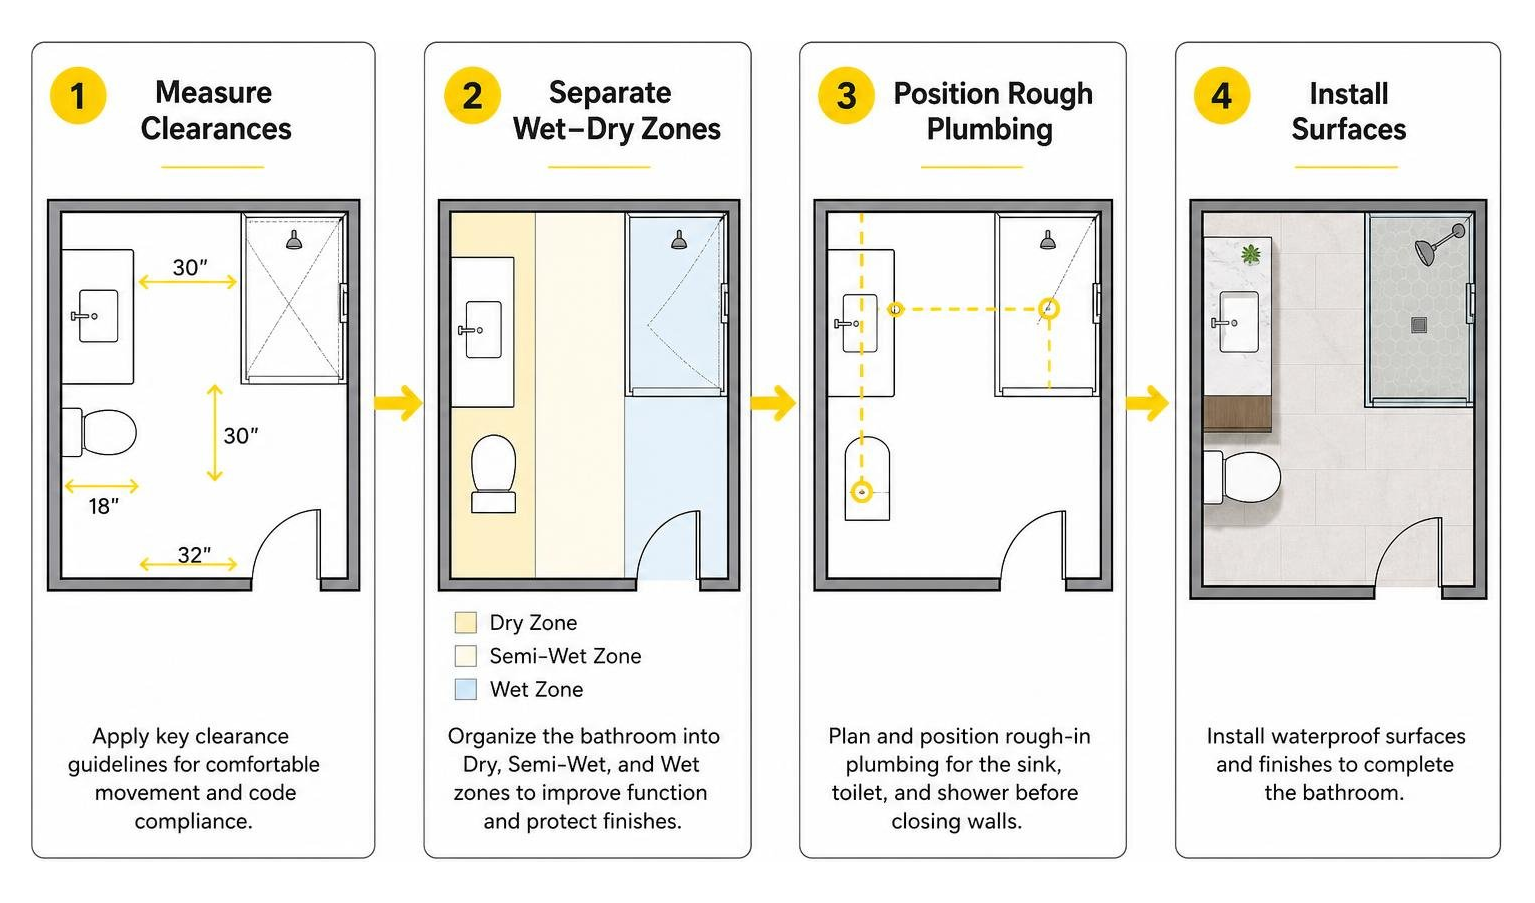
Door conflicts can quickly disrupt an otherwise great layout. Always check the swing arc of entry doors, shower doors, and vanity drawers during early planning. Where space is tight, swapping a standard swinging door for an interior pocket door or a smooth sliding glass shower screen keeps walkways clear.
Transformative Layout Trends and Spa Features

Homeowners increasingly view the bathroom as a personal wellness retreat. Whether you are adding a relaxing hydrotherapy zone or exploring How to Add a Tub to Your Walk in Shower Space, modern design seamlessly integrates comfort and clean architectural lines.
Key Bathroom Design Trends: Wet Rooms and Statement Tubs
Consolidating your shower and soaking tub behind a unified glass enclosure creates a clean, open focal point. This configuration simplifies floor waterproofing, eliminates awkward glass corners, and lets steam naturally envelop the entire bathing zone.
- Freestanding Composite Tubs: Made from non-porous resin or solid surface stone that holds heat longer than traditional acrylic.
- Steam Showers and Built-In Benches: Integrated steam generators paired with sealed ceilings, sloped drains, and tiled bench seating turn daily showers into private spa experiences.
- Dual Showerheads: Combining an overhead rain shower with an adjustable handheld wand offers both luxury and everyday practicality.
If your current layout feels restricted by an outdated, unused alcove bathtub, reviewing Everything to Know About Bathroom Conversion from Tub to Shower provides clear guidance on transforming that footprint into an expansive walk-in enclosure.
Small Space Transformations: Maximizing Function and Scale
Compact layouts benefit significantly from smart visual techniques:
- Wall-Mounted Floating Vanities: Revealing uninterrupted floor space beneath cabinetry makes narrow rooms feel significantly wider.
- Continuous Floor Tiling: Running large-format tiles straight into a curbless, zero-threshold shower visually expands the room’s footprint.
- Recessed Wall Niches: Sinking shelving directly between wall studs keeps shampoo bottles and toiletries off ledges without cluttering open space.
Homeowners evaluating the financial scope of replacing an old alcove setup can look into Understanding the Average Cost of a Tub to Shower Conversion to balance their project goals with real-world remodeling budgets.
Materials, Lighting, and Color Palettes for Cohesive Style
A well-executed room relies on durable, moisture-resistant surfaces paired with warm, flattering lighting. You can view real-world examples of balanced textures and layouts in our Bathroom Gallery.
Layered Illumination and Warm Palette Selection
A single overhead ceiling light creates harsh, unflattering shadows across the face. A thoughtful lighting plan uses three distinct layers:
- Task Lighting: Vertical wall sconces installed at eye level on both sides of the mirror (or integrated backlit LED mirrors) cast even, shadow-free light across your face for grooming.
- Ambient Lighting: Recessed, moisture-rated ceiling downlights set on smooth dimmers provide overall illumination across wet and dry zones.
- Accent Lighting: Subtle LED strip lighting placed beneath a floating vanity or inside a tiled shower niche creates a soft, relaxing glow for nighttime use.
Select light fixtures with a warm color temperature of 2700K to 3000K to keep spaces feeling inviting. Pair this illumination with earthy, grounded palettes—such as warm mushroom taupe, creamy alabaster, soft clay, or muted sage—to bring organic warmth into the home.
Strategic Bathroom Design Choices for Vanities, Tile, and Storage
When finalizing finishes, select high-touch elements that hold up well to daily moisture:
- Large-Format Porcelain Tile: Measuring 24×48 inches or larger, these panels reduce grout lines, minimizing long-term scrubbing and maintenance.
- Integrated Stone Sinks: Seamless sink basins molded directly into engineered quartz or marble countertops eliminate dirt-trapping silicone seams.
- Vertical Custom Storage: Full-height linen towers, integrated pull-out laundry hampers, and powered medicine cabinets equipped with internal charging outlets keep countertops completely free of cords and clutter.
Step-by-Step Execution: Digital Tools and Common Pitfalls
Careful preparation prevents unexpected surprises once construction gets underway. Reviewing our Ultimate Checklist for Bathroom Remodel Costs Steps helps you align material choices, labor phases, and permits with confidence. Selecting certified professionals through Finding and Vetting Reliable Local Bathroom Remodel Contractors ensures your project is built to the highest trade standards.
Digital Planning Tools and 3D Visualization
Modern 3D space planners and browser-based modeling tools let you test layout dimensions and finish combinations before ordering materials:
- Virtual Clearance Testing: Verify that vanity drawers clear door frames and that the toilet maintains the recommended 30-inch clear zone.
- Realistic Texture Previews: Test how bold stone veining pairs with natural wood cabinetry and brushed brass fixtures under various simulated lighting conditions.
- Accurate Material Take-Offs: Digital floor plans generate exact square footage requirements, reducing material waste and unexpected order shortages during installation.
Critical Remodeling Mistakes to Avoid
- Over-Mixing Metal Finishes: Combining four or five competing metal finishes creates visual clutter. Stick to a primary finish for major plumbing fixtures and an optional complementary accent for mirrors or decorative lighting.
- Inadequate Exhaust Ventilation: An undersized exhaust fan traps moisture, leading to peeling paint and mold behind walls. Choose a quiet, high-capacity fan rated accurately for your room’s square footage.
- Compromising the Waterproofing Envelope: Tile and grout shed surface water, but they are not fully waterproof on their own. High-performance sheet membranes or liquid-applied waterproofing behind every wet wall are essential to protect your home’s structural framing.
- Neglecting Rough-In Locations: Forgetting to account for valve rough-in depths, drain slopes, and electrical backing before closing up drywall leads to expensive delays during finish installation.
Frequently Asked Questions About Bathroom Renovations
Does a small bathroom need wet-dry separation?
Yes. Keeping shower spray contained preserves drywall, protects wood vanity cabinets from water damage, and keeps floor tiles slip-free. In smaller spaces, this can be achieved with a fixed glass splash panel or a sliding glass screen rather than a bulky enclosure.
How much clear space is required in front of bathroom fixtures?
While standard residential building codes generally require a minimum of 21 inches of clear floor space, the National Kitchen & Bath Association (NKBA) recommends 30 inches. This additional clearance ensures you can step out of the shower, dry off, and use the vanity comfortably without feeling crowded.
Should I select my tile or vanity first?
We recommend choosing the vanity first. The vanity serves as the primary visual anchor of the room, sets the storage layout, and dictates plumbing rough-in locations. Once the vanity wood tone and countertop are selected, choosing coordinating wall tiles, floor patterns, and metal hardware becomes much more straightforward.
Conclusion
A well-designed bathroom balances practical layout planning, durable materials, and layered lighting to create a calm, functional space you will enjoy every day. By focusing on smart traffic flow, proper fixture clearances, and trusted construction methods, you can turn your design ideas into a finished room that stands the test of time.
At Turn Key Remodel, our design-build team handles every phase of your renovation—from 3D conceptual layout and material sourcing to complete construction management across Orange County, Yorba Linda, Placentia, Anaheim Hills, Tustin, and Brea. When you are ready to bring your vision to life, schedule a consultation through our expert Design Services to get started.