
Accessible Bathroom Design Ideas That Blend Function with Pure Luxury
Accessible Bathroom Design That Feels Like Home
Start with the space a person needs to move and use each fixture. Plan a clear path through the door, room to turn, and space to approach the toilet, sink, and shower. Then add a step-free shower, secure grab bars, slip-resistant flooring, and controls that are easy to reach from a seated position. Choose finishes you love around those needs. Accessibility does not have to look clinical.
Measure before choosing fixtures. A common planning guide is a 32-inch clear door opening, a 30-by-48-inch clear space at fixtures, and a 60-inch turning circle. The right layout may need more room for a larger wheelchair or caregiver.
I’m Mark Apicella, owner of Turn Key Remodel in Orange County. My experience leading bathroom remodels and in-house design helps me approach accessible bathroom design as both a practical layout challenge and a chance to create a beautiful space.
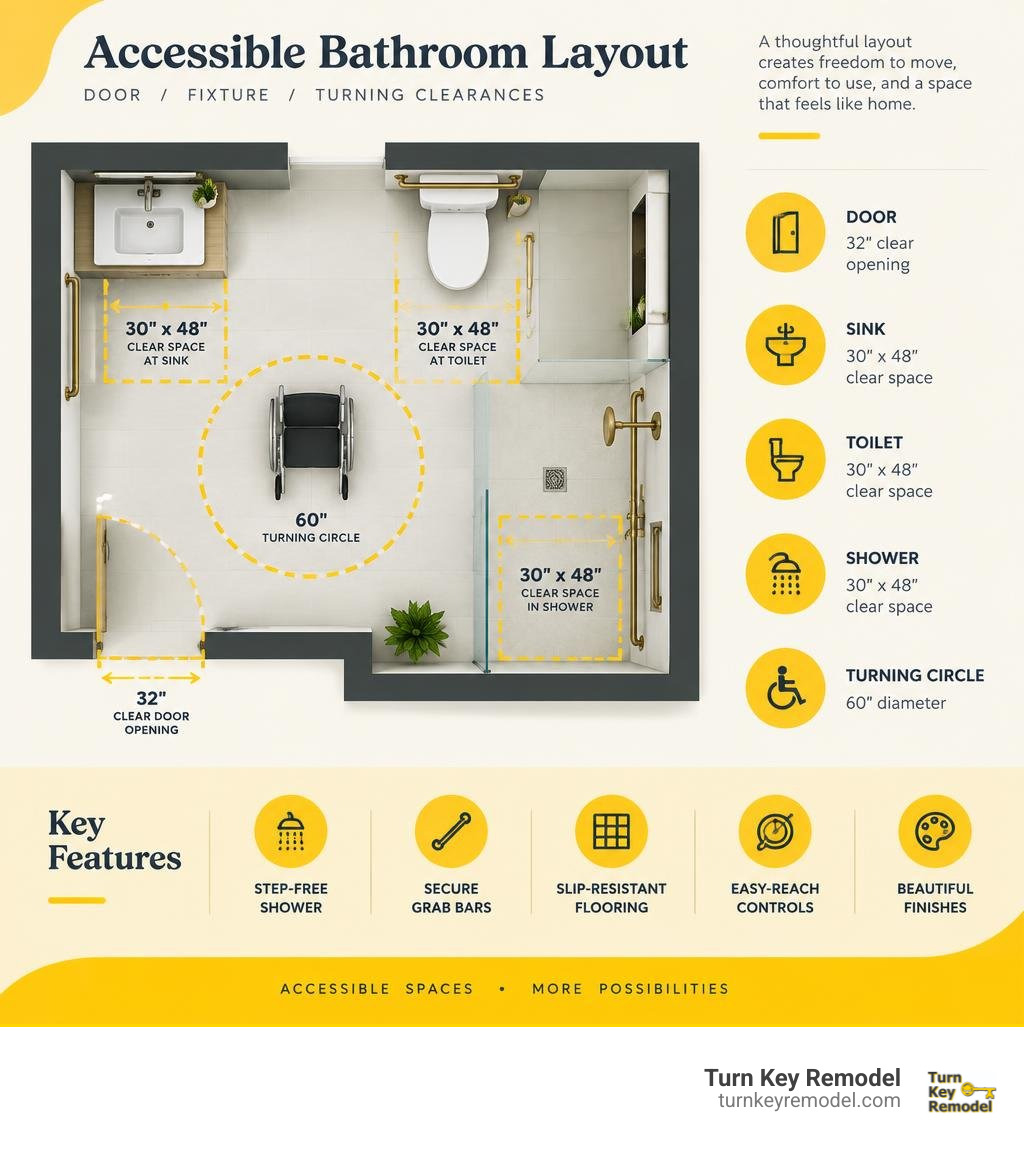
Accessible bathroom design terms made easy:
Core Principles of Luxury Accessible Bathroom Design
A thoughtfully planned bathroom should never feel like a hospital room. The foundation of modern barrier-free living relies on universal design—creating spaces that naturally accommodate every person, regardless of age, height, or mobility level, without demanding awkward adaptations.
When we integrate accessibility early in the architectural phase, practical features become intentional design statements. Eliminating physical barriers, smoothing out transitions between wet and dry zones, and providing generous circulation paths creates an airy, high-end aesthetic. Incorporating contrasting visual palettes—such as pairing dark matte finishes against light stone surfaces—assists users with low vision or depth perception challenges while lending a modern, grounded feel to the room.
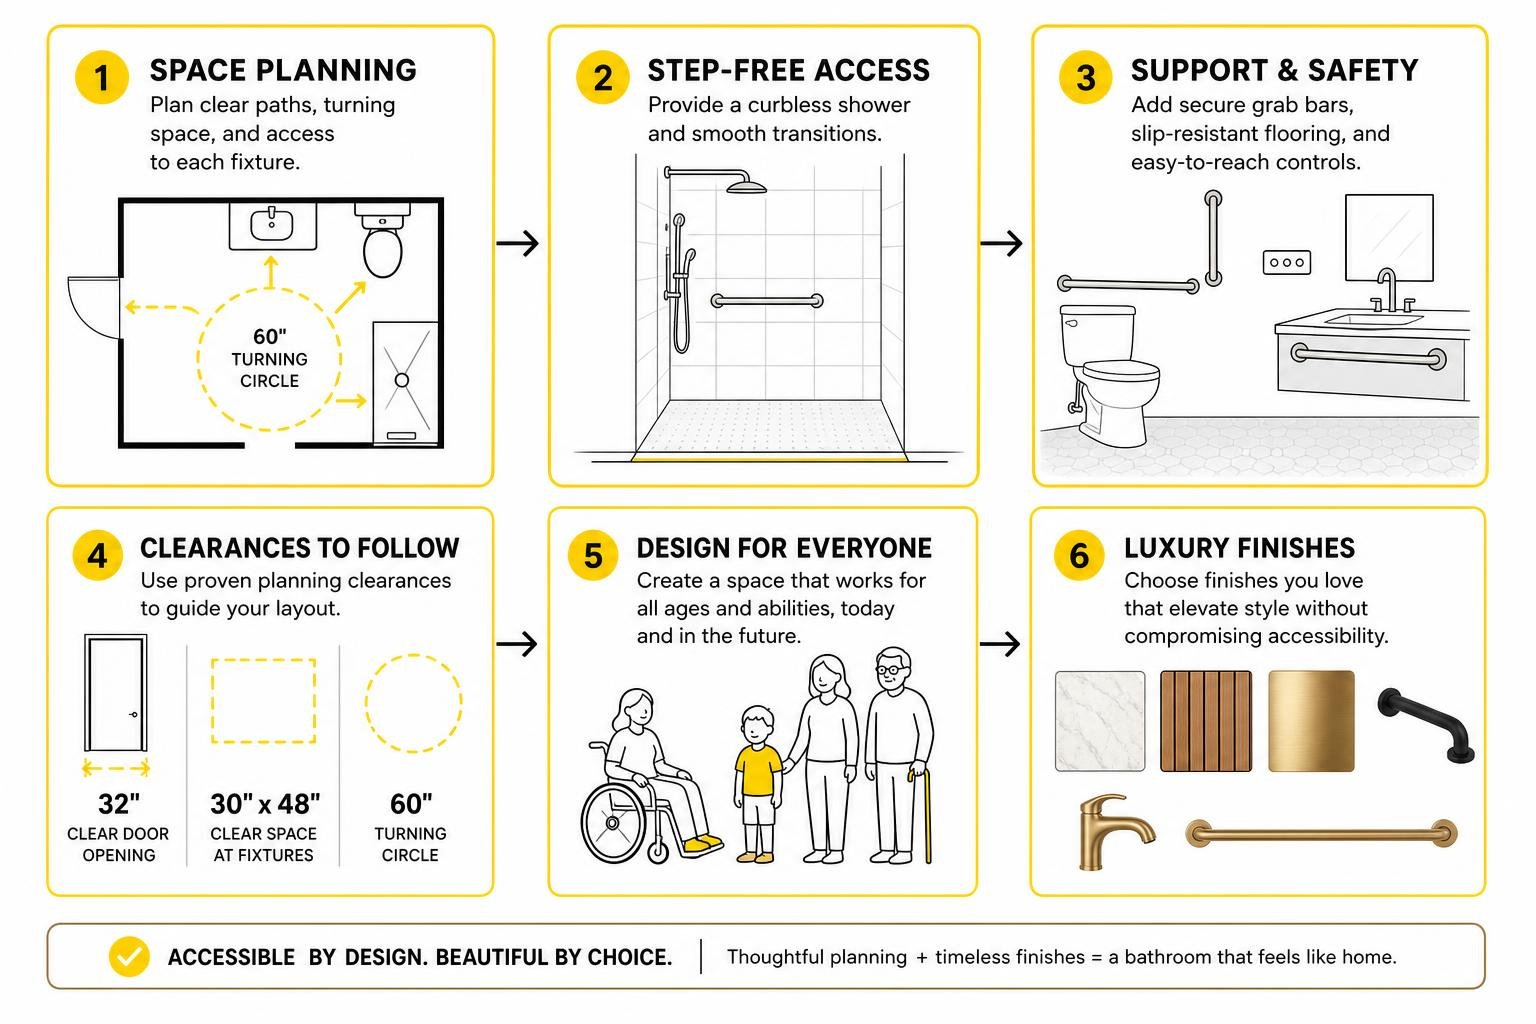
Investing in smart layouts and durable, accessible elements is one of the best home upgrades that make everyday life feel luxurious. By designing for multi-generational living, you ensure your home welcomes visiting grandparents, supports family members recovering from temporary injuries, and provides lifelong independence.
Following established industry frameworks like the NKBA Bathroom Planning Guidelines ensures that practical clearances never compromise luxury. We trade sterile white plastic for warm brushed bronze hardware, rich teak wood seats, and textured porcelain slabs.
Essential Layout Dimensions and Spatial Planning
A functional layout begins with open floor space. If a user cannot comfortably enter the room, turn around, or transfer between fixtures, even the most expensive tile is rendered impractical. Efficient spatial planning eliminates pinch points and organizes the bath into intuitive zones for washing, grooming, and showering.
Doorways, Clear Floor Space, and Wheelchair Turning Radii
Standard interior doors are often 28 to 30 inches wide, which creates an immediate bottleneck for standard wheelchairs, walkers, or crutches.
- Door Openings: A standard door must provide at least a 32-inch clear opening width (813 mm), but an accessible threshold ideally requires a 34-to-36-inch doorway (864 mm to 914 mm). Pocket doors or outward-swinging doors are ideal solutions that save interior clearance and allow emergency access.
- Fixture Clearances: Every primary fixture—the washbasin, toilet, and shower—requires a minimum clear floor space of 30 by 48 inches (762 mm by 1219 mm). This footprint allows for parallel or perpendicular approaches.
- Turning Circles: A manual wheelchair requires a continuous turning space of at least 1,500 by 1,500 mm (60 by 60 inches). For motorized wheelchairs or bariatric mobility devices, expand this turning area to 1,800 by 1,800 mm (71 by 71 inches). In tighter footprints, a T-shaped three-point turning configuration (using 36-inch-wide pathways) can achieve full clearance without sacrificing floor area.
International Building Standards and Accessibility Codes
When designing private residences across communities in Orange County, we look to recognized building standards to guarantee structural safety and universal ease of use:
- ICC A117.1: The primary standard for accessible and usable buildings, dictating fixture heights, reach ranges (15 to 48 inches from the floor), and grab bar ratings.
- DIN 18040-2: The German accessibility code focusing on clear maneuvering clearances (1.50 by 1.50 meters) and step-free shower requirements for barrier-free living.
- AS1428.1: The Australian standard emphasizing lateral transfer zones, precise toilet pan centerlines, and high-contrast fittings.
- Fair Housing Act Design Manual: Offers core guidance on reinforced wall framing and usable doorways, as detailed in the Fair Housing Act Design Manual guidelines.
- CSA B651: Canadian specifications requiring grab bars to support at least 133 kg (nearly 300 pounds) and setting ergonomic ranges for seating heights.
Designing Accessible Wet Zones: Showers vs. Bathtubs
The wet area of the bathroom represents both the highest daily slip risk and the greatest opportunity for custom luxury. Selecting between a curbless walk-in shower and an accessible tub depends on individual bathing preferences, existing plumbing, and long-term mobility goals.

| Feature | Step-Free Curbless Shower | Accessible Walk-In Bathtub |
|---|---|---|
| Mobility Suitability | Excellent for wheelchairs, walkers, and all standing mobility levels | Best for seated bathers with minor mobility limits; difficult for full wheelchair transfers |
| Footprint Required | Flexible; minimum 36″×36″ (ideal 60″×60″ for roll-in) | Fixed; standard 30″×60″ tub alcove footprint |
| Safety & Entry | Zero threshold; seamless continuous flooring | Airtight low-threshold swing door; integrated seat |
| Caregiver Assistance | High; ample open space for assisted bathing | Moderate; restricted by tub walls and enclosure height |
| Installation Profile | Involves recessing subfloor, slope packing, and tanking | Direct plumbing retrofit; requires high-capacity rapid-fill valves |
Curbless Roll-In Showers and Wet Room Conversions
A level-access, curbless shower eliminates the tripping hazard of standard curbs. By pitching the subfloor at a gentle 1:50 to 1:100 slope toward a sleek linear trench drain, water flows away cleanly without requiring a raised barrier. Reviewing proven tub-to-shower conversion steps helps clarify the floor-recessing process.
For complete wheelchair access, aim for a shower footprint of at least 1,500 by 1,500 mm (60 by 60 inches), though a standard 36-by-60-inch footprint can work well with a transfer bench. You can explore inspiring walk-in shower remodel ideas to see how custom glass splash guards, collapsible rubber water retainers, and integrated thermostatic handheld wands merge accessibility with contemporary design.
Accessible Bathtub Modifications and Transfer Solutions
If you prefer deep soaking, traditional tubs can be adapted for safety:
- Walk-In Tubs: Units equipped with low-threshold side doors, leak-free mechanical seals, and built-in contoured seating allow users to sit down before filling the tub.
- Transfer Benches and Swivel Seats: A bath board or sliding transfer bench spans the tub wall, allowing a bather to sit down outside the edge and slide their legs over safely.
- Accessible Hardware: Mount thermostatic valves and hand showers on the interior tub deck or side wall within easy reach from a seated position, avoiding awkward reaches over deep ledges.
Fixtures and Zone Planning: Toilets, Basins, and Safety Elements
Dividing your bathroom into clearly defined zones creates an intuitive layout where every element supports safe, independent use.
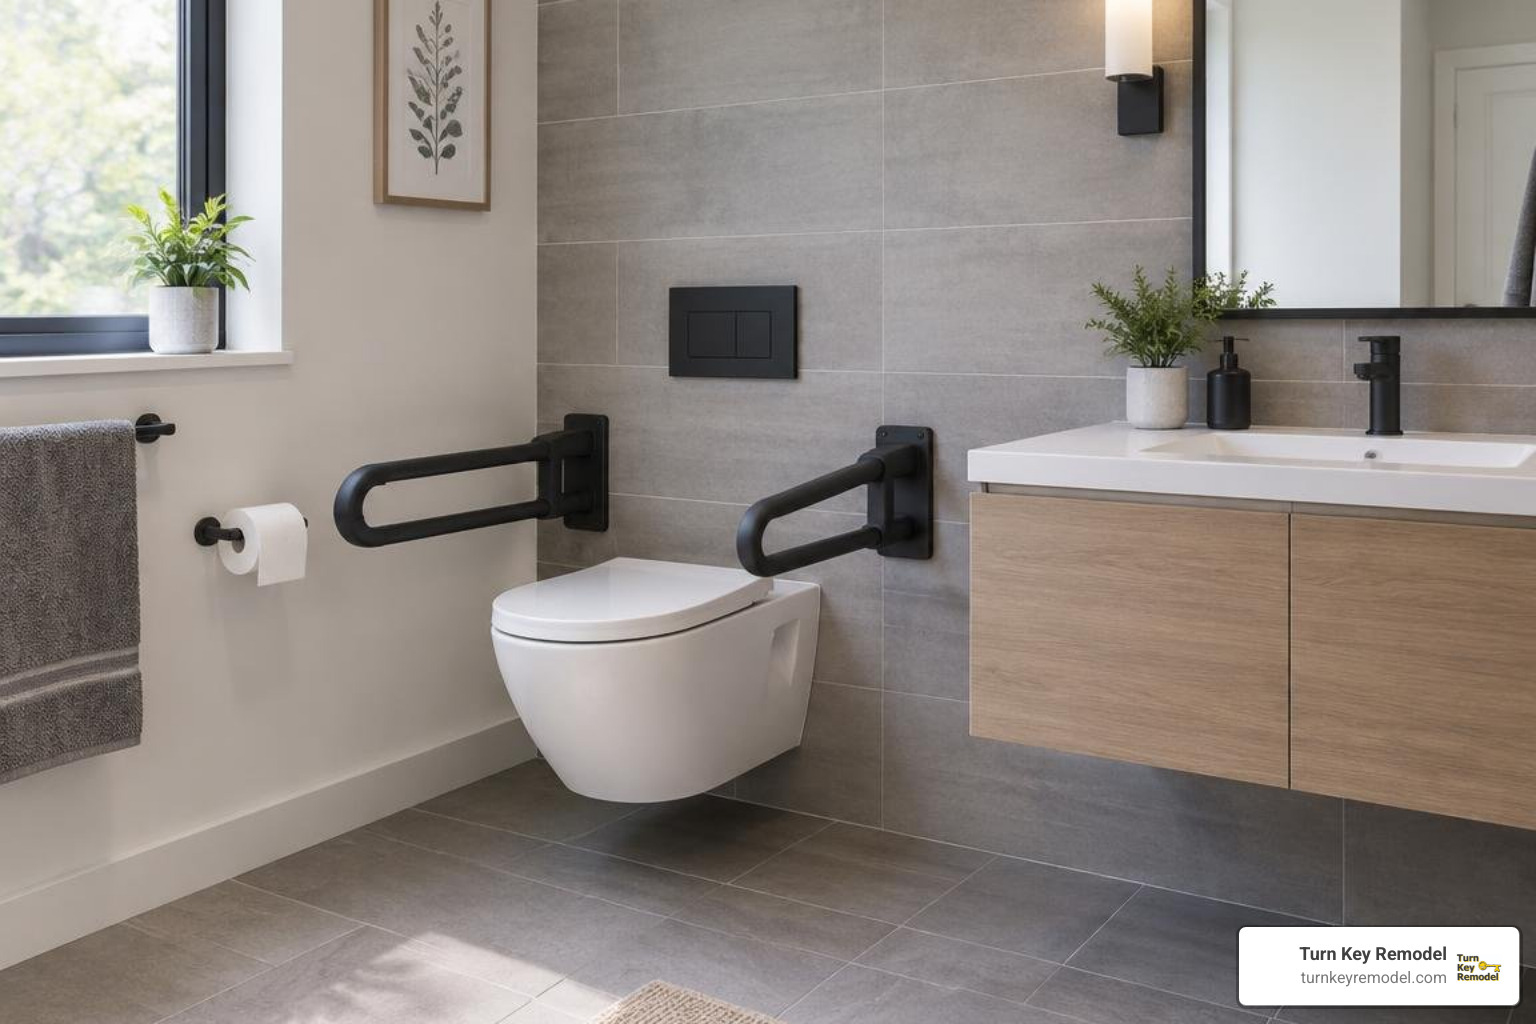
Toilet Zone Clearances and Secure Grab Bar Placement
A standard toilet seat often sits just 14 to 15 inches off the floor, which places heavy stress on knees and hips during transfers.
- Seat Height: Install a comfort-height or wall-hung toilet with a finished seat height between 16 and 18 inches (400 mm to 460 mm per CSA B651 standards, or up to 480 mm per Australian specifications).
- Lateral Transfer Space: Position the centerline of the toilet 16 to 18 inches from the adjacent side wall, leaving a generous 35-to-36-inch (900 mm) clear zone on the open side for safe wheelchair-to-seat transfers.
- Grab Bar Specs: Install horizontal and vertical grab bars at 33 to 36 inches above the floor. All grab bars must support a minimum static load of 250 pounds (113 kg), featuring a 1.25-to-1.5-inch diameter with 1.5 inches of clear wall spacing. Fold-down support arms on open sides provide sturdy balance without blocking entry paths.
- Bidet Integration: Electronic bidet toilet seats with heated water and intuitive side remotes restore hygiene independence for users with limited reach.
Roll-Under Washbasins and Stylish Lever Fittings
Standard vanities with enclosed base cabinets block wheelchair footrests and knees.
- Knee Clearance: Mount floating vanities or open-frame consoles to provide at least 27 inches (685 mm) of vertical knee clearance, 30 inches of width, and 19 inches of depth.
- Pipe Protection: Insulate or conceal supply lines and P-traps behind protective shrouds to prevent hot-water contact burns.
- Faucets and Mirrors: Specify single-lever or motion-activated sensor taps. Mount mirrors at a maximum base height of 39 to 40 inches (1,000 mm) from the floor, or install downward-tilting designer mirrors so both seated and standing family members have an unobstructed view.
Non-Slip Flooring, Smart Lighting, and Anti-Scald Controls
Wet tile surfaces are the leading cause of bathroom falls. Specifying high-traction, slip-resistant flooring rated R10 to R11—or using small-format mosaic tiles (2×2 inches or smaller) with dense grout lines—dramatically increases grip underfoot.
To protect delicate skin, hot water delivery to bathtubs, showers, and sinks should be regulated by thermostatic mixing valves (TMVs) limited to a maximum temperature of 120°F (49°C).
Pair this thermal safety with balanced LED illumination. Install low-glare perimeter lighting, illuminated toe kicks along floating vanities for midnight navigation, and large accessible rocker switches placed 36 to 42 inches above the finished floor.
Future-Proofing and Budget Strategies for Aging in Place
Planning for progressive accessibility allows your bathroom to evolve alongside your physical needs, avoiding sudden, stressful home overhauls down the road. Consulting professional guides like the Canadian CMHC guidelines for renovating for accessibility or collaborating with an occupational therapist helps pinpoint essential layout details before construction begins.
Cost-Effective Upgrades for Accessible Bathroom Design
Accessible modifications do not require an immediate down-to-the-studs overhaul. You can make substantial safety gains with strategic, cost-effective updates:
- Replace traditional twist knobs with ergonomic, ADA-compliant lever faucets.
- Swap standard-height toilets for comfort-height models with soft-close bidet seats.
- Install multi-functional 2-in-1 accessories, such as heavy-duty towel rails, soap holders, and toilet paper holders engineered with structural 250-pound load capacities.
- Add textured non-slip topical sealers over slick existing porcelain tiles.
- Install an adjustable slide-bar handheld shower kit equipped with a flexible, extra-long hose.
Structural Wall Reinforcement for Long-Term Accessible Bathroom Design
The most critical step in future-proofing happens behind the drywall during a renovation:
- Plywood Backing: Install continuous 3/4-inch (19 mm) structural plywood or solid 2×8 wood blocking between wall studs throughout the shower perimeter, alongside the toilet, and near the tub at heights between 30 and 40 inches.
- Ceiling Framing: Reinforce ceiling joists above the tub and shower to support future ceiling-track mobility lifts if ever required.
- Modular Adaptability: With solid backing concealed behind the tile, heavy-duty support bars, fold-down shower seats, or horizontal track systems can be installed, adjusted, or removed at any time without opening walls.
When executing these structural adaptations, vetting reliable local bathroom remodel contractors ensures your framing, waterproofing, and tile work strictly follow code.
Frequently Asked Questions About Accessible Bathrooms
What are the minimum dimensions required for an accessible bathroom?
An accessible full bathroom generally requires a minimum footprint of roughly 5 by 8 feet for basic adaptability, but a dedicated wheelchair-accessible layout ideally measures 8 by 8 feet or larger. Key dimensions include a minimum 32-to-34-inch clear door opening, a 60-inch (1,500 mm) clear turning circle (or 71 inches for motorized chairs), 30 by 48 inches of unobstructed floor space at every fixture, and at least 36 inches (900 mm) of lateral transfer space beside the toilet.
Can grab bars look stylish instead of clinical?
Yes. Today’s architectural bath manufacturers produce designer support rails that match high-end hardware suites. Look for heavy-duty grab bars finished in matte black, brushed brass, champagne bronze, or polished nickel with concealed screw flanges. You can also install 2-in-1 integrated accessories, such as reinforced towel bars, corner shower shelves, and paper holders that double as certified 250-pound load-bearing safety bars.
What is the safest flooring for an accessible bathroom?
The safest flooring options feature an R10 or R11 slip rating and a dynamic coefficient of friction (DCOF) of 0.42 or higher when wet. Small-format porcelain mosaic tiles (2×2 inches or smaller) are an industry standard because the dense grout grid provides natural traction. Textured matte porcelain slabs, honed natural stone, and commercial-grade slip-resistant luxury vinyl tile (LVT) also offer exceptional grip without sacrificing high-end style.
Conclusion
An accessible bathroom should be a peaceful, restorative sanctuary. By pairing universal design principles with premium finishes, you create a space that offers safe independence, barrier-free convenience, and lasting luxury for everyone in your home.
Whether you are planning an immediate zero-threshold conversion or future-proofing your forever home in Orange County, our team at Turn Key Remodel delivers end-to-end design-build craftsmanship tailored to your lifestyle. Explore our custom accessible bathroom design services to schedule your design consultation and bring your vision to life.