
Kitchen Island Ideas with Sinks, Storage, and Seating for Every Home
Plan a Kitchen Island With Sink, Storage, and Seating That Works
A well-planned kitchen island with sink can create one efficient hub for prep, cleanup, storage, and casual meals. Start by deciding its main job, then leave enough counter room around the basin, place dishwashers and trash pull-outs nearby, and protect clear walkways for cooking and seating.
- Use a prep sink when you want a second work zone for rinsing produce and helping multiple cooks work at once.
- Use a larger primary sink when the island will handle daily dishes and cleanup.
- Plan for roughly 18 to 24 inches of counter space beside the sink where possible.
- Allow at least 42 inches of clearance around the island for comfortable traffic flow.
- Add deep drawers, a dishwasher, and concealed waste bins to keep the cleanup zone organized.
The best island is not simply the biggest one. It should support how your household cooks, gathers, and moves through the kitchen – without turning the sink into a barrier between you and your guests.
I am Mark Apicella, Owner and President of Turn Key Remodel in Orange County, with more than eight years of remodeling experience and a team focused on full-service kitchen design and construction. We help homeowners plan every kitchen island with sink detail, from cabinetry and plumbing access to storage, seating, and a smooth on-time remodel.
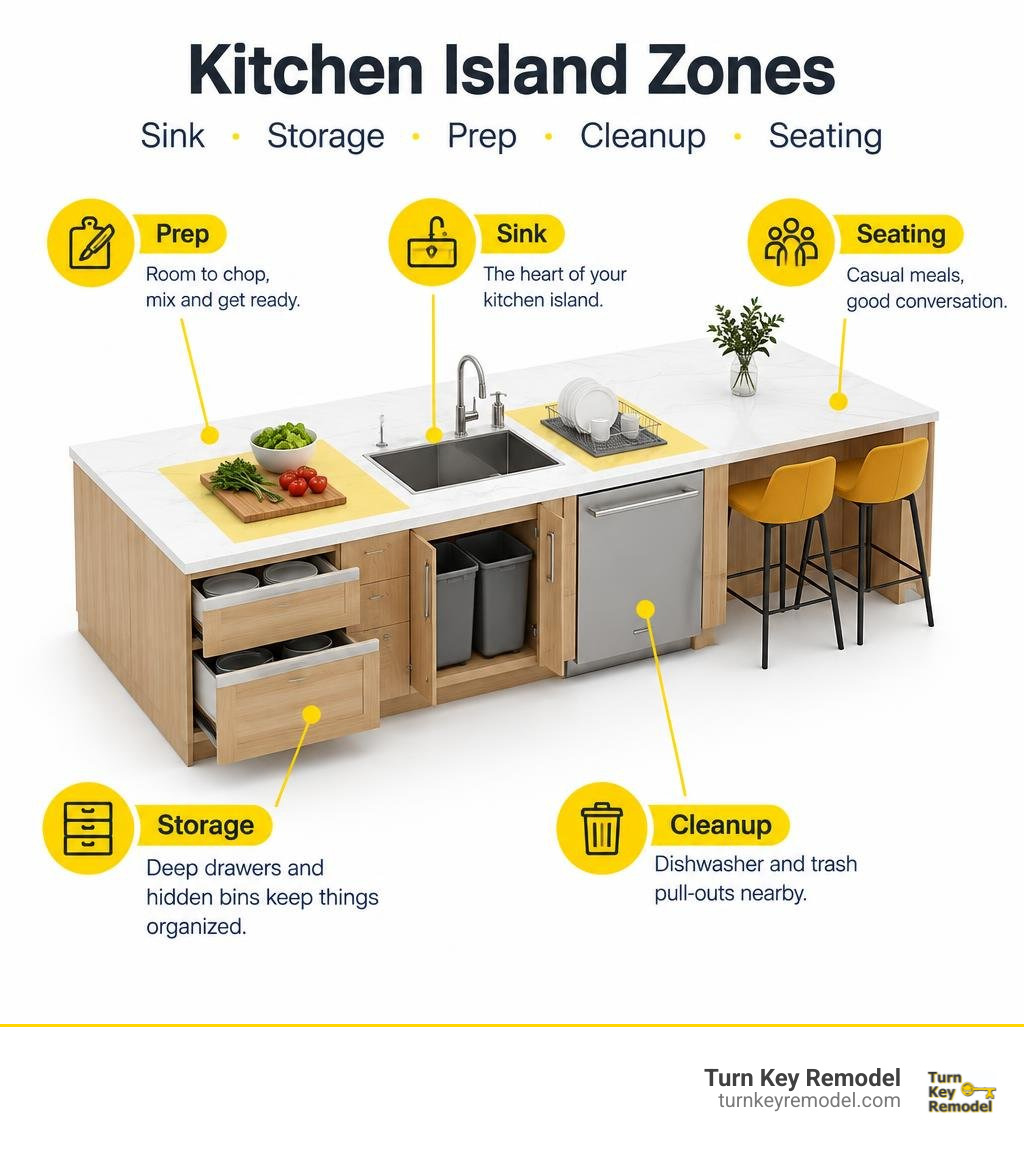
Quick kitchen island with sink definitions:
Key Design Configurations for a Kitchen Island with Sink
When designing a central workstation, ergonomics and movement dictate overall kitchen enjoyment. An island should act as a bridge connecting your primary appliances, not an obstacle you must constantly navigate around. By mapping your culinary routines, you can determine whether a single-tier or multi-level counter makes the most sense.
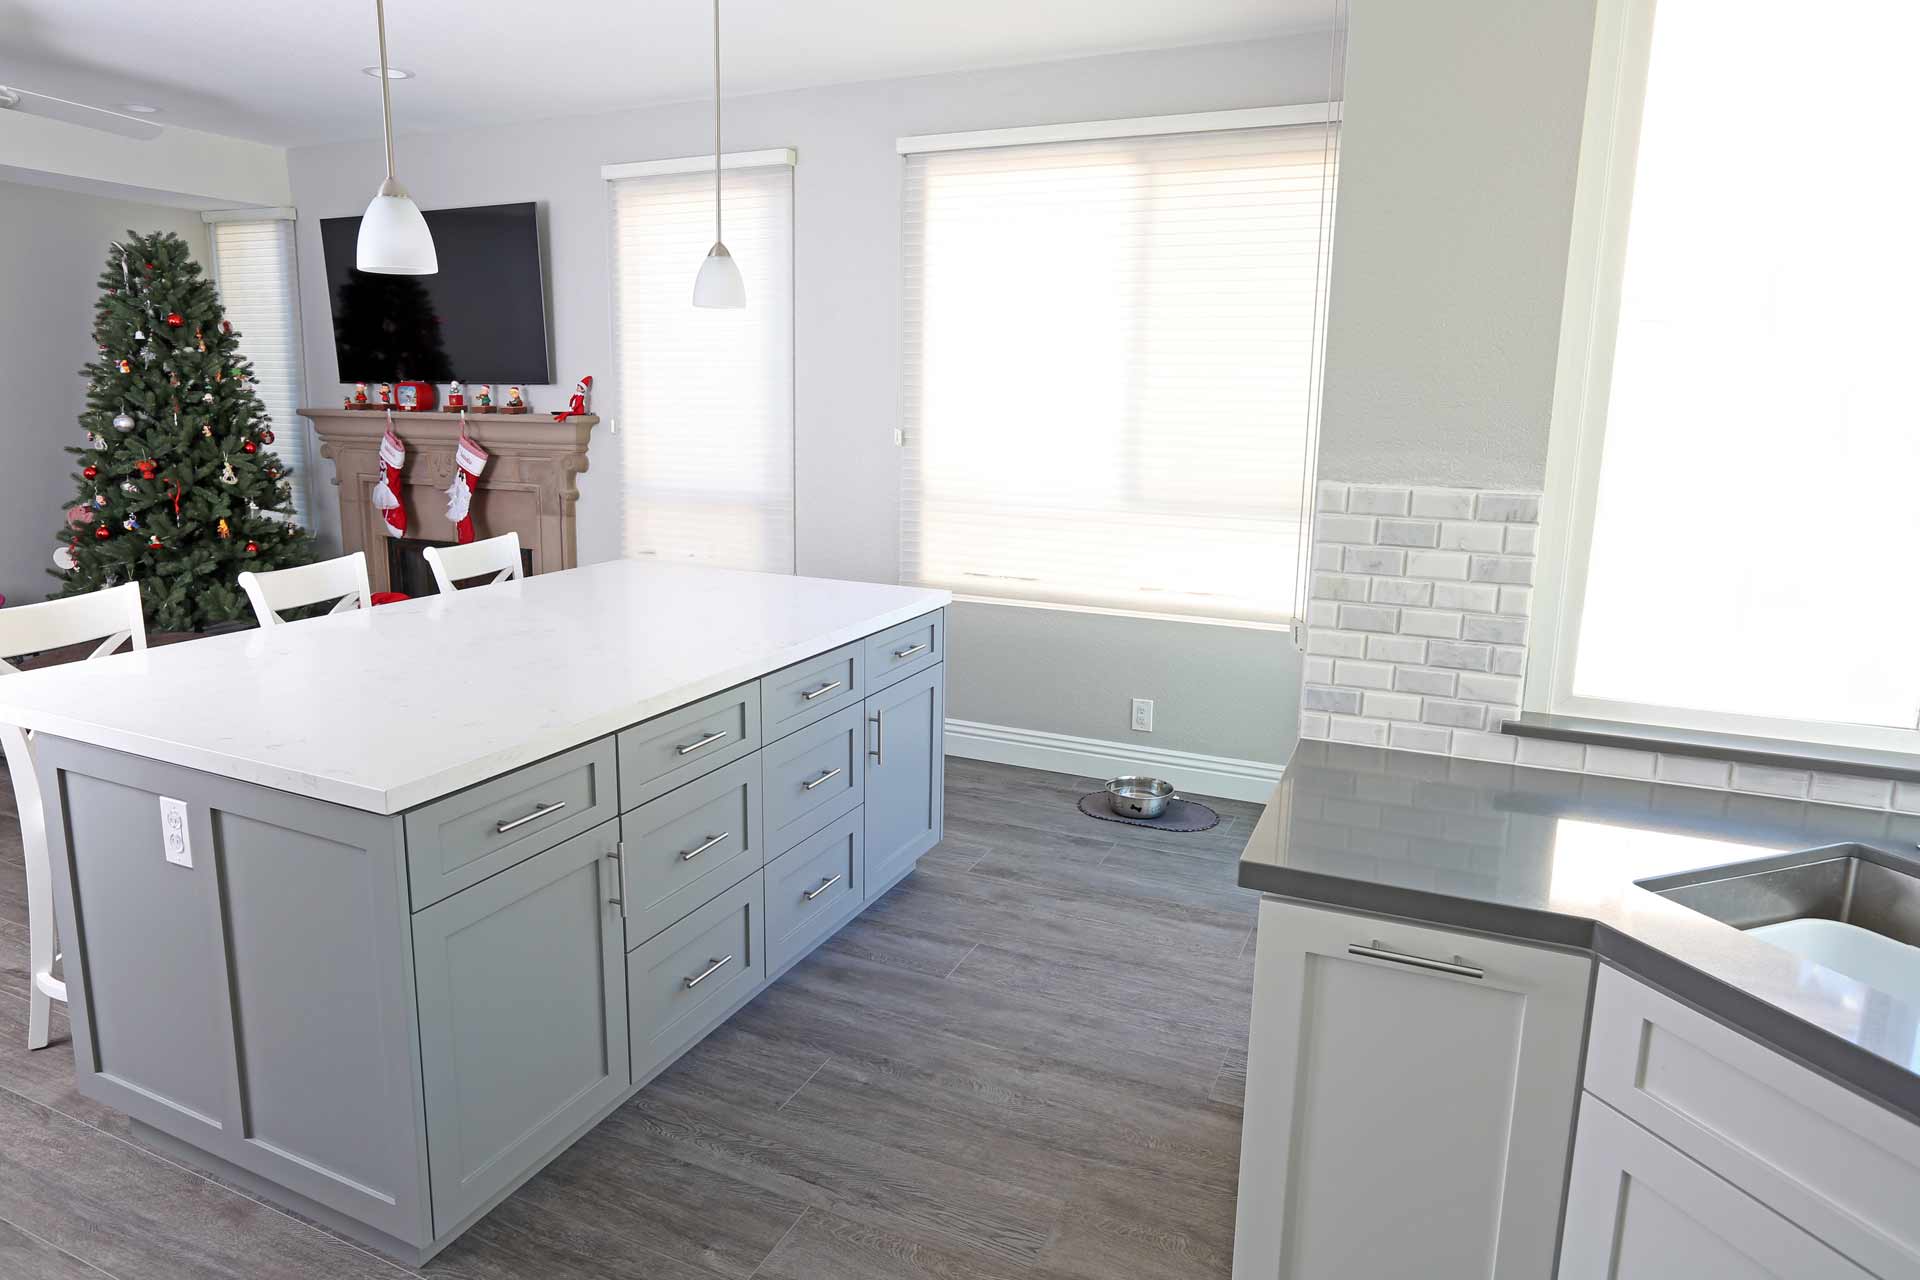
A flat, continuous countertop provides an expansive surface for rolling dough, serving buffets, and engaging with seated guests across the counter. However, if you are concerned about water splashing onto homework or charcuterie boards, a two-tier island with a raised 42-inch bar counter creates a physical splash barrier that hides dirty dishes from view while preserving comfortable stool seating.
Primary vs. Prep Kitchen Island with Sink
Deciding between a main cleanup sink and a secondary prep sink shapes your entire layout:
- Primary Cleanup Sink: Installing a full-sized 30- to 36-inch undermount basin or retrofitting a farmhouse sink into existing cabinets turns the island into your main cleaning zone. This configuration allows the cook to face friends and family rather than staring at a blank perimeter wall during cleanup.
- Secondary Prep Sink: A compact 15- to 18-inch bar or prep sink preserves the vast majority of your island workspace. This setup is ideal for multiple cooks, allowing one person to wash vegetables at the island while another handles dishwashing at the perimeter.
If you love handcrafted solid-wood designs with distinct silhouettes, selecting a Sonoma Fluted Kitchen Island with Sink & Quartz Top can deliver artisan textures while providing dedicated plumbing cutouts for modern plumbing hardware.
Integrating Dishwashers and Trash Pull-Outs Beside the Basin
A sink basin rarely functions in isolation. To create an efficient cleanup triangle, your layout should incorporate key companion elements directly alongside the plumbing core:
- Integrated Dishwasher: Position the dishwasher immediately adjacent to the sink basin (typically 24 inches wide) so rinsing and loading happen without dripping water across walkways.
- Double-Bin Waste and Recycling Pull-Out: Place trash pull-outs on the opposite side of the sink. This allows one person to scrape plates into the bin while another loads dishes.
- Plumbing and Door Clearances: Maintain at least 21 inches of clearance in front of an open dishwasher door to prevent blocking primary foot traffic paths.
Ensuring these base units line up cleanly requires precise leveling and sturdy structural anchoring. Working with experienced pros through our homeowner’s guide to hiring kitchen cabinet installers ensures heavy countertops, integrated sinks, and built-in appliances rest on a square, unyielding foundation.
Combining Island Cooking and Washing Zones
Putting both a cooktop and a sink on a single island creates a comprehensive culinary station, but it demands generous proportions.
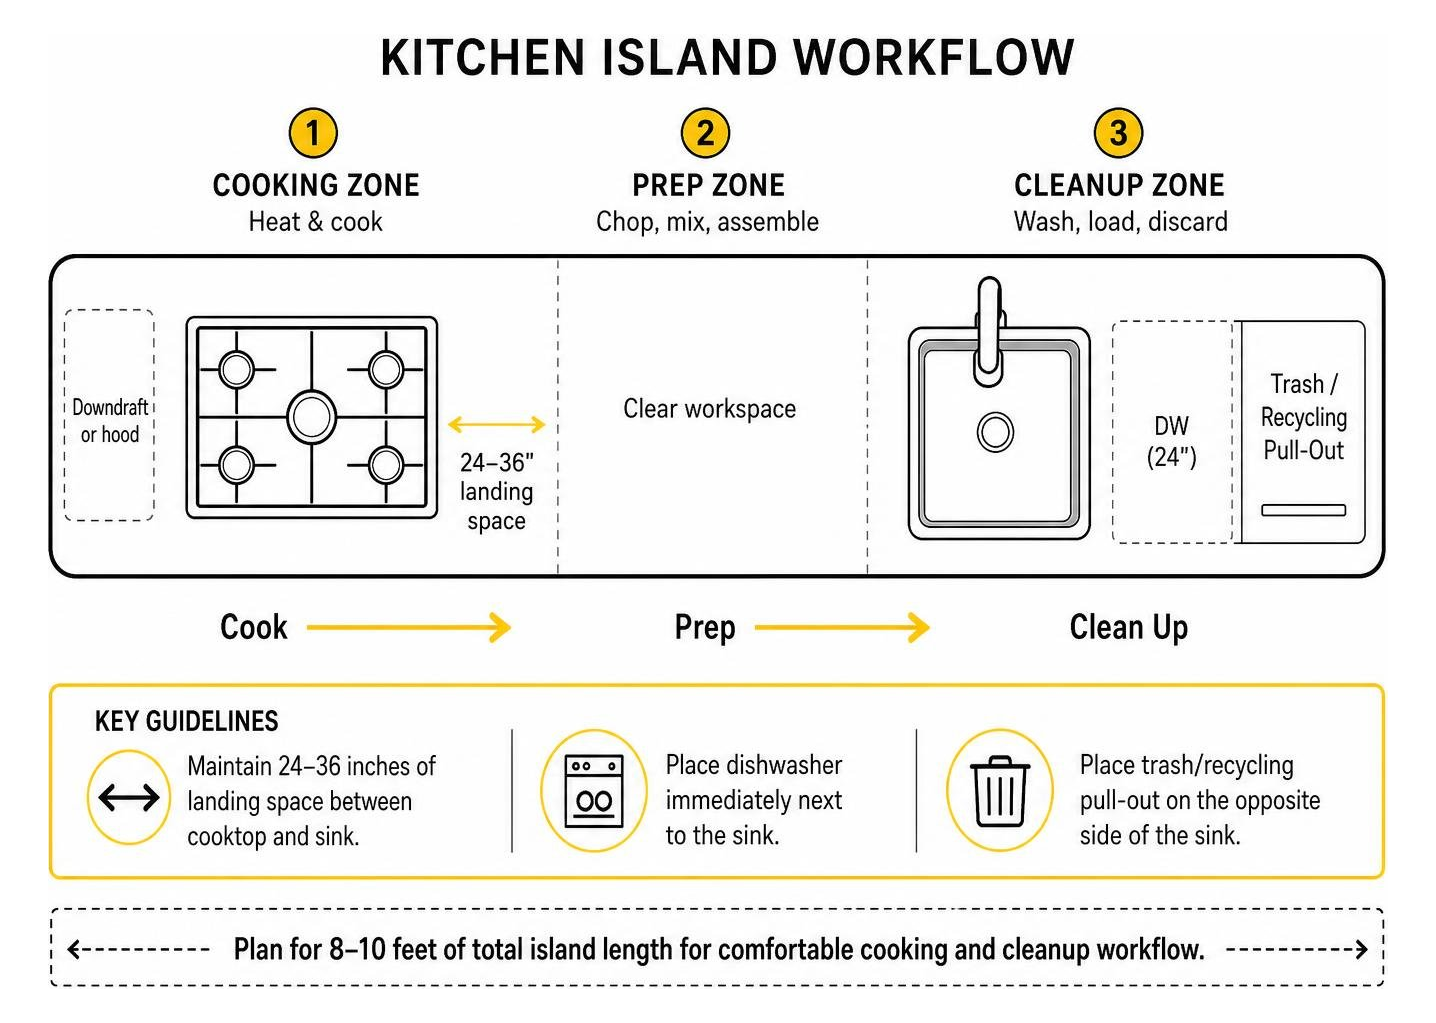
To make this pairing functional and safe, plan for at least 8 to 10 feet of total island length:
- Maintain at least 24 to 36 inches of landing space between the burner edge and the sink rim to ensure hot pans and splashing water never interfere.
- Use a high-performance downdraft ventilation unit or a ceiling-mounted range hood to capture grease and cooking steam without obstructing sightlines.
- If your kitchen footprint is compact, separate the cooktop and sink between the perimeter and island to maintain adequate continuous prep space.
Ergonomics, Dimensions, and Technical Planning
Proper technical planning ensures your island is comfortable to work at, sit around, and walk past daily.

| Island Feature | Recommended Dimension | Ergonomic & Structural Purpose |
|---|---|---|
| Walkway Clearance | 42″ (single cook) to 48″ (multi-cook) | Allows unhindered traffic flow with open cabinet doors and appliances. |
| Counter Depth (No Sink) | 24″ to 30″ | Standard perimeter base depth; compact prep island footprint. |
| Counter Depth (With Sink) | 36″ to 42″+ | Provides splash protection and allows seating overhangs on the reverse side. |
| Seating Width per Person | 24″ minimum | Prevents diners from bumping elbows while seated. |
| Seating Knee Overhang | 12″ (at 42″ bar height) / 15″ (at 36″ counter) | Provides comfortable leg clearance for bar stools. |
| Counter Space Beside Basin | 18″ to 24″ each side | Safe landing zone for dirty dishes, drying racks, and cutting boards. |
Sizing and Clearance for a Kitchen Island with Sink
As a rule of thumb, a kitchen island should occupy no more than roughly 10% of your kitchen’s total square footage. For smaller spaces in Anaheim Hills or Placentia, modular base planning using our step-by-step guide to building a kitchen island with IKEA cabinets can help you achieve custom-looking proportions on a practical budget.
For homes in Yorba Linda and Brea with expansive open layouts, islands stretching 8 to 12 feet long provide ample space for a large undermount sink, dual dishwashers, and seating for four to five people without feeling cramped.
Plumbing and Electrical Requirements Behind the Scenes
Unlike perimeter cabinetry, an island has no back wall to hide vertical plumbing stacks or wall-mounted electrical boxes.
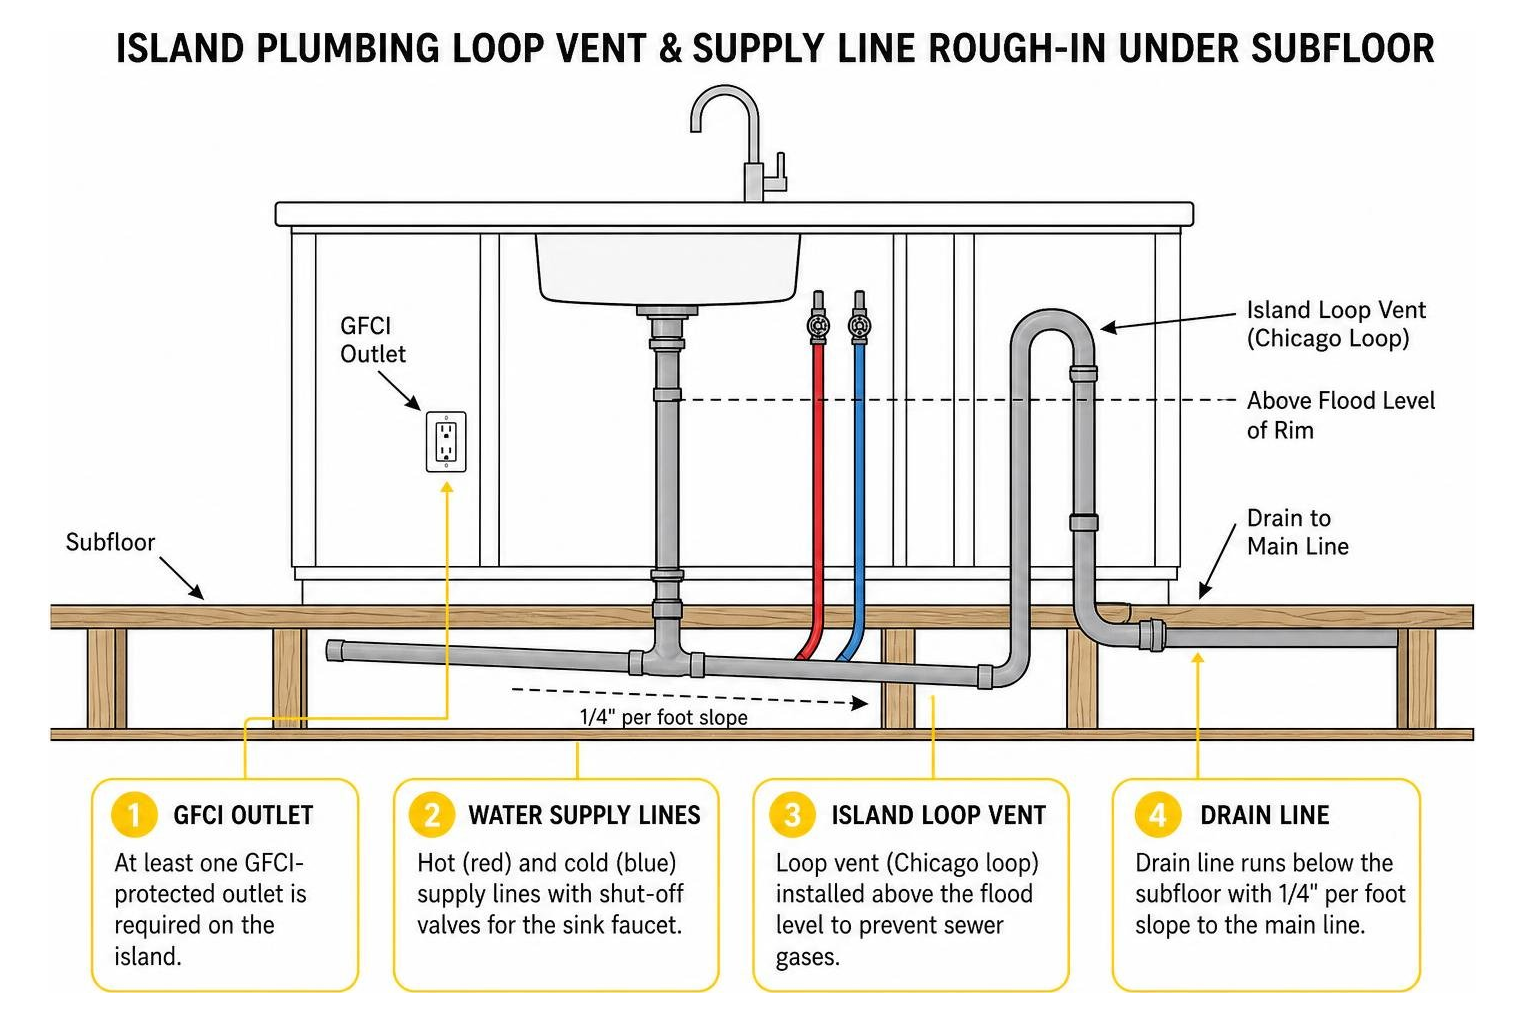
Key technical requirements include:
- Drain Lines & Trenching: Waste lines must run below the subfloor. In homes on concrete slabs, this requires careful concrete trenching and patching to establish the proper 1/4-inch per foot drainage slope.
- Island Loop Venting / AAVs: Because standard vertical vent pipes cannot rise through an open countertop, plumbers install an island loop vent (often called a “Chicago loop”) or an approved Air Admittance Valve (AAV) inside the sink base cabinet to equalize pressure and prevent sewer gases from entering the home.
- Electrical Outlets: Building codes mandate at least one dedicated GFCI-protected electrical outlet on kitchen islands to power blenders, mixers, and mobile devices safely away from the water basin.
When budgeting for these trade-specific rough-ins, referencing our kitchen renovation costs cheat sheet helps ensure all plumbing, mechanical, and electrical requirements are clearly accounted for upfront.
Styling and Material Ideas for Seamless Island Functionality
Your kitchen island acts as the visual centerpiece of the room. Combining resilient surfaces with contrasting finishes creates an inviting, balanced aesthetic.
Many homeowners pair durable quartz or natural stone worktops with rich natural wood bases. For freestanding inspiration, designs like the Terra 78″ Marble Top and Natural Oak Wood Kitchen Island show how organic wood grains and luxury stone tops bring architectural character into modern kitchens.
If you prefer prefabricated freestanding options for smaller spaces, modular units like the IKEA TORNVIKEN kitchen island in off-white oak (also available in the IKEA UK TORNVIKEN format) or the IKEA VADHOLMA black oak island offer compact prep surfaces and open shelving.
Lighting Fixtures and Hardware Accents
Proper lighting highlights your island while providing crucial task visibility over the sink:
- Pendant Scale & Spacing: Hang pendants 30 to 36 inches above the countertop surface, spacing fixtures approximately 24 to 30 inches apart to prevent visual clutter.
- Layered Task Lighting: Complement decorative pendants with recessed ceiling downlights focused directly over the basin rim to eliminate shadows when washing dishes.
- Hardware & Metal Accents: Mixing finishes—such as pairing a matte black gooseneck faucet with warm brushed brass drawer pulls—adds dimension and warmth. Explore our complete guide on kitchen island pendant lighting ideas for helpful fixture pairing concepts.
Storage Solutions from Deep Drawers to Open Shelving
Maximizing the storage under and around the sink keeps counters clean and clutter-free:
- U-Shaped Under-Sink Drawers: Custom pull-outs built around the sink trap and disposal unit utilize otherwise wasted space for sponges, scrubbers, and dish soaps.
- Deep Cookware Drawers: Sturdy drawer slides support heavy cast-iron pans directly across from the cooking range.
- Integrated End-Cap Shelving: Open bookcases on the island’s short ends provide display space for cookbooks and decorative pottery.
- Premium Surfaces: Upgrading to non-porous engineered quartz or sealed quartzite surfaces protects your investment against moisture stains. Check out our recommendations for the best home upgrades that make everyday life feel luxurious to explore surface materials that blend style with low maintenance.
Frequently Asked Questions About Island Sinks
How much space is needed around a sink on a kitchen island?
Plan for at least 18 to 24 inches of clear countertop space on both sides of the sink basin. This provides a safe landing zone for food preparation, cutting boards, and dirty dishes without crowding people sitting nearby.
Does an island sink reduce usable seating and dining space?
Not if your island is planned with sufficient depth. A standard island depth of 36 to 42 inches allows for a front sink basin and a comfortable 12- to 15-inch overhang for seating behind it. A two-tier island design can also provide an elevated 6-inch splash wall to keep diners separated from the sink work area.
How are plumbing pipes and vents installed in a freestanding island?
Plumbing supply and drain pipes run underneath the floor framing or through channels cut into concrete slabs. Because you cannot run a standard vertical plumbing vent through an open island ceiling, plumbers install a specialized island loop vent or a code-compliant air admittance valve (AAV) inside the sink cabinet to ensure proper airflow and drainage.
Conclusion
Integrating a sink into your kitchen island brings workflow efficiency, social connection, and storage convenience together in the center of your home. By balancing sink sizing, clear walkway clearances, and smart plumbing rough-ins, your island will serve as a functional workstation for daily prep and an inviting hub for entertaining.
At Turn Key Remodel, we provide comprehensive design-build services across Orange County—including Yorba Linda, Placentia, Anaheim Hills, Tustin, and Brea. From initial 3D design concepts to structural plumbing and custom cabinetry installation, our team manages every stage of your renovation on time and on budget. Explore our full-service kitchen remodel solutions to start planning your dream kitchen island today.