
Retrofitting a Farmhouse Sink into Existing Cabinets Made Easy
Can You Install a Farmhouse Sink in an Existing Cabinet?
Yes. You can install a farmhouse sink in an existing cabinet without replacing all your cabinetry, but the right sink and support plan matter. For the simplest retrofit, choose a short-apron or self-trimming model sized for your cabinet, remove the false drawer front if needed, and build a solid internal support frame before setting the sink.
Traditional full-apron sinks often need more work. Their taller apron can require cutting the cabinet face frame, trimming or replacing doors, and possibly altering the countertop. Heavy fireclay and cast-iron models can exceed 100 pounds empty, so silicone is only a water seal – not structural support.
A successful retrofit starts with accurate cabinet, countertop-cutout, apron-height, and plumbing measurements. It also requires a level wood cradle or ledger that transfers the sink’s weight safely to the cabinet sides and floor.
I’m Mark Apicella, Owner and President of Turn Key Remodel in Orange County, with more than eight years of remodeling experience managing kitchen upgrades from design through installation. In this guide, I will explain how to plan a farmhouse sink in existing cabinet project while protecting your counters, cabinetry, and plumbing.
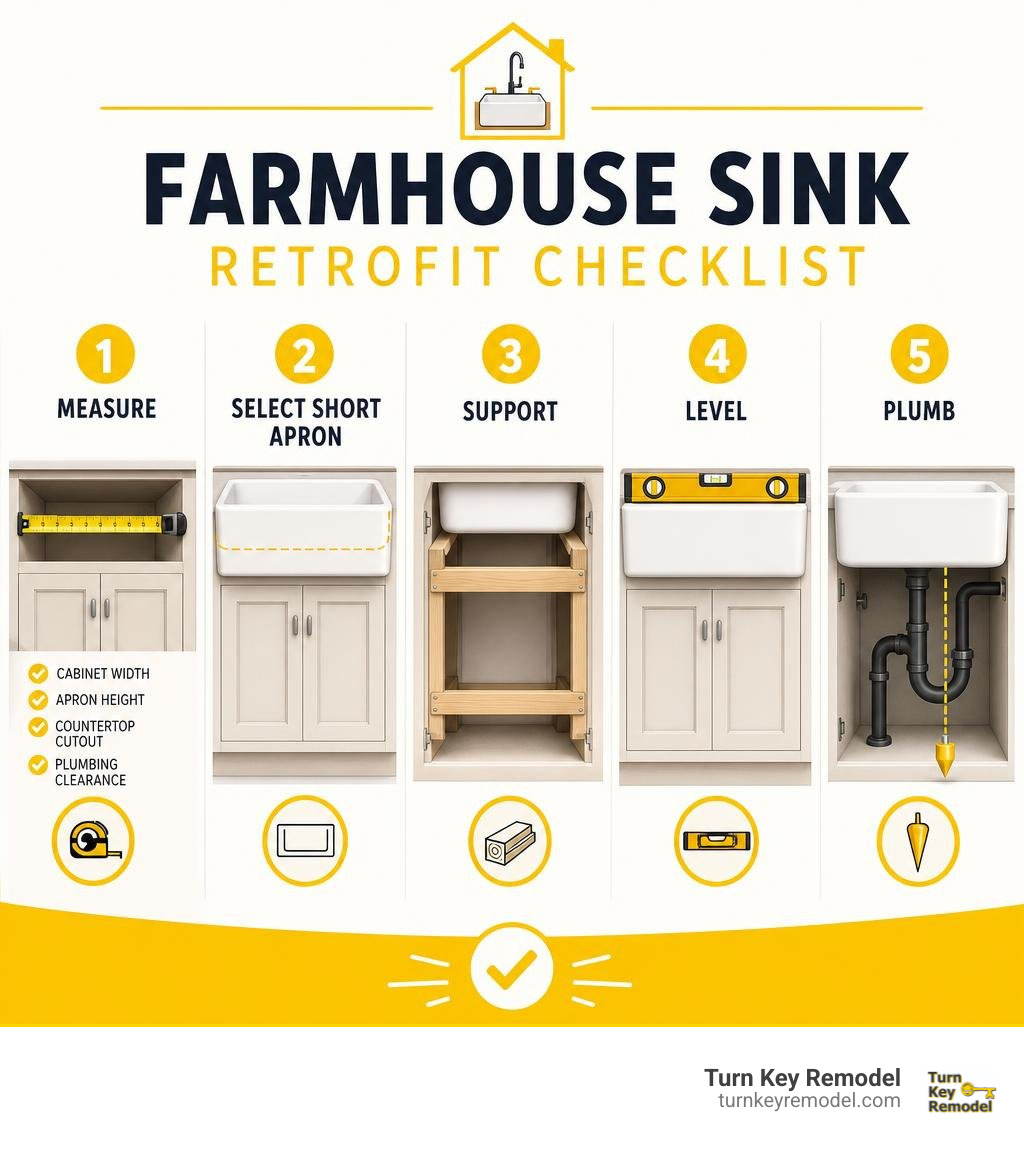
Basic farmhouse sink in existing cabinet vocab:
Understanding Retrofit vs. Traditional Apron-Front Sinks
When upgrading your kitchen, you do not need to gut your layout to achieve an upscale aesthetic. In fact, following a few practical small kitchen budget remodel tips can give you high-end style without an astronomical price tag. Choosing the right sink style is the most critical decision in this process.
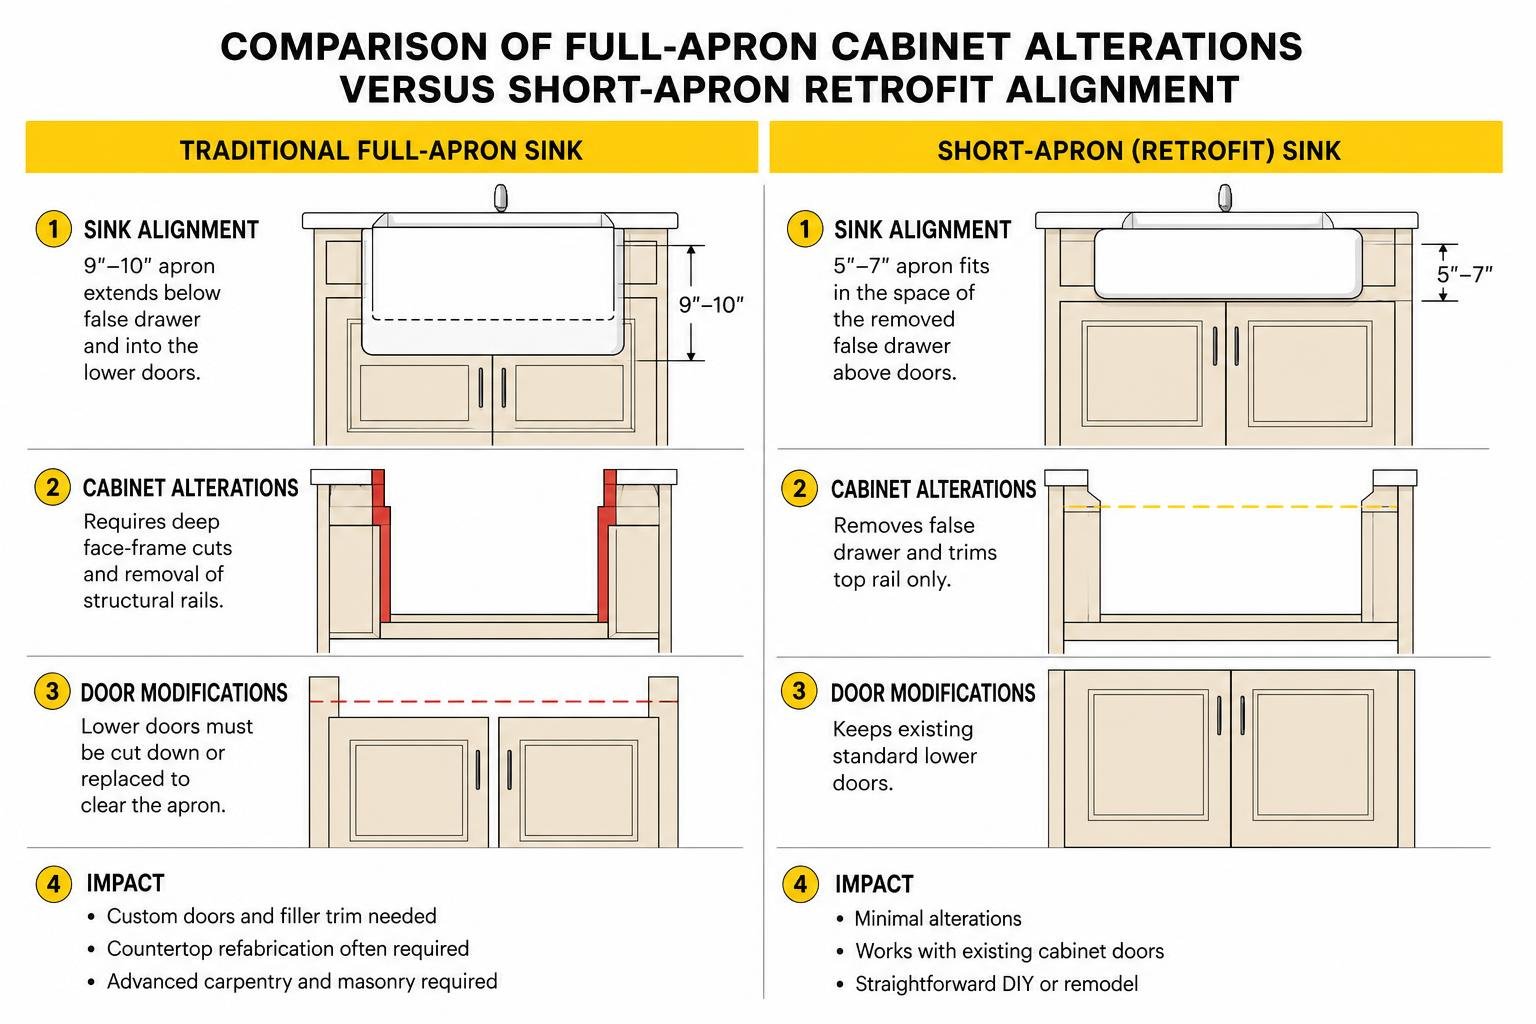
Apron-front sinks fall into two major categories: traditional full-apron models and short-apron retrofit models. A traditional farmhouse sink features an apron that extends 9 to 10 inches down the front of your base cabinetry. Because standard builder-grade sink base cabinets feature top dummy drawers (false drawer fronts) paired with full-height lower doors, a 10-inch apron will collide directly with your existing doors. Installing a full-apron sink requires cutting the face frame significantly, ordering custom-shortened cabinet doors, and completely reworking the front elevation.
In contrast, a retrofit farmhouse sink (often called a short-apron or self-trimming sink) is specifically engineered for existing standard cabinetry. These sinks feature an apron measuring roughly 5 to 7 inches tall—such as the popular Kohler Whitehaven, which delivers a full 9-inch-deep basin while utilizing a 6 11/16-inch front apron. When you remove the false drawer fronts from a standard cabinet, the short apron fits neatly into that vacant vertical space, resting entirely above your existing lower doors. Many retrofit designs also incorporate self-trimming lips that overlap the rough cabinet cuts, concealing minor cosmetic gaps.
| Feature | Short-Apron Retrofit Sink | Traditional Full-Apron Sink |
|---|---|---|
| Apron Height | 5″ to 7″ | 9″ to 10″ |
| Cabinet Alterations | Minimal (removes false drawer, trims top rail) | Major (deep face-frame cuts, custom filler trim) |
| Door Modifications | Keeps existing standard doors | Requires cutting/replacing lower cabinet doors |
| Countertop Compatibility | Matches existing cutout footprints | Often requires custom stone refabrication |
| Installation Difficulty | Moderate DIY / straightforward remodel | Advanced carpentry & masonry required |
Retrofit vs Traditional Farmhouse Sink in Existing Cabinet Frameworks
Standard residential base cabinets typically measure 30, 33, or 36 inches wide. Standard manufacturer guidelines recommend that your sink base cabinet be roughly 3 inches wider than your sink basin, though many dedicated retrofit models are engineered to fit flush into exact cabinet widths.
The primary structural hurdle is vertical face-frame clearance. Traditional sink bases have a low horizontal support rail situated well below the false drawer line. If you drop a standard deep-apron sink into that layout, you must rebuild the front perimeter. Conversely, utilizing dedicated resources for retrofitting apron sinks into standard bases shows how a short apron bridges the gap without destabilizing your lower door hinges or compromising the cabinet face frame.
Comparing Sink Materials: Fireclay, Cast Iron, and Stainless Steel
The material you choose impacts both the visual appeal of your kitchen and the structural demands placed on your cabinet box:
- Fireclay: Molded from ceramic clay and fired at intense temperatures, fireclay offers classic beauty and extreme resistance to chips and fading. However, fireclay sinks are very heavy (often 100 to 140 pounds) and have slight dimensional variances due to the kiln-firing process.
- Enameled Cast Iron: Cast iron provides unmatched gloss and vintage appeal. It is extraordinarily heavy (frequently exceeding 130 to 150 pounds). It requires robust internal carpentry to avoid cabinet sag over time.
- Stainless Steel: The lightest and easiest material to install. Standard 16-gauge or 18-gauge stainless steel models place minimal load on stock cabinetry. While lightweight, keep in mind that stainless basins can show water spots and hairline scratches over months of heavy daily use.
- Granite Composite: Highly durable, heat-resistant, and scratch-resistant. Composite basins offer a clean, modern aesthetic with moderate weight demands.
Step-by-Step: Installing a Farmhouse Sink in Existing Cabinet Bases
Before grabbing your reciprocating saw, review your broader scope of work. Looking at our cheat sheet to kitchen renovation costs and process helps you organize your schedule so plumbing shutoffs and carpentry occur in the right sequence.

Cabinet Modifications and Face Frame Trimming
- Clear the Workspace and Remove Hardware: Shut off the hot and cold water shutoff valves beneath the sink. Disconnect your existing supply lines, P-trap, and garbage disposal. Remove the cabinet doors and set them safely aside.
- Detach the False Drawer Fronts: Reach inside the cabinet and back out the pocket screws or clips holding the decorative false drawer fronts in place. Pop off the front panels.
- Scribe and Mark the Cut Lines: Measure the exact height and width of your sink’s apron. Use painter’s tape to mask off the cabinet face frame, and mark your cut lines with a pencil and carpenter’s square.
- Execute Precise Cuts: Use an oscillating multitool or a fine-tooth jigsaw to cut the top horizontal rail and any center stiles flush with your marked dimensions. Hand saws offer extra control near delicate cabinet corners.
- Refinish Exposed Edges: Sand down cut wood edges. Seal any raw, exposed plywood or hardwood edges using matching stain, paint, or water-resistant polyurethane to protect the core wood against moisture.
Building the Internal 2×4 Support Cradle
A farmhouse sink filled with water and cookware can easily exceed 250 to 300 total pounds. Cabinet sidewalls alone cannot bear this concentrated load. You must build a dedicated 2×4 internal cradle:
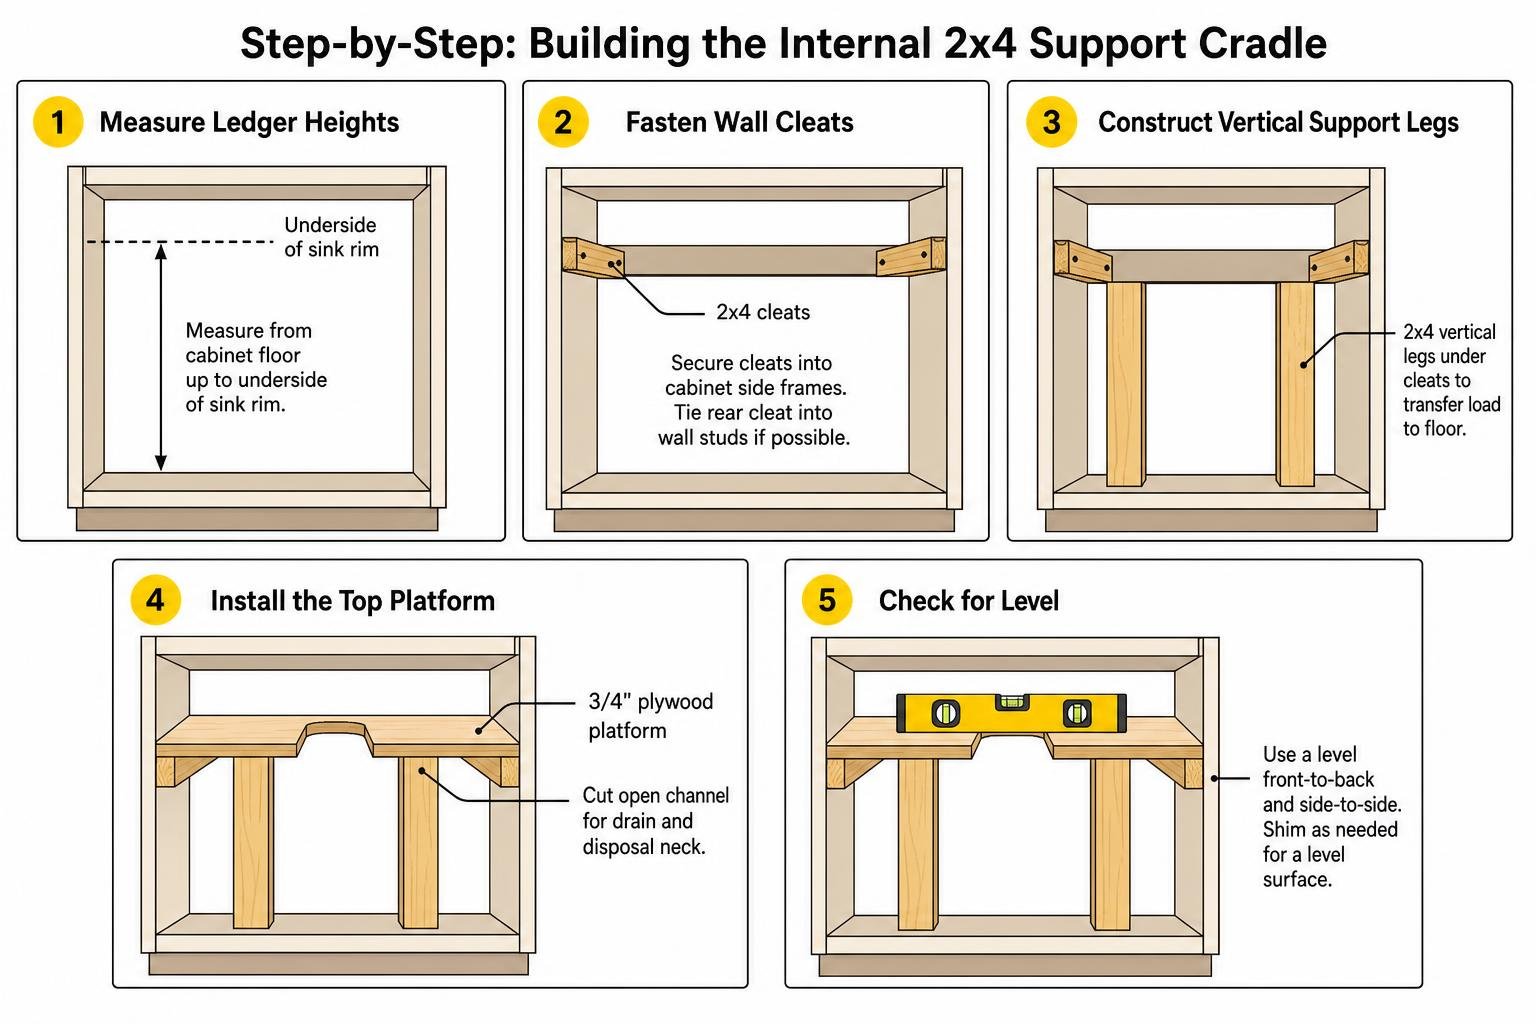
- Measure Ledger Heights: Measure from the cabinet floor up to the underside of the installed sink rim. Deduct the thickness of your horizontal support platform (typically 3/4-inch exterior-grade plywood).
- Fasten Wall Cleats: Cut 2×4 structural lumber cleats to fit the interior depth of the cabinet sidewalls. Secure these cleats into the cabinet side frames using 2 1/2-inch or 3-inch wood screws. If your cabinet backs directly onto wall studs, tie your rear cleat directly into the wall framing.
- Construct Vertical Support Legs: Cut vertical 2×4 jack studs to sit directly underneath your horizontal cleats, transferring all downward force straight to the kitchen subfloor or cabinet base plinth.
- Install the Top Platform: Cut a 3/4-inch plywood shelf to span the cleats. Use a jigsaw to cut out an open channel in the center of the plywood to accommodate the sink drain and garbage disposal neck.
- Check for Level: Place a spirit level across the platform from front-to-back and side-to-side. Use composite shims under the sink base to achieve a perfectly level surface.
Countertop Preservation and Drop-In vs. Undermount Placement
Protecting existing granite, quartz, or solid surface counters requires patience. Reviewing engineering techniques for replacing a sink without removing countertops confirms that preserving your stone depends entirely on choosing the right sink rim profile:
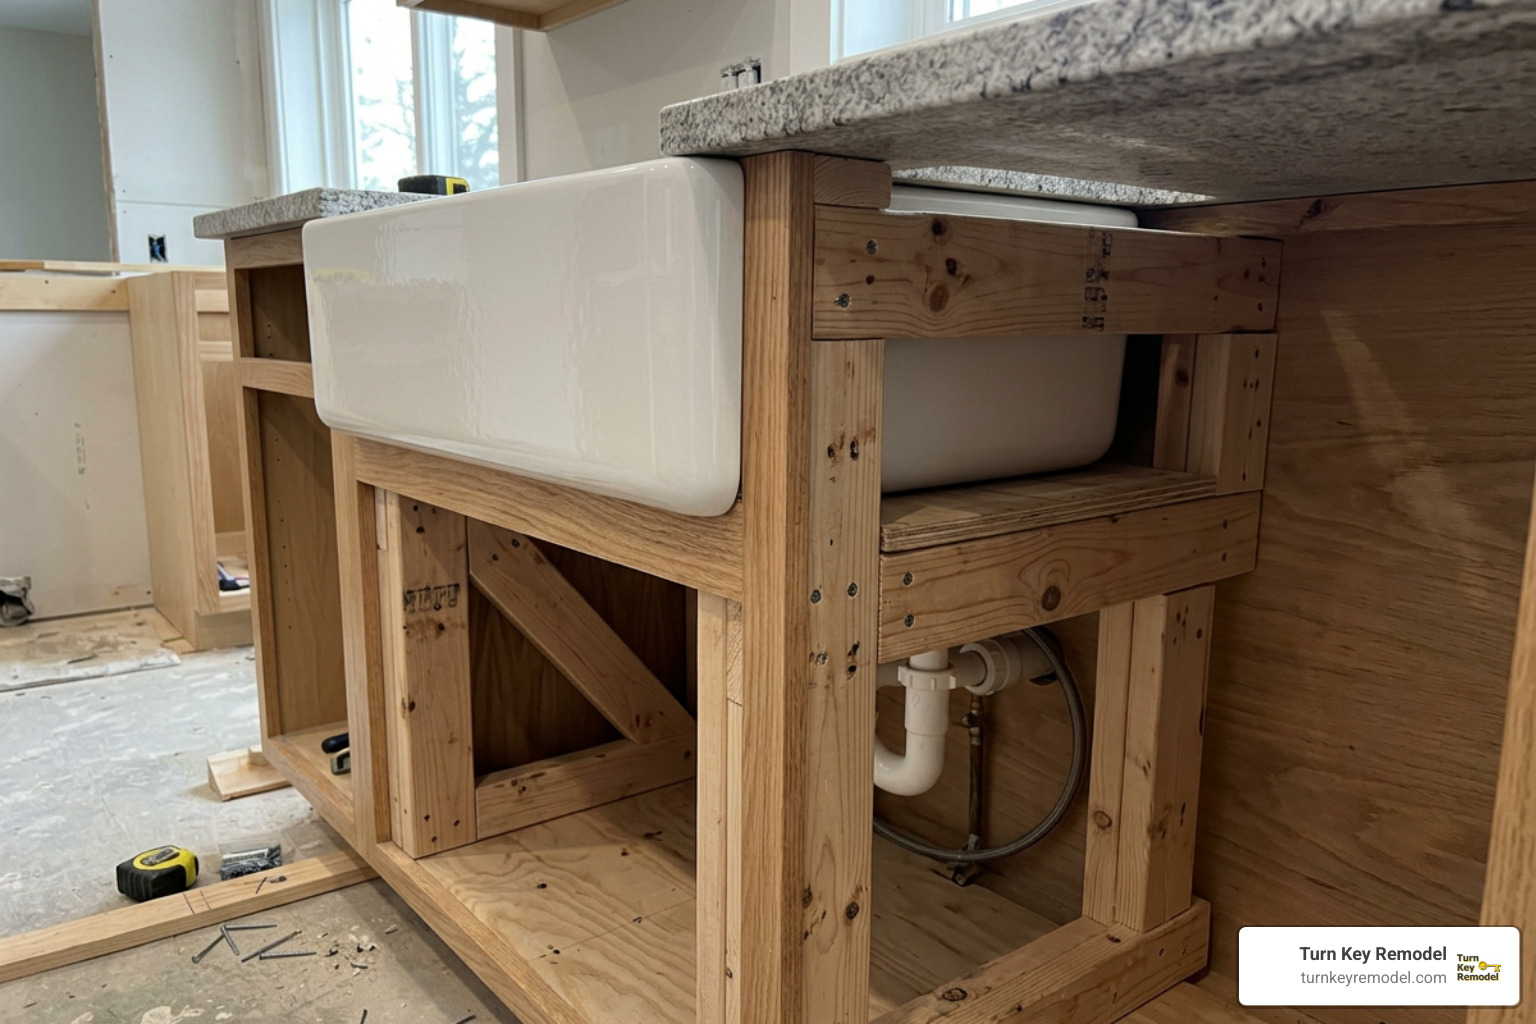
- Undermount Retrofit: The top rim of the sink mounts flush beneath the polished bottom edge of your countertop cutout. Apply a continuous 100% silicone bead around the rim, jack the sink upward from within your wooden cradle using shims or mechanical supports, and verify a tight, uniform seal against the stone.
- Drop-In (Top-Mount) Retrofit: If you have laminate or tile counters with unfinished cutout edges, choose a top-mount retrofit sink. The sink’s overlapping perimeter rim rests directly on top of the counter surface, hiding raw cuts while the apron hangs over the front of the cabinet. Apply silicone beneath the rim to prevent water infiltration.
Plumbing and Drainage Reconfigurations for Deeper Basins
One commonly overlooked hurdle when retrofitting a farmhouse sink is the drain height. Standard drop-in sinks are 6 to 8 inches deep, whereas farmhouse basins are commonly 9 to 10 inches deep.
Because the sink basin sits lower, the drain basket and garbage disposal discharge port drop 2 to 4 inches lower inside your cabinet. Water cannot flow uphill: your sink drain outlet must sit higher than the sanitary tee outlet in your home’s wall.

- Inspect Rough-In Height: Measure the distance from your kitchen floor to the center of the drain pipe exiting the wall. If your new deep basin positions the P-trap outlet below that wall pipe, you will experience standing water and chronic drainage issues.
- Lowering the Sanitary Tee: If there isn’t enough drop for proper gravity drainage, open the drywall behind the sink base cabinet and lower the plumbing sanitary tee by several inches.
- Disposal Clearance: Always install a standard 3.5-inch drain opening sink to ensure seamless compatibility with modern waste disposal units.
Critical Pitfalls to Avoid When Retrofitting Apron Sinks
- Relying on Silicone for Support: Silicone is strictly an elastic waterproofing barrier, not an adhesive fastener. Never rely on silicone or basic sink clips to hold heavy fireclay or cast iron basins in place. Always build a complete load-bearing timber cradle.
- Neglecting Cabinet Door Swing Clearance: Double-check that the lower edge of the sink apron does not obstruct your lower cabinet doors. If the apron sits too low, your cabinet doors won’t open or close properly.
- Skipping the Dry Fit: Never apply adhesives before completing a comprehensive dry fit. Slide the sink onto its internal framing without glue or silicone to ensure the face frame, countertop overhang, and drain holes align cleanly.
- Over-Cutting the Face Frame: Cut less material than you think you need initially. You can always trim an extra 1/8-inch of wood with a sanding block or rasp, but replacing mistakenly cut cabinet stiles requires extensive filler and repainting.
- Ignoring Sink Leveling: A basin that slopes even slightly backward or sideways will cause water to pool in the corners, leading to mineral build-up and constant water spotting.
If you are planning an extensive kitchen overhaul, browsing our kitchen gallery can give you plenty of layout ideas and demonstrate how seamless a retrofitted sink looks alongside refreshed millwork.
Frequently Asked Questions About Farmhouse Sink Conversions
Can I Fit a Farmhouse Sink in Existing Cabinet Layouts Without Modifying Stone Counters?
Yes. If you choose a retrofit farmhouse sink engineered to match your existing countertop cutout dimensions, you will not need to hire a stone fabricator to cut your granite or quartz. The sink slides directly beneath the existing stone cutout while its front apron drops over the trimmed cabinet face frame.
Do I Need to Cut or Replace My Cabinet Doors?
If you select a short-apron retrofit sink (with an apron height of 5 to 7 inches), your existing cabinet doors will typically remain fully functional without cutting. However, if you choose a traditional 10-inch full-apron sink, the basin will extend into the door opening, requiring you to cut down your existing doors or order custom replacement fronts.
Is Silicone Sealant Enough to Support a Heavy Farmhouse Sink?
No. Silicone sealant provides a water-tight perimeter to prevent moisture from seeping into your lower cabinetry, but it has zero structural load-bearing capacity for heavy basins. Sinks made of fireclay, cast iron, or thick composite materials require a dedicated 2×4 wooden ledger frame built inside the cabinet base to transfer weight safely down to the floor.
Conclusion
Retrofitting an apron-front sink into your existing kitchen is one of the most transformative upgrades you can make. By choosing a short-apron retrofit model, constructing a sturdy internal 2×4 support cradle, and carefully checking your plumbing rough-in heights, you can enjoy all the rustic character of a farmhouse basin without replacing your surrounding cabinets.
While a short-apron retrofit is a manageable project for confident DIYers, handling custom carpentry, heavy fireclay basins, and stone modifications requires careful precision. If you are located in Orange County—including Yorba Linda, Placentia, Anaheim Hills, Tustin, or Brea—our team at Turn Key Remodel is here to help. We bring over 20 years of on-time, on-budget craftsmanship, comprehensive design-build services, and clear communication to every project.
Ready to elevate your kitchen with flawless finishes and durable craftsmanship? Explore our custom cabinetry remodeling services today to bring your dream kitchen to life!