
Everything to Know About Bathroom Conversion from Tub to Shower
What to Know About a Bathroom Conversion From Tub to Shower
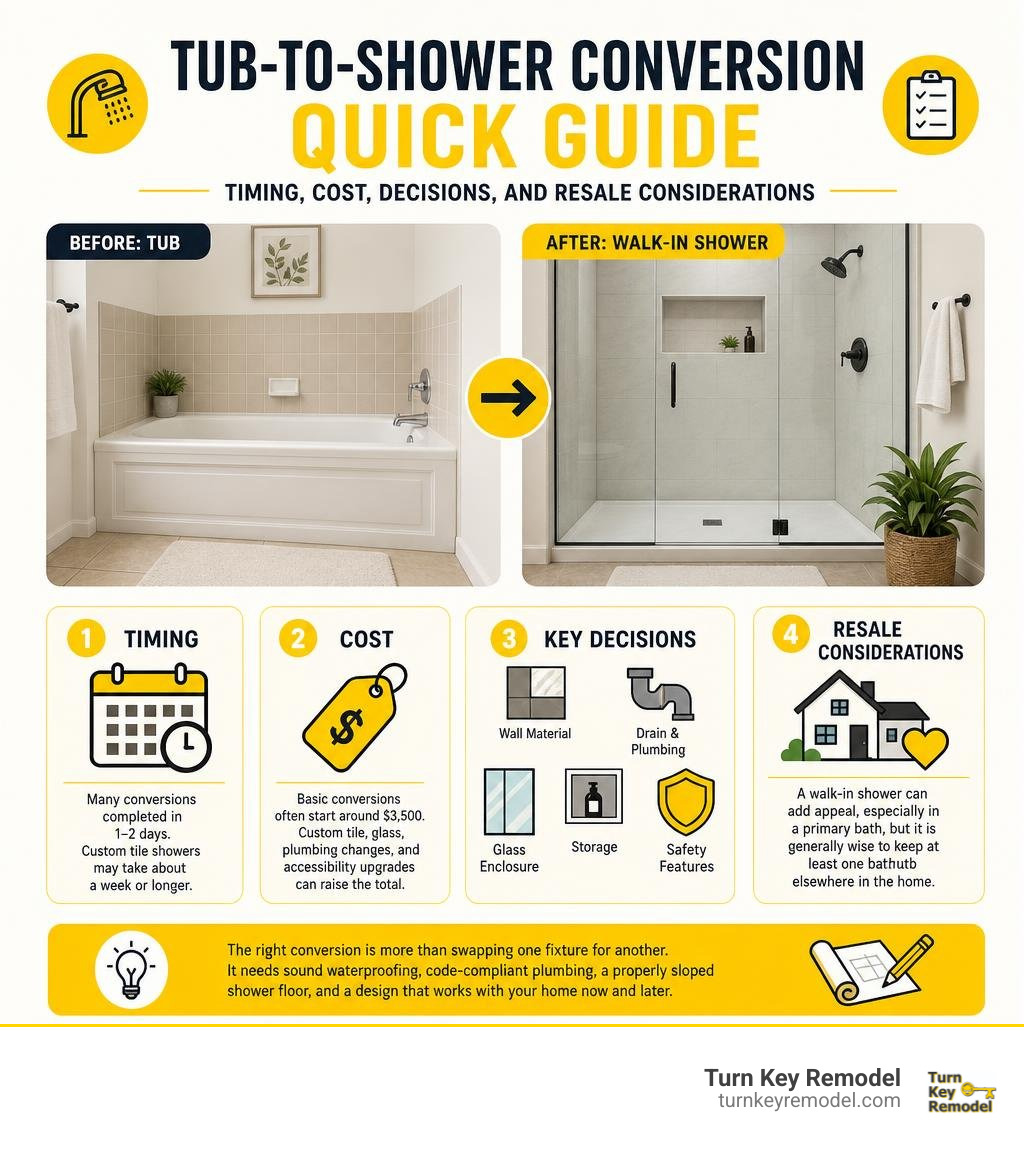
A bathroom conversion from tub to shower replaces an existing bathtub with a shower that better fits how you use the space each day. In many homes, the work can be completed in one to two days with a prefabricated shower system, while a custom tile shower may take about a week or longer.
- Best for: Homeowners who rarely use the tub, want easier entry, or prefer a cleaner, more open look.
- Typical cost: Basic conversions often start around $3,500, while custom tile, glass, plumbing changes, and accessibility upgrades can raise the total substantially.
- Key decisions: Shower wall material, drain and plumbing needs, glass enclosure, storage, and safety features.
- Resale consideration: A walk-in shower can add appeal, especially in a primary bath, but it is generally wise to keep at least one bathtub elsewhere in the home.
The right conversion is more than swapping one fixture for another. It needs sound waterproofing, code-compliant plumbing, a properly sloped shower floor, and a design that works with your home now and later.
I’m Mark Apicella, Owner and President of Turn Key Remodel in Orange County, CA. With more than eight years in remodeling and a team experienced in full-service bathroom projects, I help homeowners plan each bathroom conversion from tub to shower around clear design choices, dependable communication, and quality craftsmanship.
Easy bathroom conversion from tub to shower word list:
Why Convert a Bathtub to a Walk-In Shower?
For many homeowners across Orange County—whether in Placentia, Brea, or Yorba Linda—the daily routine rarely involves soaking in a bathtub. Climbing over high tub walls every morning can feel cumbersome and unnecessary. Converting an underutilized bathtub into a modern walk-in shower reclaims valuable floor space, enhances daily convenience, and modernizes the entire room.
Daily Convenience and Spatial Freedom
Standard bathtubs take up a significant footprint, yet much of that space goes unused during a quick morning shower. A bathroom conversion from tub to shower expands the usable showering space by up to 40% within the exact same footprint. The elimination of high tub walls makes entering and exiting effortless, creating an open, airy feeling even in smaller hall bathrooms.
Accessibility and Aging-in-Place
Safety is a primary motivation for replacing a bathtub. According to national health statistics, the bathroom is one of the most common locations for home falls, with tub thresholds presenting a major tripping hazard. A walk-in shower eliminates this barrier. With options for low-threshold or curbless entry, integrated grab bars, non-slip flooring, and built-in benches, homeowners can ensure their bathroom remains safe and comfortable for decades to come.
The Conversion Process: Step-by-Step
Understanding how a conversion unfolds helps eliminate surprise and ensures your project stays on schedule. While single-day composite installs offer rapid results, custom tile conversions follow a systematic multi-step process engineered for maximum longevity.
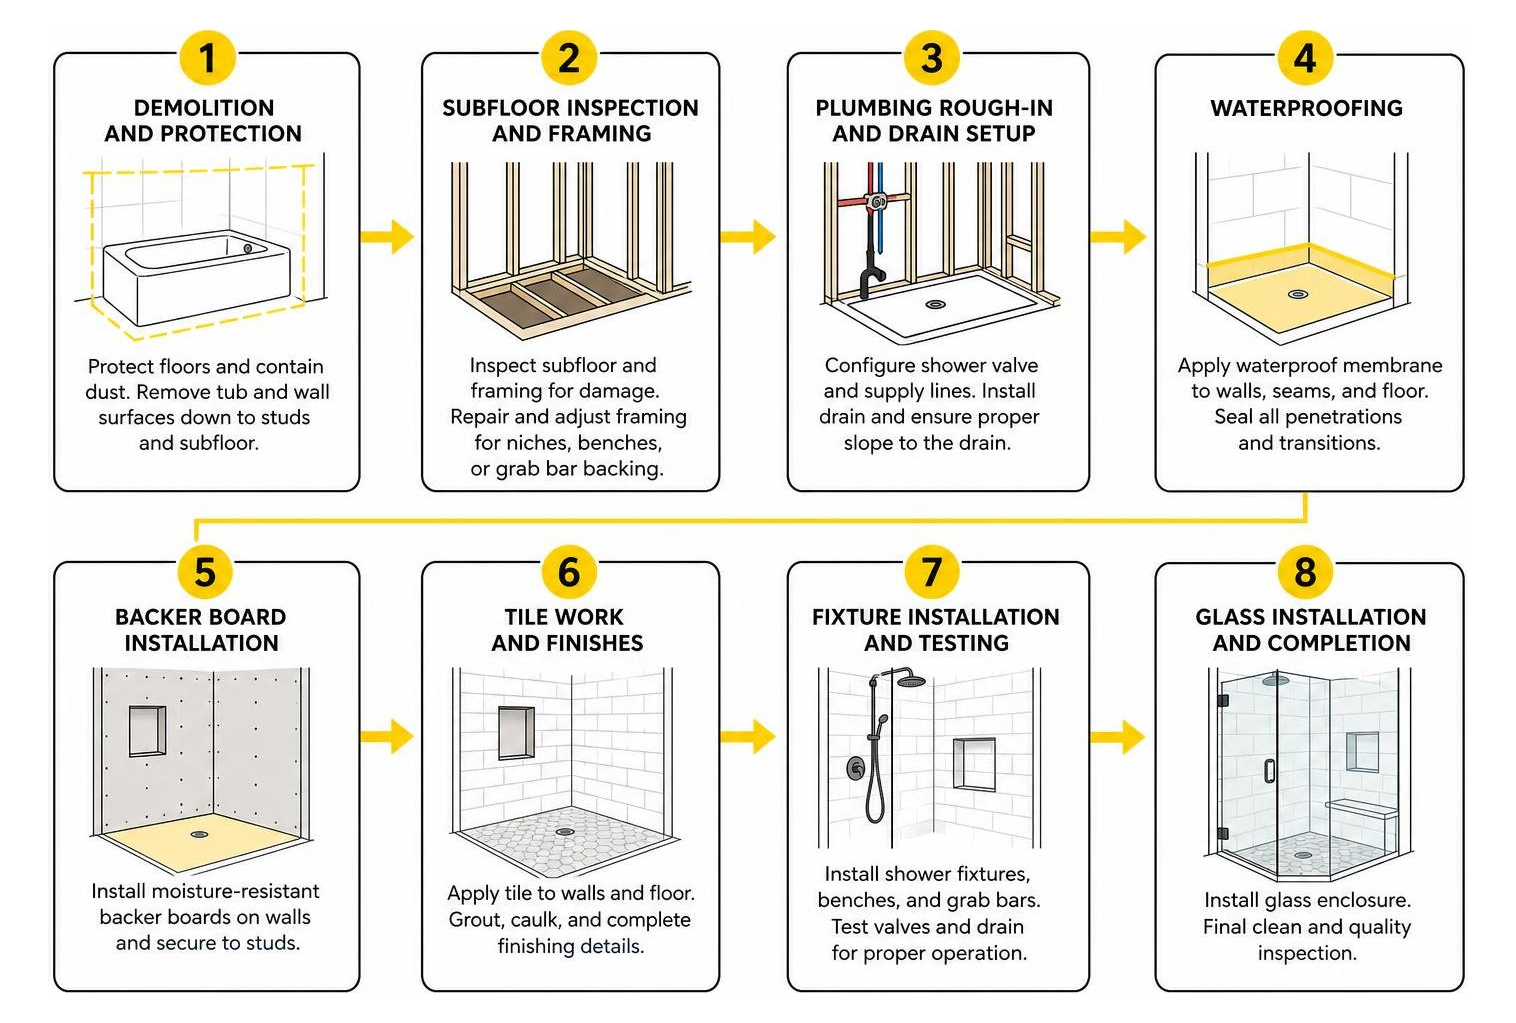
Step 1: Demolition and Protection
Before any structural work begins, heavy floor protection and dust barriers are installed throughout the home. Installers then carefully remove the old bathtub, surrounding wall panels, or tile down to the wall studs and subfloor.
Step 2: Subfloor Inspection and Framing
Once the old tub is removed, the team inspects the exposed subfloor and structural framing for hidden water damage or rot. Any weakened joists or subfloors are repaired immediately. Framing adjustments are made to accommodate custom niches, bench seats, or grab bar backing.
Step 3: Plumbing Modifications
Converting a tub to a shower requires specific mechanical updates:
- Drain Relocation and Upsizing: Tubs typically rely on a 1.5-inch drain located at one end. Modern plumbing codes require a 2-inch drain pipe for showers to handle higher water flow and prevent overflow, usually centered in the new base.
- Valve Adjustment: Shower valves must be relocated higher on the wall (typically 48 to 80 inches above the finished floor) compared to lower bathtub combination valves.
Step 4: Waterproofing Installation
Waterproofing is the single most critical phase of any shower installation. For custom tile showers, continuous waterproofing membranes like Schluter-KERDI are bonded directly to cement board or waterproof backing boards. This creates a completely impenetrable barrier that prevents moisture from reaching the framing.
Step 5: Base and Wall Installation
Depending on your project scope, either a factory-engineered acrylic base or a hand-sloped mortar pan is installed. Once the base is set and tested for leaks, wall surfaces—whether non-porous composite panels or custom porcelain tiles—are installed.
Step 6: Fixtures, Glass, and Trim
After tile or wall panels are cured and grouted, shower heads, handheld sprayers, thermostatic valves, and frameless glass enclosures are installed.
How Long Does a Tub-to-Shower Conversion Take?
The duration of a bathroom conversion from tub to shower depends primarily on the materials selected and structural scope:
| Conversion Type | Typical Timeline | Best Suited For |
|---|---|---|
| Acrylic / Composite System | 1 – 2 Days | Fast turnarounds, minimal disruption, budget-conscious updates |
| Essential Tile Conversion | 3 – 5 Days | Classic porcelain tile, standard glass doors, mid-range budgets |
| Custom Luxury Tile & Stone | 7 – 10+ Days | Large-format tile, curbless entries, custom benches, frameless glass |
Prefabricated acrylic and composite systems can be installed in as little as 6 to 8 hours because components are custom-measured off-site and fitted directly into the existing alcove. Custom tile installations require dedicated time for subfloor leveling, pan sloping, membrane drying, detailed tile setting, grouting, and custom glass fabrication.
For homeowners in Placentia and throughout Orange County seeking clear project timelines, our team plans every phase carefully to ensure your remodel is completed on schedule.
Cost Factors and Budgeting Guidelines
Understanding the financial investment helps you select options that align with your home improvement goals. A bathroom conversion from tub to shower typically costs 60% to 70% less than a full top-to-bottom bathroom remodel because plumbing footprint changes are localized.
Cost Breakdown by Tier
- Basic Acrylic / Composite Conversions: Typically range from $3,500 to $6,000. These packages include pre-molded shower bases, seamless wall panels, standard fixtures, and sliding glass doors.
- Standard Tile Conversions: Typically range from $6,000 to $9,500. This tier incorporates custom tile bases, porcelain wall tile, recessed storage niches, updated valves, and semi-frameless glass.
- Custom / Luxury Conversions: Range from $10,000 to $15,000+. Features include full natural stone or designer porcelain, curbless zero-threshold construction, linear drains, thermostatic body jets, and heavy custom frameless glass.
Key Variables Affecting Price
- Material Selection: Acrylic walls are fast and affordable, while natural stone or large-format subway tiles require extra labor and specialized setting materials.
- Plumbing Adjustments: Moving drain locations, replacing rusted iron pipes, or upgrading to multi-jet shower systems adds to plumbing labor.
- Glass Systems: Standard bypass doors are economical, whereas thick 3/8-inch frameless custom glass enclosures require precise post-tiling measurements and custom fabrication.
- Structural Repairs: Uncovering hidden rot or subfloor decay during demolition requires immediate repair before new work continues.
Explore our comprehensive guide on overall project budgeting in our bathroom remodel guide.
Resale Value and Impact on Home Equity
A common question among homeowners in Anaheim Hills and Tustin is whether removing a tub will harm their home’s market value. Real estate experts agree on a clear guideline:
The Golden Rule of Bathroom Resale: Keep at least one functional bathtub in your home (typically in a hall or kids’ bathroom). Converting a secondary or primary bathroom tub into a modern walk-in shower almost always increases home value and buyer appeal.
Modern homebuyers overwhelmingly prefer spacious, walk-in tile showers in primary suites over unused garden tubs. A quality tile shower with proper waterproofing can last 25 to 50+ years, offering an exceptional long-term return on investment (ROI). Replacing an outdated tub with an elegant glass-enclosed shower elevates the modern feel of the home while serving practical daily needs.
For real-world design inspirations, browse our completed projects in our gallery or explore dedicated ideas on our bathroom gallery page.
Design Options: Walls, Fixtures, Enclosures, and Storage
Converting your tub allows you to customize every aesthetic and functional element to match your interior style.
Shower Wall Options: Composite vs. Tile
- Composite & Acrylic Wall Surrounds: These engineered panels provide a continuous, non-porous surface. They eliminate grout lines completely, resisting mold, mildew, and hard water stains. Cleaning takes just minutes per week.
- Custom Ceramic & Porcelain Tile: Tile offers unlimited aesthetic combinations—from classic 4×16 subway tiles to luxurious 12×24 marble-look porcelain. To prevent tile lippage (uneven tile edges), manufacturers recommend limiting offset brick patterns to 33% (or 25% for tiles with edges over 18 inches).
Glass Enclosures
The right glass enclosure keeps water contained while maintaining an open visual line throughout the bathroom:
- Frameless Enclosures: Utilizes thick 3/8-inch or 1/2-inch tempered glass with minimal metal hardware for a clean, luxury appearance.
- Semi-Frameless & Sliding Bypass Doors: Feature metal tracks designed for tighter spaces where swing doors are impractical.
- Open Walk-In / Splash Panels: Fixed glass panels that leave an open entry, popular in modern curbless shower layouts.
Fixtures and Storage Accessories
Upgrade your daily showering experience with thoughtfully chosen accessories:
- Rain Showerheads & Handheld Sprayers: Dual-function valves allow you to switch effortlessly between an overhead soak and a versatile handheld wand.
- Recessed Shower Niches: Integrated wall niches eliminate messy hanging caddies. Setting niche edges with bullnose trim or turning subway tiles vertically creates a clean finish without metal edging.
- Corner Benches & Fold-Down Seats: Built-in seating provides comfort and safe foot-washing access.
- Storage Lockers: Built-in recessed storage columns keep shampoo bottles hidden from view.
For additional luxury features, check out our insights on the top 5 must-have features for a luxury bathroom remodel.
Accessibility and Curbless Entry Solutions
Universal design principles allow bathrooms to remain functional for people of all ages and mobility levels. A bathroom conversion from tub to shower provides an ideal opportunity to build safety features seamlessly into the aesthetic design.
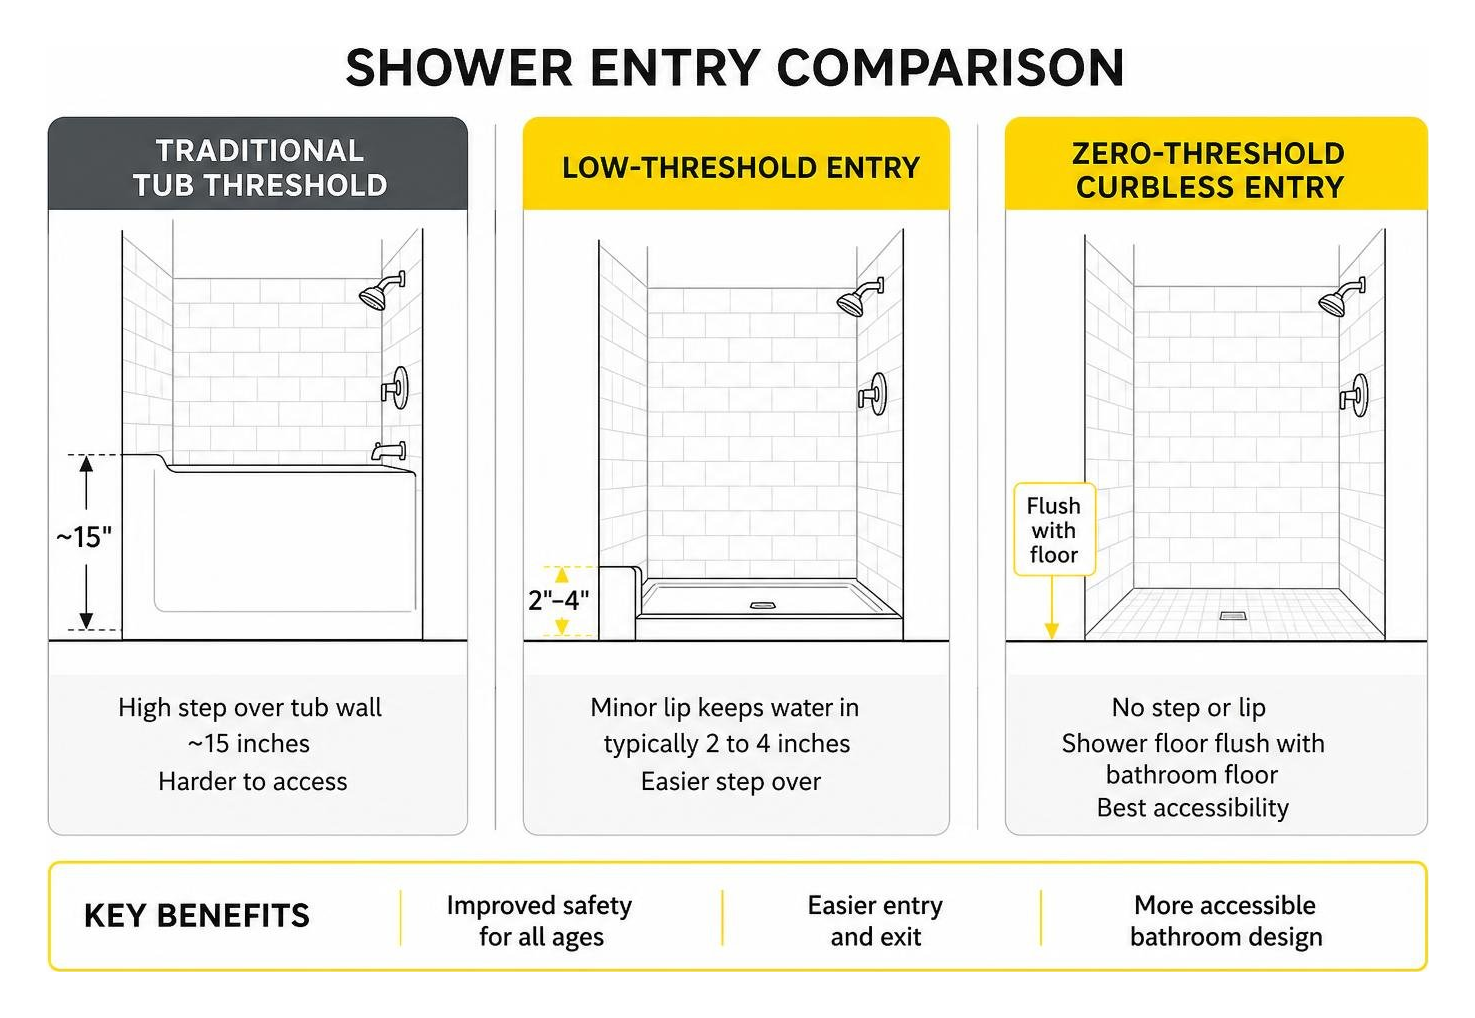
Low-Threshold vs. Curbless (Zero-Threshold) Entries
- Low-Threshold Pans: Feature a minor lip (typically 2 to 4 inches) that easily keeps water in while reducing stepping height dramatically compared to a 15-inch tub wall.
- Curbless Entry: The shower floor sits completely flush with the surrounding bathroom flooring. Achieving a curbless entry requires recessing the subfloor or installing a specialized sloped pan system like Schluter-KERDI-SHOWER.
Safety Features That Look Great
Modern accessibility upgrades no longer look institutional:
- Decorative Grab Bars: Available in matching finishes (brushed nickel, matte black, champagne bronze) that double as sturdy towel bars.
- Slip-Resistant Floor Tile: Small-format tiles, such as 1-inch hexagonal porcelain or textured river rock, increase traction underfoot while properly accommodating sloped floor drainage.
- Solid Blocking: Installing solid wood backing behind drywall during framing guarantees that grab bars and shower seats remain anchor-secure for life.
Critical Plumbing and Structural Considerations
Converting a bathtub into a shower involves hidden structural and mechanical factors that require expert execution.
Drain Sizing and Slope Requirements
Plumbing codes mandate that shower drains must be 2 inches in diameter, compared to 1.5 inches for tub drains. Connecting a shower to a 1.5-inch pipe can lead to slow drainage and standing water. Furthermore, the shower pan floor must maintain a continuous pitch of 1/4-inch drop per foot toward the drain to ensure efficient water removal.
Subfloor Moisture Protection
Underneath old bathtubs, hidden leaks often cause localized water damage. During demolition, subfloors must be thoroughly inspected for soft spots, mold, or joist rot. Replacing damaged subfloor panels before waterproofing prevents structural settling and cracked tile later.
Permits and Code Compliance
In cities across Orange County—including Brea, Yorba Linda, and Tustin—modifying plumbing drain lines, altering electrical outlets, or re-framing shower walls requires municipal building permits. Working with a licensed design-build contractor ensures all work passes city inspections and adheres strictly to California Plumbing and Building Codes.
For advice on selecting qualified local professionals, review our guide on finding and vetting reliable local bathroom remodel contractors.
Maintenance and Long-Term Care Comparison
Maintaining a new shower requires a different routine than caring for an old bathtub.
| Feature | Bathtub Surround | Acrylic Walk-In Shower | Custom Tile & Grout Shower |
|---|---|---|---|
| Cleaning Effort | High (scrubbing soap scum off porcelain/fiberglass) | Low (5-minute weekly wipe down) | Moderate (weekly pH-neutral cleaning) |
| Grout Maintenance | Moderate caulking updates | None (grout-free non-porous panels) | Seal grout lines every 1 to 2 years |
| Lifespan | 10 – 15 Years | 20 – 30 Years | 25 – 50+ Years (with waterproofing) |
| Mold & Mildew Risk | High at silicone seams | Very Low (non-porous surface) | Low (when properly sealed & ventilated) |
Keeping Tile and Glass Looking New
- Daily Maintenance: Use a simple rubber squeegee on glass panels and tile walls after your shower to reduce hard water spots and soap film build-up.
- Weekly Cleaning: Clean tile and acrylic walls using pH-neutral, non-abrasive cleaners. Avoid harsh bleach products that can degrade grout sealers.
- Grout Sealing: Cementitious grout lines should be sealed 12 months after installation and re-applied every 1 to 2 years to prevent staining and moisture absorption.
Frequently Asked Questions
1. How long does a typical tub-to-shower conversion take?
Prefabricated acrylic or composite conversions can be completed in as little as 1 to 2 days (6 to 8 hours of active labor). Custom tile showers with frameless glass typically take 3 to 7 working days to allow proper curing for mortar, waterproofing, grout, and glass installation.
2. Will converting my tub to a shower decrease my home’s resale value?
Not if you keep at least one bathtub elsewhere in the house. Real estate professionals agree that converting a secondary or primary bath tub into a modern walk-in shower increases buyer appeal and resale value, provided families with small children still have access to one tub in a hall bathroom.
3. Do I need to move the plumbing lines during a conversion?
Yes, minor plumbing adjustments are required. The lower bathtub water valve must be raised to standard shower height (around 48 inches for control valves, 72–80 inches for shower heads), and the tub drain (1.5 inches) must be expanded to a code-compliant 2-inch shower drain centered in the base.
4. Can any bathtub be converted into a walk-in shower?
Virtually any standard alcove, drop-in, or corner tub can be converted into a shower. The existing footprint provides ample space for a comfortable walk-in shower layout.
5. What is the difference between acrylic wall panels and tile?
Acrylic or composite panels are non-porous, grout-free wall systems installed quickly in solid sections. They are cost-effective and extremely easy to clean. Custom tile offers higher luxury, custom aesthetic designs, and longer lifespans, but requires more installation time and periodic grout maintenance.
6. Do I need a building permit for a tub-to-shower conversion in Orange County?
Yes. Cities across Orange County require permits when altering plumbing lines (such as upgrading drain sizes) or modifying electrical circuits. Professional contractors handle all permit filings and city inspections on your behalf.
For answers to more project questions, visit our dedicated frequently asked questions page.
Transforming Your Bathroom with Turn Key Remodel
A bathroom conversion from tub to shower is one of the most rewarding home improvements you can make. It optimizes daily utility, dramatically improves safety and accessibility, and brings a clean, modern aesthetic to your home.
At Turn Key Remodel, we specialize in end-to-end design-build renovations across Orange County—including Yorba Linda, Placentia, Anaheim Hills, Tustin, and Brea. We manage every step of your project with our in-house team, clear communication, and dedicated craftsmanship backed by over two decades of experience.
Ready to replace your underused bathtub with a beautiful walk-in shower? Explore our full range of services, visit our primary bathroom page, or contact us today to schedule your free in-home design consultation!