
Clawfoot Tub into Shower: Practical DIY Conversion and Enclosure Guide
How to Convert a Clawfoot Tub into a Shower
Converting a clawfoot tub into a shower starts with measuring the tub and checking how its faucet connects to the water supply. Choose a compatible shower kit with a diverter, riser, showerhead, and curtain ring. Secure the ring to suitable wall or ceiling supports, then hang a liner that falls inside the tub on every side. Test the plumbing and spray pattern before using the shower so you can catch leaks and splashes.
The hard part is usually not adding the showerhead. It is keeping water off the walls and floor while making the tub safe to stand in. A well-fitted curtain, protected surfaces, and an anti-slip mat matter just as much as the fixtures.
I’m Mark Apicella, owner of Turn Key Remodel in Orange County. My bathroom remodeling experience helps me guide homeowners through the plumbing, layout, and water-control choices involved in a clawfoot tub into shower project.

Clawfoot tub into shower terms explained:
Practical Challenges of Showering in a Clawfoot Tub
Standing in a vintage tub feels romantic until the practical realities of daily showering set in. Unlike modern alcove setups with three flat, tiled walls, a freestanding clawfoot tub sits open in the room. This design introduces specific quirks that every homeowner must handle:
- Curtain Cling and the Bernoulli Effect: When warm water flows, the air pressure inside the curtain ring drops relative to the cooler room outside. This pulls lightweight curtains inward, causing them to cling to you like plastic wrap.
- 360-Degree Water Overspray: Without surrounding tiled enclosures, any gap in the curtain sends stray spray directly onto baseboards and wood subfloors.
- Curved and Narrow Tub Basin: The interior slopes naturally to cradle a reclining bather. Standing upright means your feet rest on a narrow, rounded floor with less standing traction than a flat shower pan.
- Zero Built-In Ledges: Historic tubs lack shampoo niches, corner benches, or wide ledges for soap bottles.
- Surrounding Wall Moisture Protection: splattering water will degrade standard drywall or historical beadboard if perimeter protection is neglected.
| Showering Challenge | Standard Shower Stall | Clawfoot Tub Shower | Practical Solution |
|---|---|---|---|
| Water Containment | Fixed glass or 1 straight curtain | Full 360-degree perimeter | Oversized hoop with overlapping, weighted liners |
| Curtain Behavior | Minimal movement | Strong inward cling | Heavy-gauge fabric, magnetic hem weights, wider track |
| Footing & Traction | Textured, flat floor pan | Sloped, glossy porcelain | Mold-resistant suction bath mat |
| Toiletry Storage | Built-in tiled wall niches | No flat rims or ledges | Wire riser caddies or freestanding rolling carts |
| Wall Splash Exposure | Fully waterproof backer board | Exposed room walls | Moisture-resistant enamel paint or tile wainscoting |
Overcoming Curtain Cling and Water Containment
Taming the “human car wash” effect requires managing air flow and curtain weight. Selecting a curtain ring that extends 2 to 3 inches wider than your tub’s rim provides your elbows with much-needed breathing room.
Pair your enclosure with heavy-gauge, washable fabric curtains rather than featherweight plastic sheets. Liners equipped with heavy corner weights or bottom hem magnets hug the inside iron basin securely. Leaving a slight 1-inch gap at the top of the ring allows hot steam to escape, balancing bathroom air temperature and stopping the pressure drop that pulls fabric inward. Finally, coat surrounding walls in high-quality moisture-resistant paint to repel incidental mist.
Enhancing Safety, Stability, and Storage
Because cast iron and acrylic basins are slick when wet, an anti-slip mat with strong suction cups is non-negotiable for everyday footing.
For storing shampoo and body wash, avoid suction caddies that pull loose from curved porcelain. Instead, choose a wire caddy that clamps directly onto the vertical shower riser pipe, or roll a slim, tiered cart alongside the tub. If your family finds these daily compromises cumbersome, exploring inspiring walk in shower bathroom remodels can help you decide whether a dedicated, curbless shower structure fits your long-term routine better.
Complete Kits to Transform a Clawfoot Tub into Shower Enclosures

A comprehensive conversion kit takes the guesswork out of retrofitting exposed plumbing. Rather than piecing together disparate pipes, a dedicated kit provides an integrated diverter faucet, a vertical shower riser pipe, an overhead showerhead, and an overhead hoop enclosure.
Sizing and Support for a Clawfoot Tub into Shower Setup
Shower rings are generally available in four standardized footprints:
- 42-inch compact rings: Built for small soaking tubs or tight half-baths.
- 48-inch standard rings: Ideal for typical 5-foot vintage tubs.
- 54-inch mid-size rings: Designed for broader slipper tubs.
- 60-inch large rings: Sized for deep 6-foot grand soaking tubs.
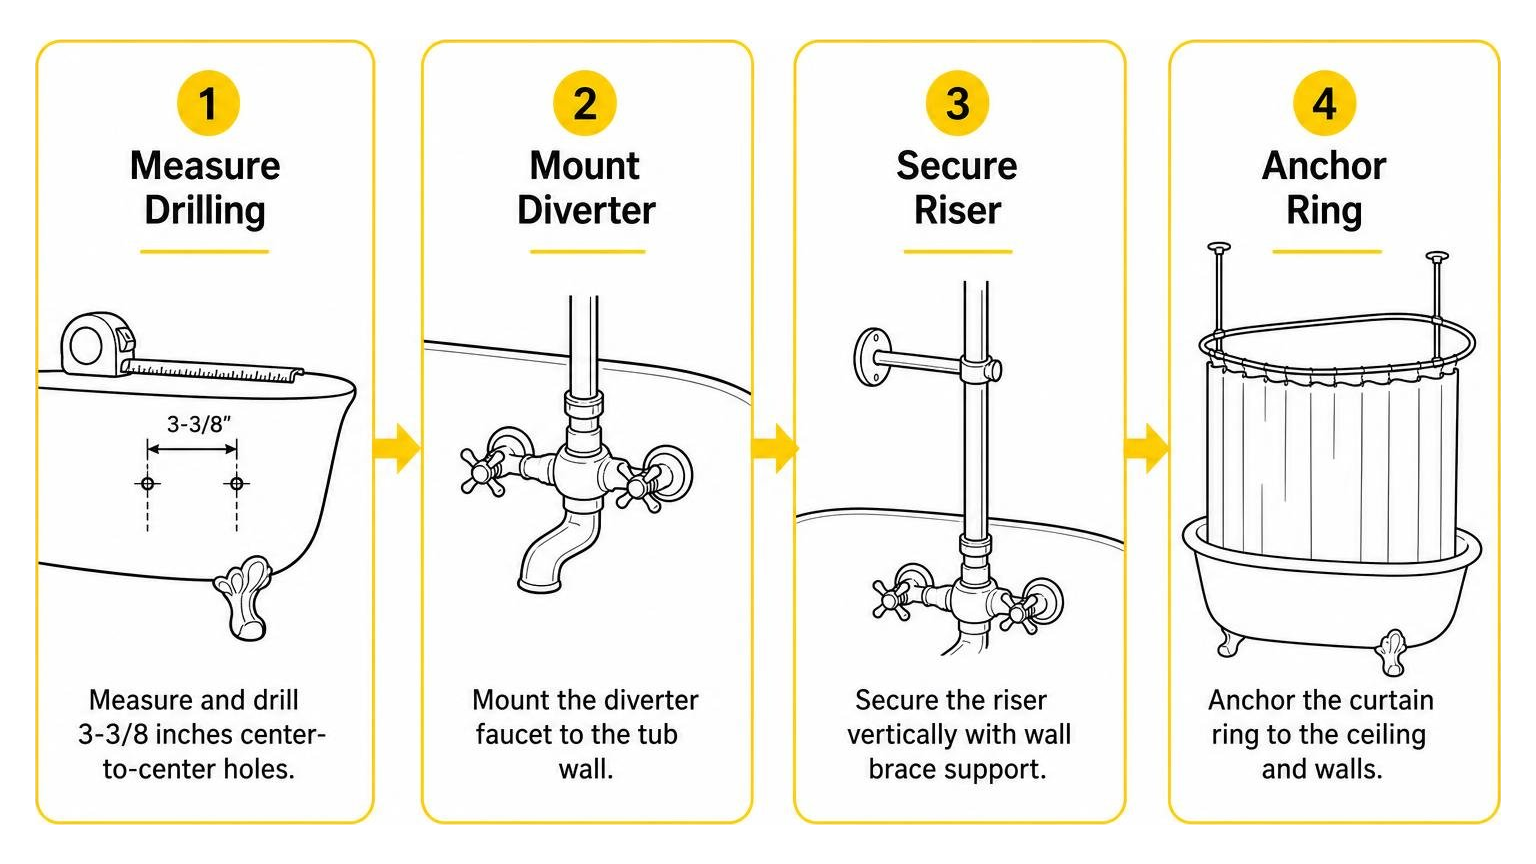
Stability depends entirely on your bracing method. Tall vertical risers and wide curtain rings act like levers; without proper anchoring, pulling a curtain can strain your tub connections. Quality kits use ceiling support rods anchored directly into ceiling joists, paired with horizontal wall braces. For tubs with sloping interior walls, specialized riser leveling nuts and beveled cone washers ensure your riser stands plumb.
Mounting Styles: Deck Mount, Tub Wall, and Wall-Mounted Units
Choosing the right kit depends on how water lines enter your bathtub:
- Tub Wall-Mount (Inside Basin): Features faucet inlets spaced 3-3/8 inches center-to-center that mount directly through pre-drilled holes in the tub’s interior wall.
- Deck Mount (Rim): Uses 7-inch center connections installed through holes drilled flat along the top rolled rim. High-end systems like the Strom Living Exposed Enclosure Shower System use specialized deck couplers to fasten securely to the rim while providing gooseneck risers for overhead clearance.
- Bathroom Wall-Mount: Mounts into rough-in plumbing emerging directly from the finished bathroom wall behind a freestanding tub.
Browse our custom bathroom remodeling gallery to see how exposed piping integrates into vintage and transitional interior aesthetics.
Materials, Finishes, and Modern Plumbing Standards
Exposed plumbing serves as a visual centerpiece in the room, making material quality critical. Solid brass and heavy-gauge stainless steel offer superior corrosion resistance compared to thin zinc alloy or hollow aluminum tubing.
Popular finishes allow you to create a harmonious period look:
- Polished Chrome: Timeless, durable, and easy to clean.
- Brushed Nickel: Warm, contemporary, and forgiving of water spots.
- Polished or Raw Brass: Authentically historic, allowing natural patina over time.
- Oil-Rubbed Bronze: Deep, rustic tones ideal for Spanish Revival or craftsman architecture.
- Matte Black: Crisp and modern for transitional farmhouse styles.
Always match the finish of your shower riser, curtain ring, and ceiling stays to your tub’s claw feet and drain assembly for a cohesive appearance.
Plumbing Code Compliance, Flow Rates, and Efficiency
When sourcing hardware in Southern California communities like Anaheim Hills, Tustin, or Yorba Linda, ensure your fixtures satisfy regional efficiency mandates. California Title 20 and CALGreen standards require showerheads to limit water flow to 1.75 or 1.8 GPM (gallons per minute). Look for lead-free compliance certifications and internal ceramic disc cartridges, which prevent persistent drips. Brands such as Randolph Morris, Cheviot, and Strom Living engineer reproduction fixtures specifically to comply with modern municipal plumbing codes.
Tub Restoration and Base Preparation
Before installing shiny new plumbing, examine the tub itself. Chipped, rough porcelain harbors mildew and feels abrasive underfoot. If your cast iron basin shows wear, consider applying Armoglaze Odorless Tub Refinishing Solutions. Their zero-VOC epoxy coatings pour over worn iron surfaces, creating a smooth, high-gloss protective finish without filling your home with hazardous chemical odors.
Step-by-Step Guide for Converting a Clawfoot Tub into a Shower
Follow this installation progression to ensure a leak-free setup:
- Shut Off Main Water Supply: Turn off your water supply and open low-point faucets to drain existing lines completely.
- Remove Existing Faucet: Unthread old supply couplers behind or beneath the tub wall. Clean mineral deposits from mounting surfaces.
- Dry-Fit Diverter and Riser: Mount your new diverter faucet onto the tub wall or deck couplers using rubber washers. Thread the lower shower riser loosely into the diverter to confirm vertical alignment.
- Assemble Overhead Curtain Ring: Connect the straight and curved segments of the hoop on the floor. Slide the riser support loop and ceiling support brackets into position.
- Anchor Ceiling and Wall Braces: Use a level and plumb line to transfer bracket positions onto the ceiling. Secure stays directly into solid wood blocking or heavy-duty hollow-wall anchors. Instructional resources like the classic guide on How to Add a Shower to a Claw-Foot Tub illustrate how crucial rigid ceiling anchoring is for eliminating sway.
- Finalize Connections & Seal: Apply PTFE thread-seal tape to all threaded pipe joints. Tighten riser compression nuts with a smooth-jaw wrench to protect decorative finishes.
- Pressure Test: Restore water supply slowly. Divert water to the showerhead, checking every joint for weeping, and verify that the 360-degree curtain liner hangs completely within the tub rim.
Cost Breakdown of a Clawfoot Tub Shower Conversion
Converting a clawfoot tub fits a wide variety of remodeling budgets, ranging from basic DIY hardware additions to full bathroom overhauls:
| Conversion Method | Typical Cost Range | Included Elements | Ideal For |
|---|---|---|---|
| Budget DIY Setup | $200 – $400 | Custom copper piping, basic sunflower head, utility curtain hoop | Cabins, creative DIYers, utility bathrooms |
| Economy Pre-Packaged Kit | $450 – $800 | Chrome/brushed nickel diverter kit, aluminum ring, standard riser | Guest bathrooms, light-duty showering |
| Luxury Period System | $1,200 – $2,800+ | Solid brass components, custom finishes, CALGreen diverter, heavy ring | Master suites, historic home restorations |
| Full Turnkey Professional Conversion | $4,500 – $10,000+ | New plumbing rough-in, tub restoration, tiled wainscoting, ventilation | Complete, code-compliant luxury remodels |
A budget-conscious homeowner can fashion exposed copper lines for a couple hundred dollars, while premium solid-brass assemblies cost significantly more. Review our breakdown of expected bathroom conversion costs to plan your overall budget realistically.
Frequently Asked Questions About Clawfoot Tub Conversions
Will a shower enclosure kit work with any clawfoot tub?
Most roll-top and flat-rim clawfoot tubs accept standard conversion kits. However, double-ended slipper tubs—which slope upward on both ends—require extended gooseneck risers to clear the high porcelain backrest. Always measure your faucet drilling centers (typically 3-3/8″ or 7″) before purchasing hardware.
Can a clawfoot tub shower enclosure handle daily family use?
Yes, provided you choose heavy-gauge brass components and secure ceiling supports. Daily use requires diligent ventilation to prevent moisture buildup within the enclosed curtain area. If several family members shower back-to-back, managing wet liners can become high-maintenance compared to an in-depth guide to tub to shower conversion featuring a walk-in shower stall.
How do I prevent water damage to surrounding walls and floors?
Use two overlapping curtain liners hung inside the tub basin to eliminate side gaps. Install a high-capacity bathroom exhaust fan rated for your bathroom’s square footage, and protect adjacent drywall with water-repellent enamel paint or tile wainscoting.
Conclusion
Converting a classic clawfoot tub into an everyday shower lets you preserve vintage charm while gaining modern functionality. By choosing solid brass fixtures, securing reliable ceiling braces, and selecting heavy-gauge curtain liners, you can create a comfortable, water-tight bathing setup.
If you are weighing the pros and cons of retrofitting versus a full bathroom redesign in Orange County, Placentia, Brea, or Tustin, Turn Key Remodel is here to help. Our design-build team handles everything from historic plumbing updates to full luxury conversions. Contact us today or learn more by understanding the average cost of a tub to shower conversion to find the ideal layout for your home.