
Developing the Ultimate Kitchen Lighting Plan and Design Ideas
Kitchen Lighting Design Ideas That Make Every Zone Work Better
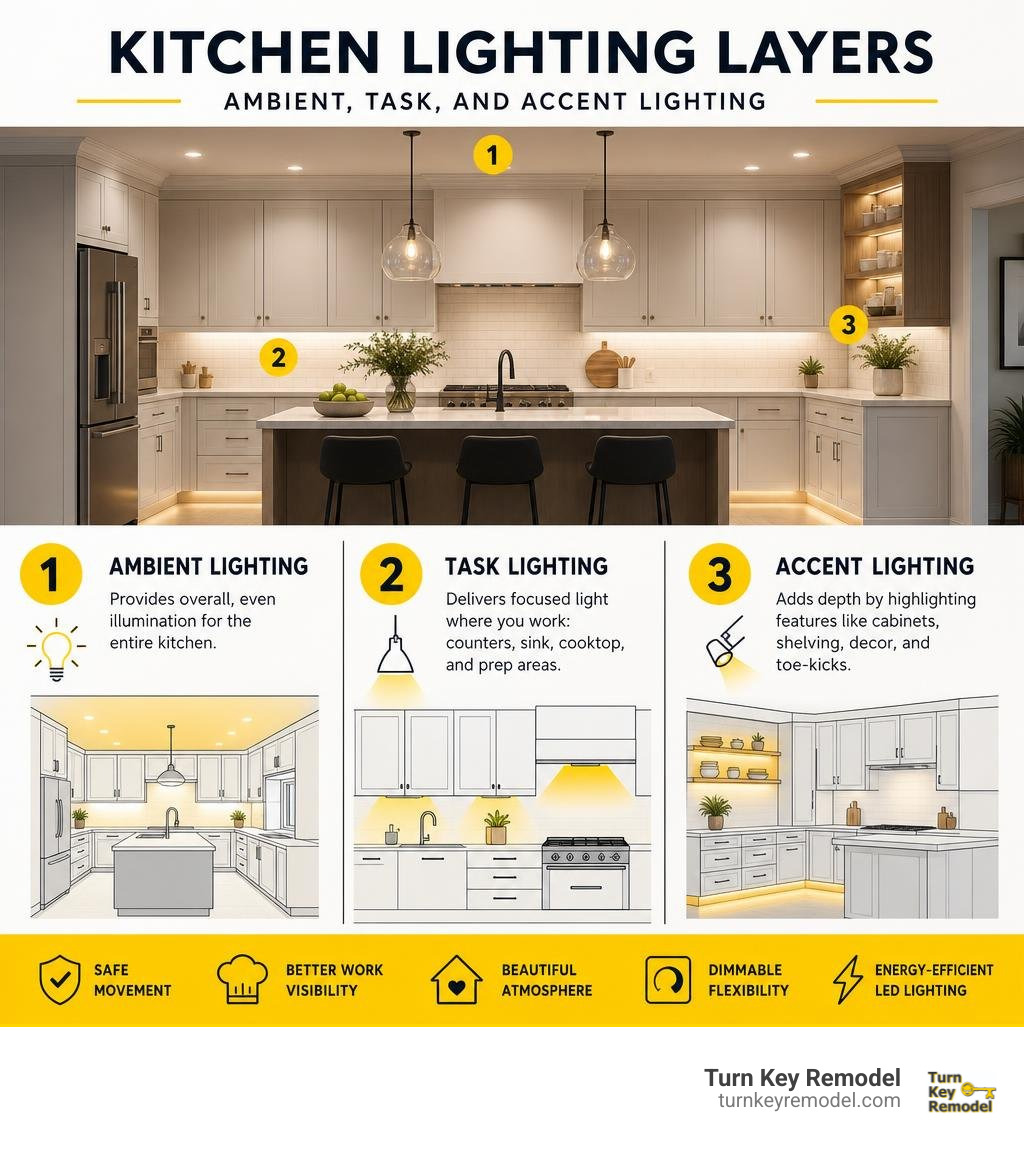
The best kitchen lighting design ideas combine layers of light so the room is safe for prep, comfortable for everyday use, and welcoming when guests arrive. A strong plan does not rely on one ceiling fixture. It uses separate light sources for the whole room, work surfaces, and visual detail.
- Ambient lighting provides general, even brightness for moving through the kitchen.
- Task lighting puts focused light on counters, the island, sink, cooktop, and pantry.
- Accent lighting adds depth by highlighting cabinets, shelving, architectural details, or toe-kicks.
For most homes, aim for 30 to 40 footcandles of ambient light and 50 to 100 footcandles on countertop task areas. Warm-white LEDs around 2700K to 3000K, consistent across fixtures, help the kitchen feel clean without looking harsh or commercial.
Good lighting planning starts early in a remodel. Fixture size, placement, ceiling height, natural daylight, finishes, and dimmer zones all affect how the completed kitchen looks and functions.
I am Mark Apicella, Owner and President of Turn Key Remodel in Orange County, with more than eight years of remodeling experience and a team that manages kitchen projects from design through construction. In this guide to kitchen lighting design ideas, I will help you understand the choices that support a polished, practical kitchen plan.
The Core Layers of Kitchen Lighting Design Ideas
When we design a modern kitchen space, we treat light as a multi-dimensional tool rather than a single light bulb hanging from the ceiling. Relying on a single center fixture forces you to chop vegetables, measure ingredients, and wash dishes entirely in your own shadow. By contrast, a thoughtful layered approach distributes illumination precisely where your eyes and hands need it most.
To build a plan that balances beauty and function, we follow the American Lighting Association’s foundational three-layer rule: ambient, task, and accent lighting.
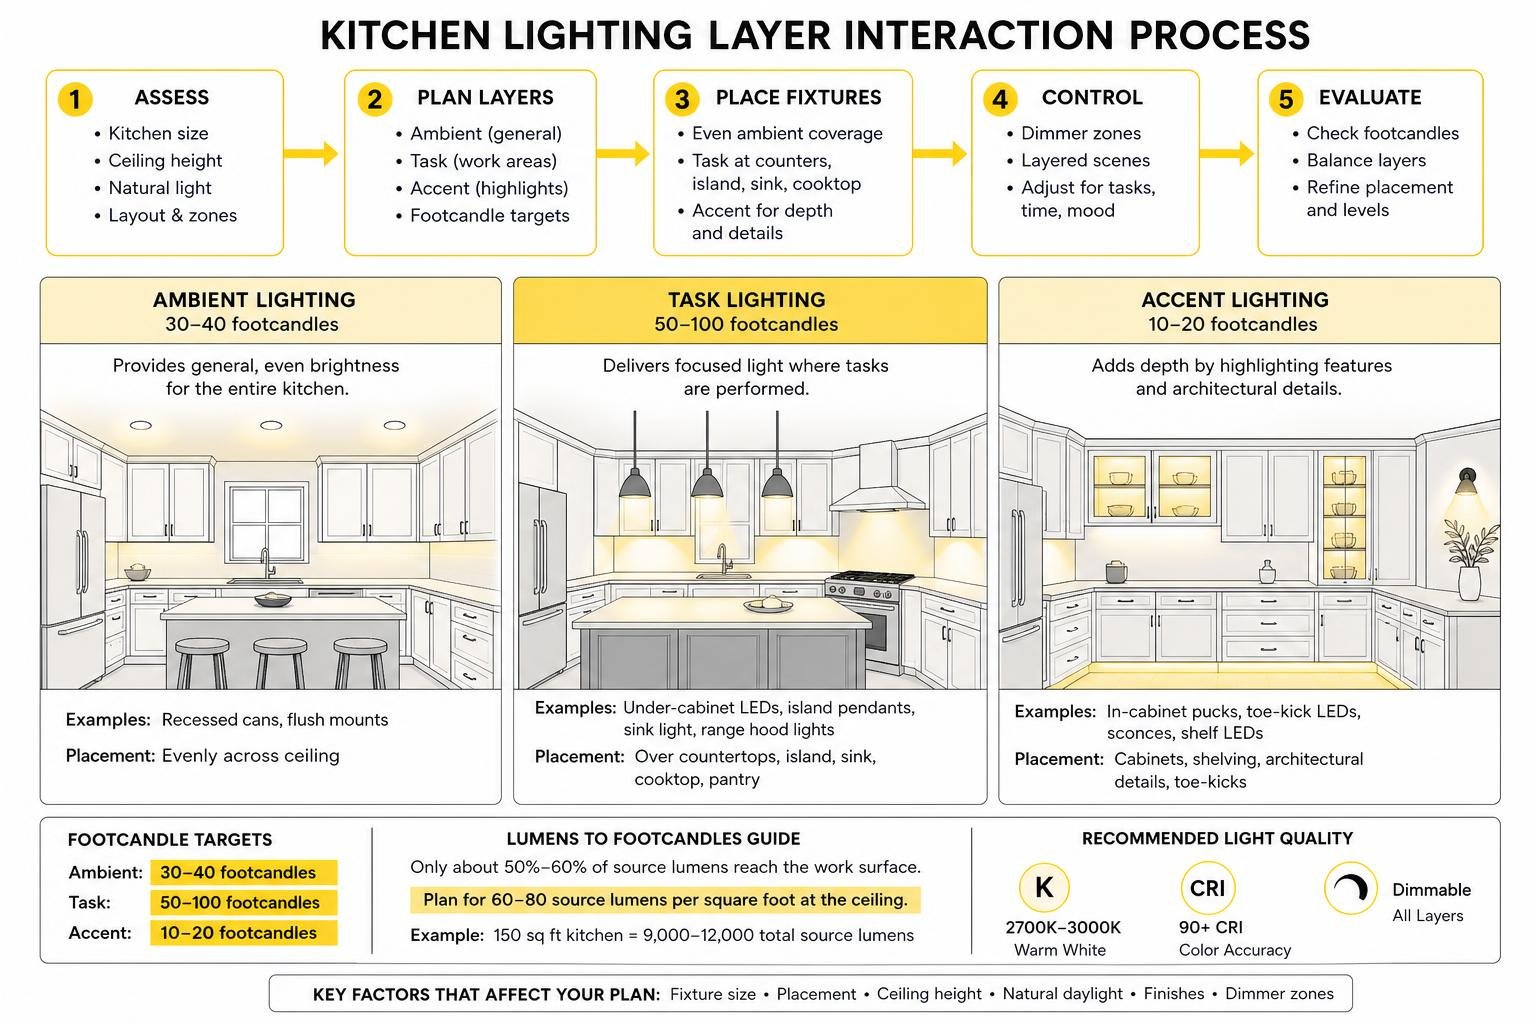
When calculating light output for these layers, it is crucial to understand the distinction between source lumens and footcandles. Lumens measure the total amount of light produced at the bulb, while footcandles measure how much actual light hits a specific surface. In a typical kitchen environment, only about 50% to 60% of the light leaving a ceiling fixture actually reaches your countertops or floor due to ceiling height, beam spread, and absorption by dark cabinets or surfaces.
Consequently, a kitchen generally requires 60 to 80 source lumens per square foot at the ceiling to hit target illumination levels. For a 150-square-foot kitchen, that equates to roughly 9,000 to 12,000 total source lumens distributed across your various fixtures.
Ambient Overhead Lighting and Recessed Cans
Ambient lighting acts as the foundational background layer, providing uniform overhead illumination across walkways and open spaces. It establishes the baseline brightness so you can safely walk through the room, open drawers, and clean up after dinner.
Recessed ceiling cans remain the most popular choice for ambient overhead illumination. Modern architectural standards favor discreet 3-inch to 4-inch recessed trims over older, bulkier 6-inch cans. To ensure smooth, shadow-free background light:
- Space recessed fixtures roughly 4 to 6 feet apart across the ceiling grid.
- Select fixtures with wide beam spreads to ensure light pools overlap seamlessly.
- Coordinate ceiling cans with natural daylight sources, such as large windows or skylights, so artificial lights seamlessly supplement daytime sunshine without creating harsh glare.
Task Lighting and Under-Cabinet LED Solutions
Task lighting delivers direct, focused illumination to areas where precision work happens—specifically countertops, the sink, range, and kitchen island. The Illuminating Engineering Society (IES) recommends 50 to 100 footcandles at countertop surfaces for comfortable, safe food prep.
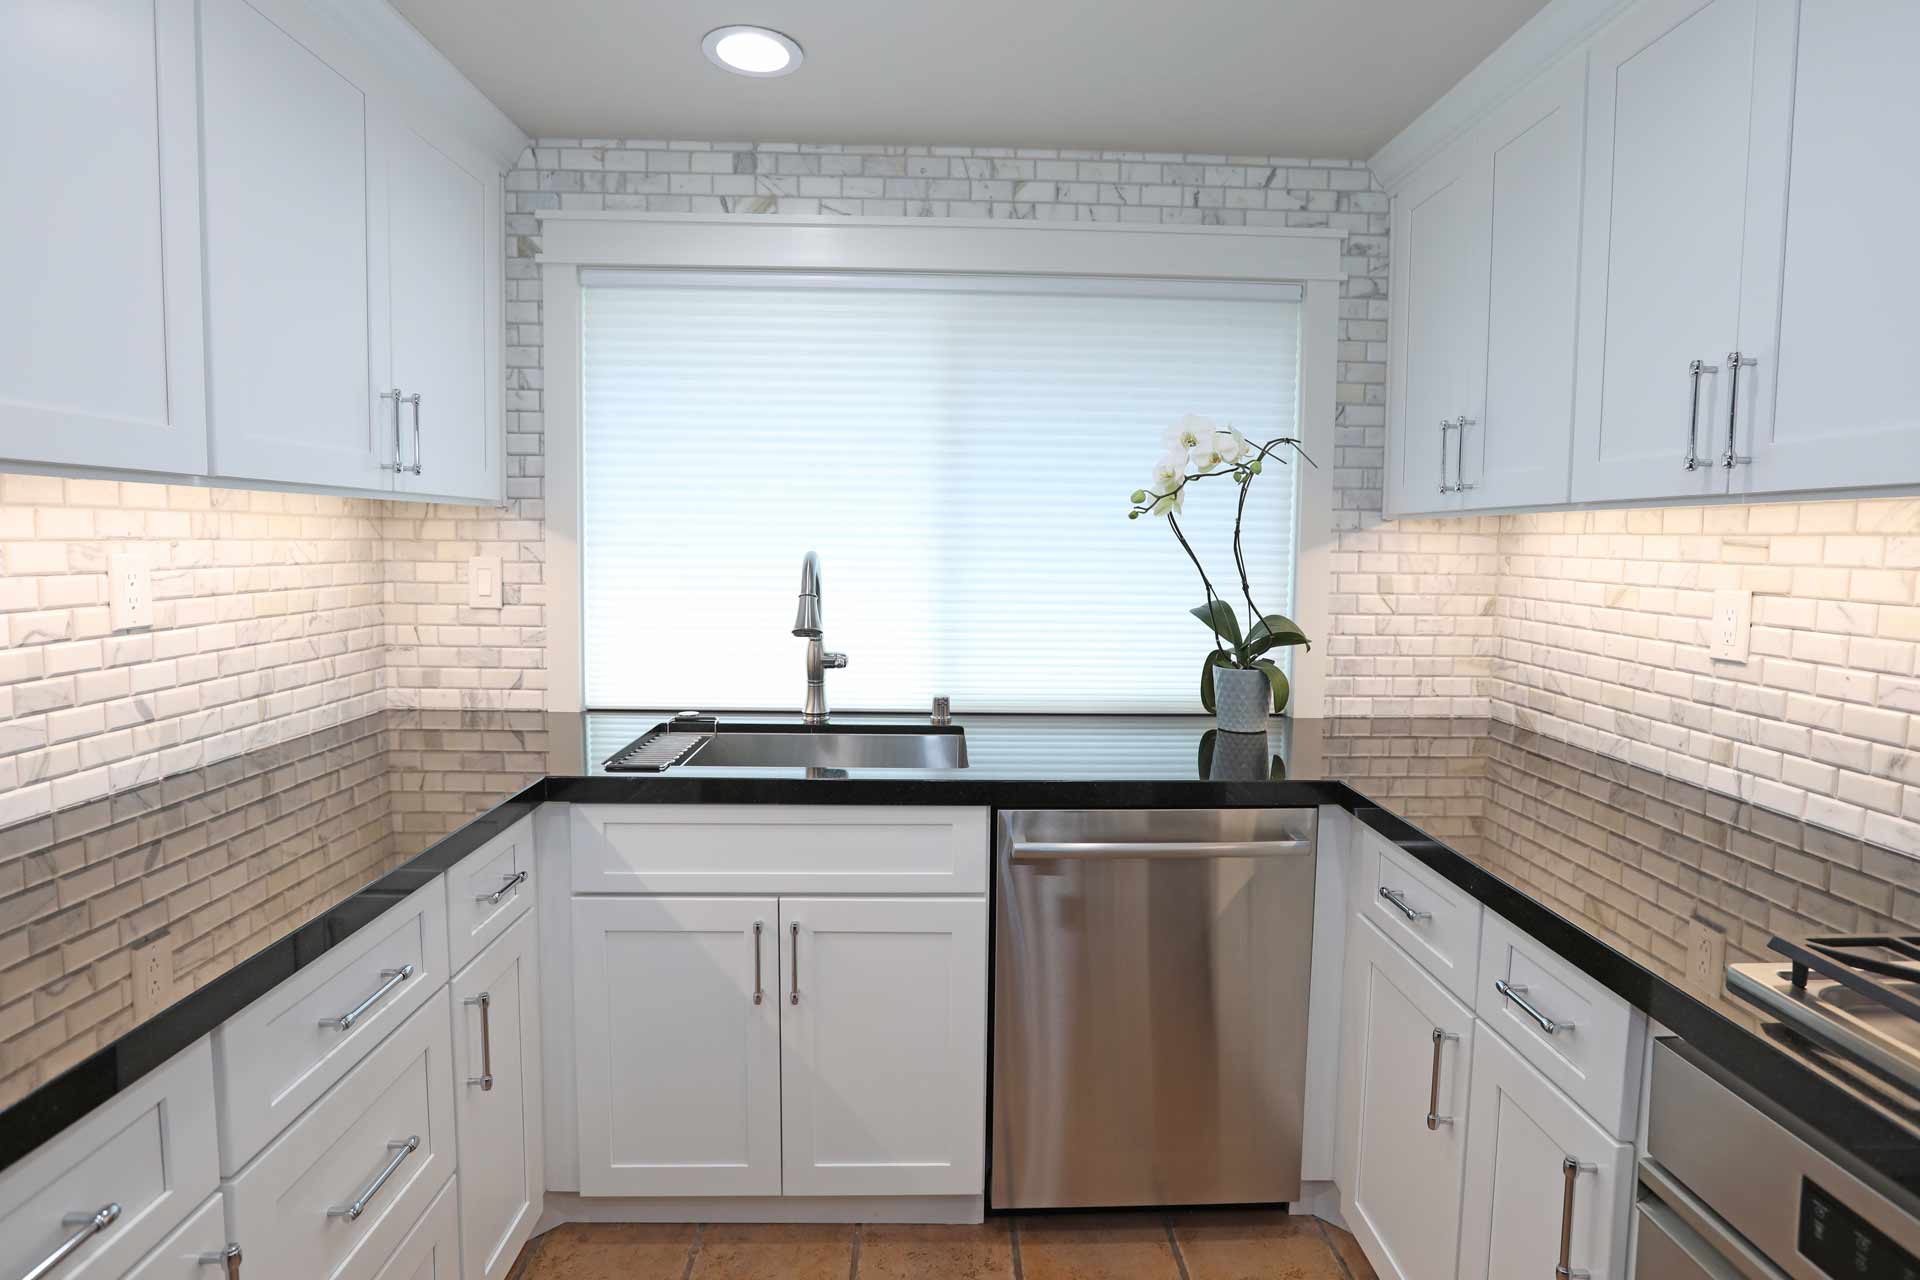
Under-cabinet LED lighting is hands-down the most cost-effective and transformative task lighting upgrade you can make. Standard overhead lighting casts shadows directly onto countertops when you stand at the counter. Continuous LED tape lights or ultra-thin puck lights installed underneath upper cabinets eliminate these shadows completely.
For the best results:
- Placement: Mount LED strip lights near the front lip of upper cabinets pointing down toward the center of the countertop. Placing them too close to the back wall leaves the front work area in shadow, while directing them straight down standard cabinetry can create harsh hotspot reflections on polished quartz or granite.
- Concealment: Hide fixture housings and wiring behind integrated cabinet light rails or drop edges so the light source remains completely invisible to the naked eye.
- Output: Choose high-CRI (90+) LED strips to ensure meat, produce, and stone textures display their natural, vibrant colors.
Accent and Decorative Kitchen Lighting Design Ideas
Accent lighting adds depth, drama, and architectural interest by highlighting decorative features, textures, or display items. While ambient and task layers focus primarily on function, accent lighting focuses on atmosphere and aesthetic character.
Popular accent lighting features include:
- In-Cabinet Lighting: Glass-front cabinets fitted with soft LED puck lights or vertical strip lights transform stored glassware and china into elegant visual display cases.
- Toe-Kick LEDs: Strips installed beneath base cabinets project a soft wash of light across the floor. Toe-kick lighting functions as a subtle nightlight for late-night water runs while creating a floating effect for kitchen cabinetry.
- Backsplash Sconces & Picture Lights: Mounting wall sconces flush against tile, stone, or brick backsplashes adds classic architectural charm and warm perimeter glowing.
Kitchen Island Lighting: Pendants, Proportions, and Placement
The kitchen island is the visual and functional centerpiece of the modern home. Whether host to morning coffee, homework sessions, or evening wine tastings, island lighting must balance bold decorative appeal with sharp task performance.
Sizing and Spacing Pendants Over an Island
The most common mistake homeowners make with island pendants is selecting fixtures that are either too small (“dinky”) or hanging them at awkward heights that block line-of-sight across the room.
To achieve ideal visual proportion and light coverage over your island, follow these time-tested design formulas:
- Clearance Height: Hang the bottom of each pendant fixture 30 to 36 inches above the top of the island counter. This keeps light low enough to prevent eye glare while keeping fixture bases safely above standing eye level. If your ceiling exceeds 8 feet, add 3 inches of hanging height for every additional foot of ceiling height.
- Spacing Between Pendants: Space individual pendants 24 to 30 inches apart, center-to-center.
- Edge Clearance: Ensure end pendants sit at least 6 inches inward from the outer edge of the counter to avoid an overhanging look.
| Island Length | Recommended Fixture Setup | Spacing & Placement Guidelines |
|---|---|---|
| Under 5 Feet | 1 Medium Pendant or Mini-Chandelier | Center directly over the island footprint. |
| 6 to 8 Feet | 2 Large Pendants (12″ – 16″ diameter) | Center-to-center spacing: 24″-30″. Keep 6″+ clearance from edges. |
| 8 to 10 Feet | 3 Medium Pendants OR 1 Linear Chandelier | Distribute 3 pendants evenly; or select a linear fixture equal to ~2/3 island length. |
| 10+ Feet | 3 Large Pendants OR 4 Medium Pendants | Maintain 28″-32″ spacing; scale fixture diameter to 1/3 of island width. |
A handy mathematical trick for placing two pendants over an island: measure the total length of your island in inches, divide by 4, and place the center of each fixture that exact distance from each end.
Statement Chandeliers vs Decorative Pendants
While traditional pendant clusters remain a classic choice, linear suspension chandeliers have surged in popularity for modern and transitional kitchens. A linear chandelier anchors a large island with a single, sleek ceiling canopy, delivering unbroken light across the entire counter length.
When deciding between pendants and chandeliers:
- Use pendant clusters (groups of 2 or 3) if you want vertical rhythm and soft, diffused light cones over distinct seating positions.
- Choose a linear statement chandelier if your island is 8 to 12 feet long and you want a single dramatic focal point that coordinates seamlessly with open-concept dining fixtures.
- Opt for solid or frosted glass shades over clear glass if your island faces heavy cooktop activity; clear glass shades show grease splatter and dust far quicker, requiring constant cleaning.
Technical Guidelines: Lumens, Kelvin Color Temperature, and Dimming
Technical lighting specifications like Kelvin ratings, Color Rendering Index (CRI), and circuit dimming dictate how comfortable your kitchen actually feels at night.
As highlighted in designer guides discussing The “Four Layer Formula” Is the BEST Way to Light Your Kitchen, According to a Designer, consistency in bulb selection elevates a kitchen from standard to luxury status.
Selecting Color Temperature and Brightness Levels
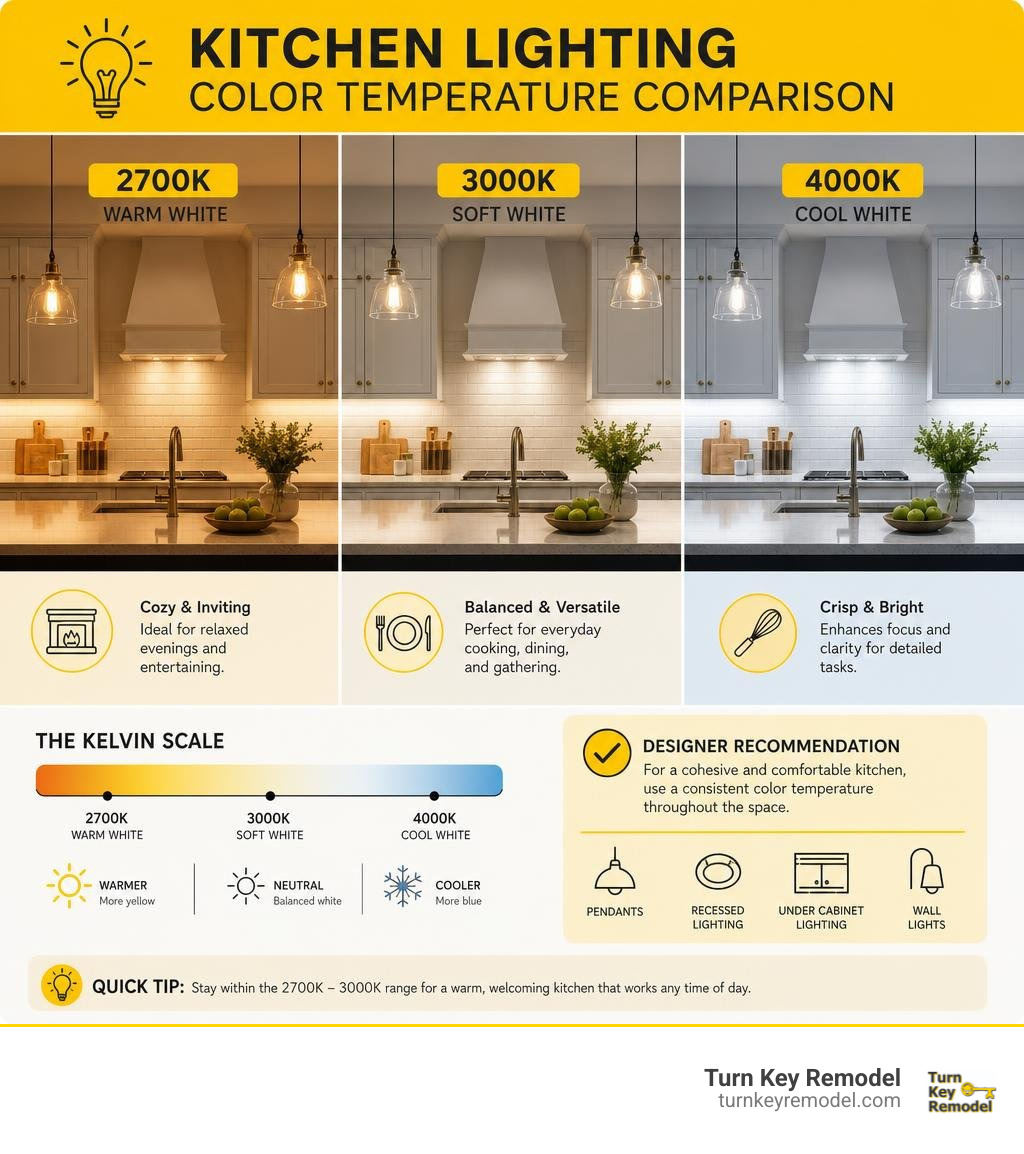
Color temperature is measured on the Kelvin (K) scale. For residential kitchens, we recommend maintaining a tight 2700K to 3000K warm white range across every light fixture in the room:
- 2700K: Emits a soft, warm glow with subtle golden undertones. Ideal for traditional kitchens, natural wood cabinetry, and warm brass hardware.
- 3000K: Delivers a crisp, warm-white light that enhances quartz countertops and painted cabinets without feeling cold. This is our top choice for most modern renovations.
- Avoid 4000K+: Bulbs rated at 4000K or higher create a cold, clinical, hospital-like atmosphere that washes out food tones and organic finishes.
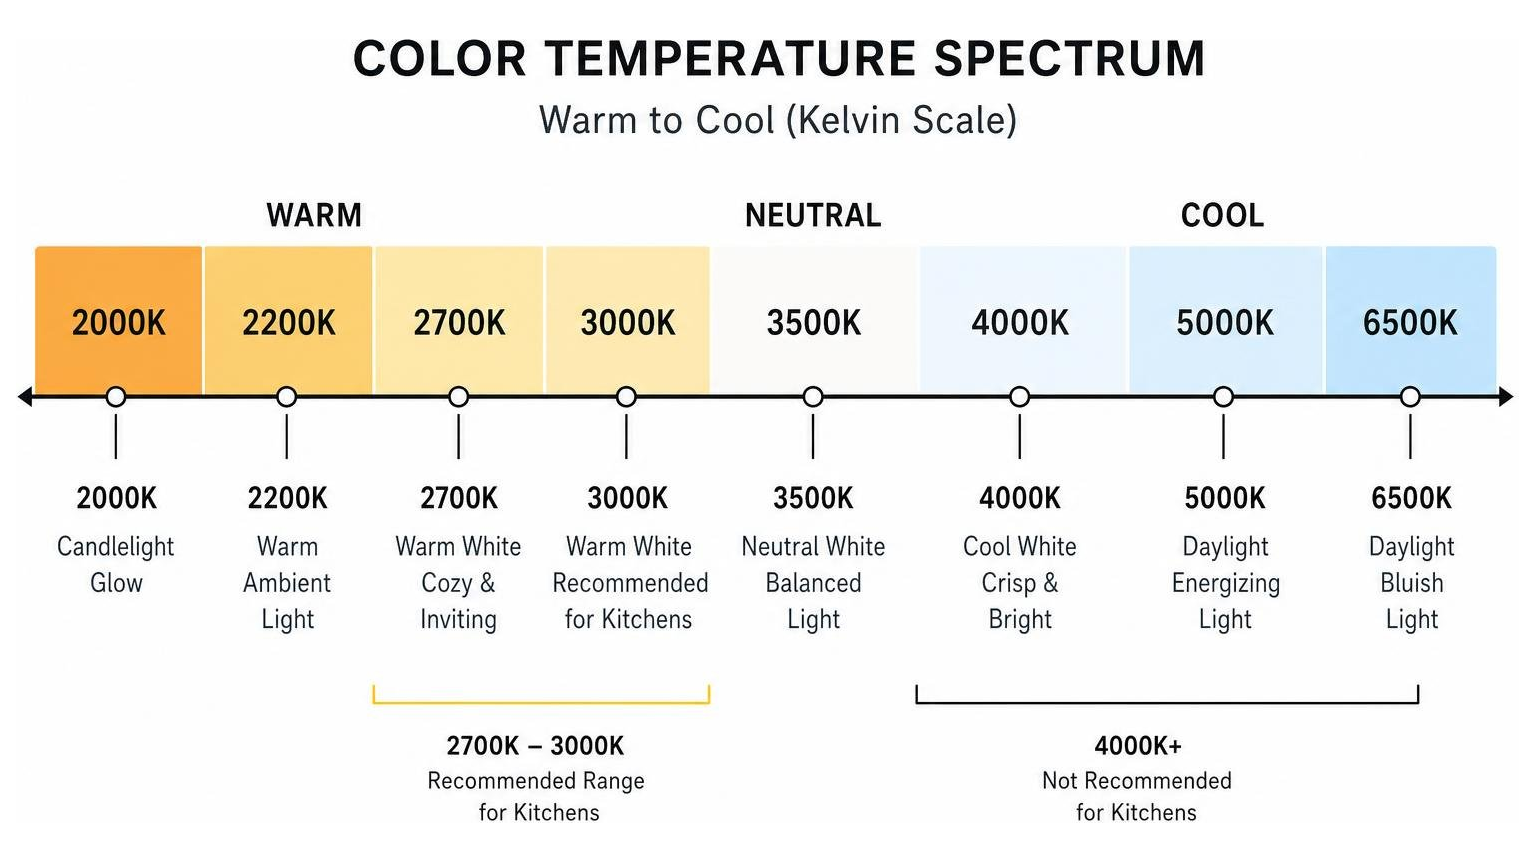
Never mix different color temperatures within the same space. Combining 3000K recessed ceiling lights with 4000K under-cabinet lighting creates an unappealing material clash that makes natural stone and custom paint look mismatched.
Additionally, select LED bulbs with a Color Rendering Index (CRI) of 90 or higher. High-CRI bulbs reflect true, accurate colors, making fresh ingredients look appetizing during food prep.
Strategic Dimming and Lighting Controls
Installing dimmers on every single kitchen circuit is an absolute necessity. Dimmers allow you to instantly transition your kitchen from a brightly illuminated 100-footcandle prep zone during meal preparation to an intimate, soft-lit entertainment hub when hosting guests.
To maximize flexibility, group your controls into dedicated switches:
- Zone 1 (Ambient): Recessed ceiling cans.
- Zone 2 (Task): Under-cabinet LED strips and sink downlights.
- Zone 3 (Decorative): Island pendants or statement chandeliers.
- Zone 4 (Accent): Toe-kick lights and glass cabinet display lights.
Using smart home switches or multi-scene dimmers allows you to program one-touch scenes—such as “Cooking” (all layers at 100%), “Dining” (ambient dimmed to 30%, island pendants at 50%, accent lights on), and “Nightlight” (toe-kick lights at 20%).
Layout Strategies and Mixing Metal Finishes
Every kitchen layout presents unique architectural sightlines and physical boundaries. Designing a layout-specific lighting plan ensures your fixtures enhance traffic flow while accentuating room proportions.
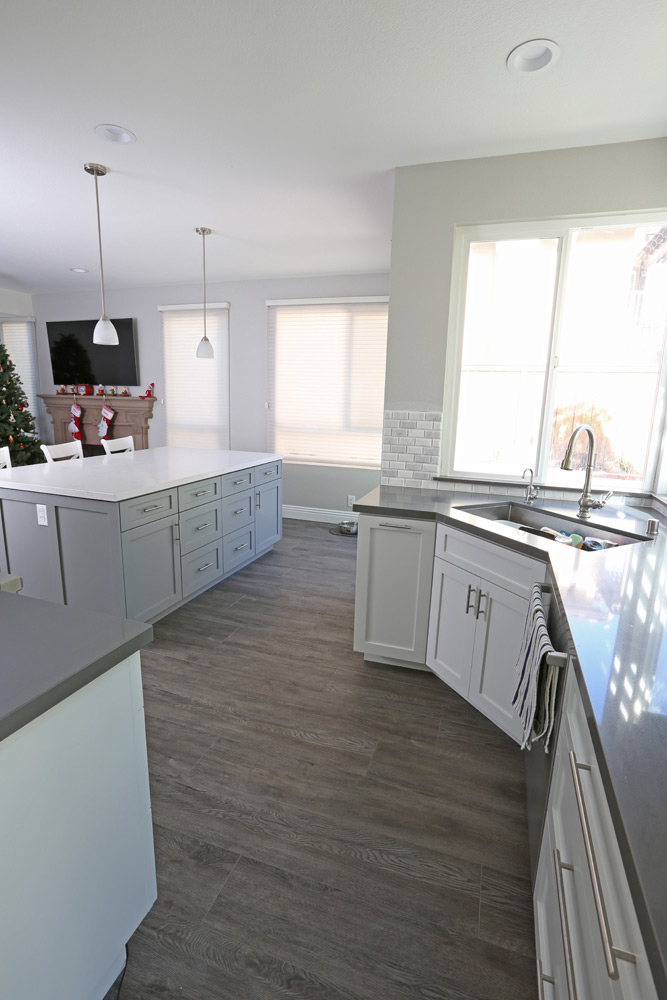
Layout-Specific Kitchen Lighting Design Ideas
- Galley Kitchens: Narrow galley layouts benefit from a single centered row of recessed lights paired with continuous under-cabinet LEDs. If ceiling height allows, hanging a linear row of two or three compact mini-pendants down the central corridor adds warm charm without crowding visual headroom.
- L-Shape Kitchens: L-shaped layouts often feature an asymmetrical work triangle. Focus high-output task lighting along the main counter run using under-cabinet lights, and anchor the open corner with a pair of decorative wall sconces or a statement semi-flush ceiling fixture.
- U-Shape Kitchens: U-shaped footprints surround the cook with three walls of cabinetry, which can create dark corner pockets. Install small 2-inch recessed downlights directly above corner countertops and supplement with continuous under-cabinet tape lights to eliminate dark spots.
- Open-Concept Kitchens: In modern open-floorplan designs, kitchen lighting must harmoniously converse with adjoining dining and living areas. Use hanging island pendants to visually define the kitchen boundary without constructing physical walls. Ensure sightlines from living room seating remain unobstructed by choosing open-frame or sleek glass silhouettes. If you are exploring broader aesthetic inspiration, review our guide on 2025 Modern Kitchen Trends.
- Cathedral or Vaulted Ceilings: Vaulted ceilings require specialized sloping ceiling adaptors and narrower beam spreads on recessed cans to push light down to floor level. Pair tall vertical spaces with long-drop sculptural chandeliers or exposed timber beam accent sconces to bridge soaring ceiling height with ground-level counter surfaces.
Mixing Fixture Styles and Metallic Finishes
Gone are the days when every metal finish in a kitchen had to match perfectly. Today’s most sophisticated designs thoughtfully layer two or three complementary metallic finishes to create visual depth and character.
To successfully mix finishes without creating a chaotic, mismatched look:
- Establish a 70/30 Dominance Rule: Select one primary metal for 70% of the room’s hardware (e.g., cabinet handles and main plumbing faucets) and a secondary accent metal for 30% (e.g., island pendant shades or wall sconces).
- Pair Warm Metals with Cool Tones: Warm finishes like unlacquered brass, aged gold, or matte bronze contrast beautifully against cool finishes like brushed nickel, stainless steel, or chrome.
- Use Matte Black as an Anchor: Matte black acts as a neutral grounding element that bridges warm brass and cool nickel effortlessly.
- Repeat Finishes Intentionality: If you choose aged brass island pendants, repeat that brass finish in smaller doses elsewhere—such as on breakfast nook sconces, open shelf brackets, or barstools.
Common Kitchen Lighting Mistakes to Avoid
Even with generous budgets, kitchen lighting projects can succumb to simple layout oversights. Avoid these common traps when planning your renovation:
- Placing Recessed Cans Directly Behind Standing Work Areas: Placing overhead cans directly behind where you stand forces your body to block the overhead beam, casting a dark shadow over your cutting board. Always position task recessed cans roughly 24 inches from the wall, aligning them directly above the front leading edge of your countertops.
- Relying on a Single Overhead Fixture: A single central ceiling flush mount floods the center of the floor with light while leaving perimeter prep counters, sink corners, and cooktops shrouded in shadow.
- Choosing the Wrong Fixture Scale: Installing oversized pendants over a small 4-foot island overwhelms the space, while hanging tiny mini-pendants over a massive 10-foot island looks floating and incomplete. Always measure counter dimensions before purchasing decorative fixtures.
- Forgetting Under-Cabinet Task Lighting: Leaving out under-cabinet fixtures is the single biggest regret homeowners express after a remodel. Countertop prep work requires dedicated, unblocked light.
- Mixing Light Bulb Color Temperatures: Combining 2700K warm bulbs with 4000K cool white bulbs causes uneven color patches across custom cabinetry and stone backsplashes. Standardize all bulbs across all fixtures to 3000K.
- Installing Circuits Without Dimmers: Operating lights on simple toggle switches deprives you of atmospheric flexibility, leaving your kitchen stuck in maximum-brightness utility mode at all times.
Frequently Asked Questions About Kitchen Lighting
How many lumens do I need for my kitchen?
A standard residential kitchen requires roughly 60 to 80 source lumens per square foot at the ceiling level. To calculate your total light needs:
- Measure your kitchen’s total square footage (Length × Width).
- Multiply square footage by 70 lumens.
- For a 200-square-foot kitchen, aim for approximately 14,000 total source lumens spread across recessed cans, island pendants, under-cabinet lighting, and accent fixtures. If your space features dark cabinetry, dark countertops, or limited natural daylight windows, increase your total target output by 10% to 20%.
How far apart should kitchen island pendants be spaced?
Space island pendants 24 to 30 inches apart, measured from the center of one fixture to the center of the next. Ensure the outer edges of your end pendants sit at least 6 inches inward from the island’s side edges. Hang the bottom rims 30 to 36 inches above the countertop surface for standard 8-foot ceilings, adding 3 inches of height for every extra foot of ceiling clearance above 8 feet.
What color temperature is best for kitchen light bulbs?
The ideal color temperature range for residential kitchen lighting is 2700K to 3000K warm white. This range produces a flattering, inviting glow that brings out the natural beauty of wood cabinetry, warm metal hardware, and natural stone countertops without feeling dull or clinical. Keep Kelvin ratings identical across every fixture layer in the room.
Conclusion
Creating a masterfully lit kitchen requires balancing detailed technical calculations with creative design vision. By layering ambient overhead cans, direct under-cabinet task LEDs, and decorative island fixtures on separate dimming zones, you transform your kitchen into an inviting, high-performance space built for modern living.
At Turn Key Remodel, we specialize in high-end design-build renovations across Orange County, including Yorba Linda, Placentia, Anaheim Hills, Tustin, and Brea. Our team manages every detail of your kitchen renovation in-house—from initial layout design and lighting plans to electrical rough-ins, custom cabinetry installation, and final fixture placement.
Ready to bring your dream kitchen to life with expert craftsmanship and seamless project execution? Browse our extensive project photo gallery in our Kitchen Gallery, explore our complete range of custom design options on our Kitchen Services page, or learn more about our streamlined process in our detailed Design Build Remodeling Article. Contact us today to schedule your personalized design consultation!