
Floor Plan Ideas to Make Your 7×10 Bathroom Feel Twice as Big
Spatial Planning and Code Requirements for a 70-Square-Foot Space
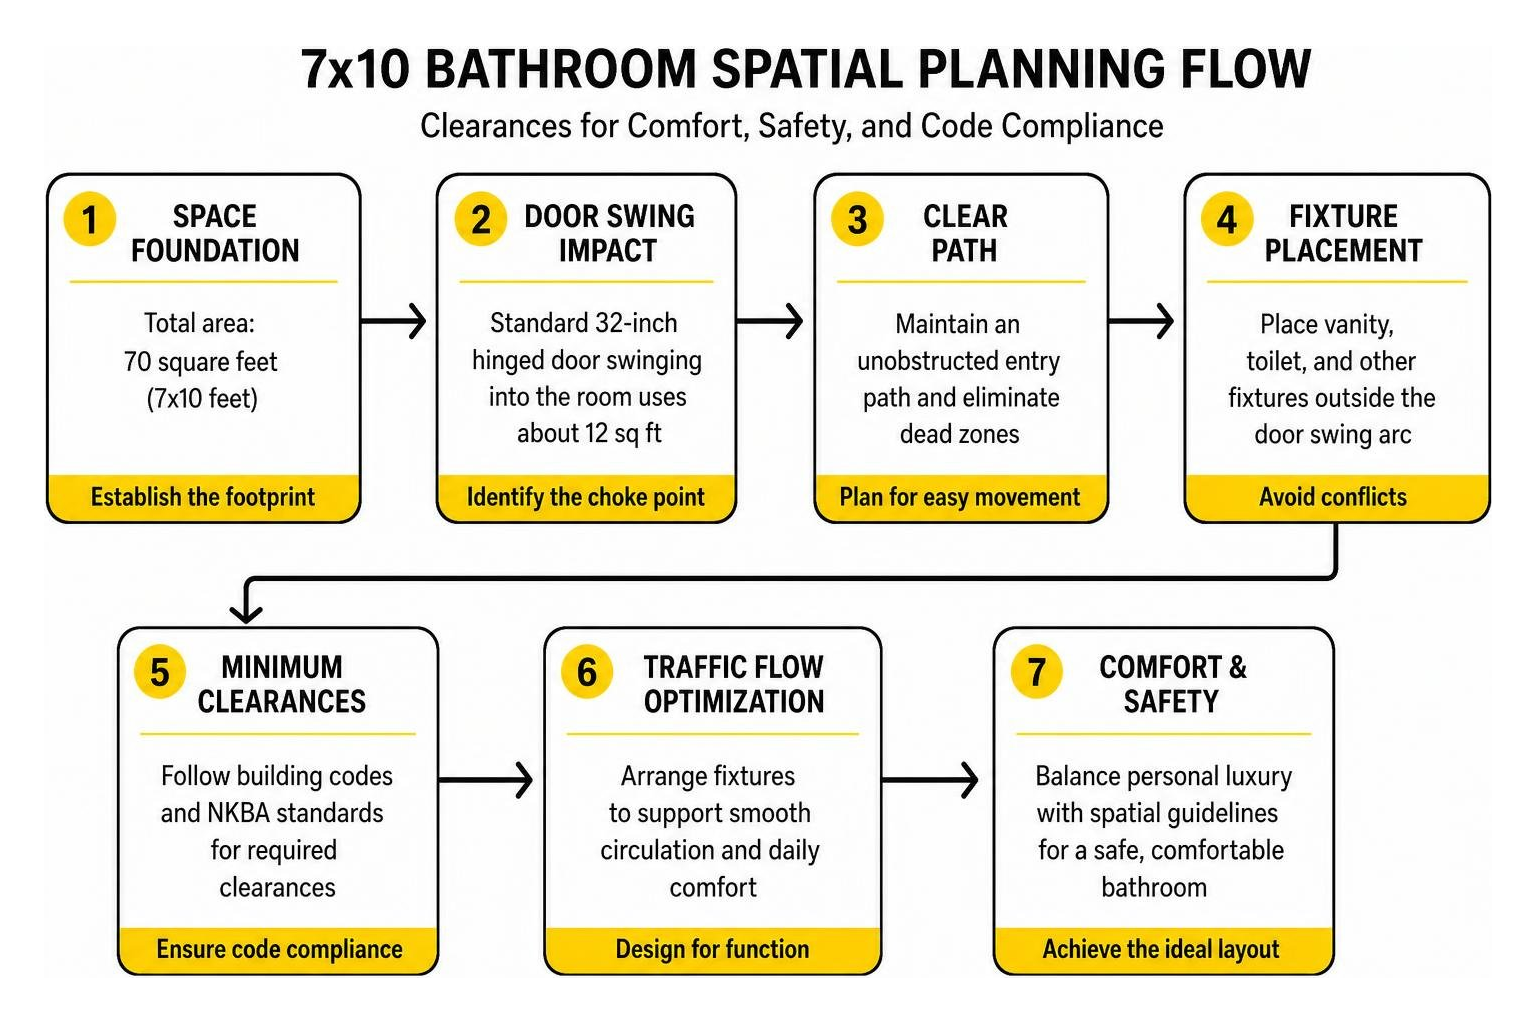
A 7×10 bathroom layout works best when you run the vanity, toilet, and shower along a single wet wall, use a pocket or outward-swinging door to preserve floor space, and choose a floating vanity to keep sightlines open. These strategies help a 70-square-foot bathroom feel larger while meeting building code and NKBA clearance requirements. Whether you are transforming an existing footprint in Anaheim Hills or planning and executing a home bathroom addition in Yorba Linda, building codes and National Kitchen & Bath Association (NKBA) standards dictate the minimum dimensions needed for daily comfort and safety.
Optimizing Traffic Flow and Door Clearance
The primary choke point in a 7×10 space is often the entry door. A standard 32-inch hinged interior door swinging into the room sweeps through an arc that consumes roughly 12 square feet of floor area. This swing path frequently limits where you can position the vanity or toilet, forcing awkward fixture layouts.
To eliminate dead zones and maintain an unobstructed entry path:
- Pocket Doors: Installing a solid-core pocket door slides completely into the wall framing, giving you back that entire 12-square-foot swing zone. This extra room allows you to position a vanity right beside the entryway without clearance conflicts.
- Outward-Swinging Doors: If your wall framing contains plumbing stacks or electrical chases that prevent a pocket door, re-hinge the entry door to swing out into the bedroom or hallway.
- Sliding Barn Doors: For master suites with wide adjoining walls, a decorative wall-mounted sliding track keeps floor paths clear inside the bathroom without opening internal drywall.
Meeting NKBA and Building Code Clearances
To ensure code compliance and seamless everyday movement, keep these critical clearance benchmarks in mind:
- Toilet Clearance: The plumbing code requires a minimum of 15 inches from the toilet centerline to any finished side wall, vanity, or partition (18 inches is preferred for comfort). You must also provide at least 21 inches of clear space in front of the bowl, though we recommend 30 inches for standard primary suites.
- Vanity Clearance: A minimum of 30 inches of clear floor space in front of the sink is required so you can bend, wash, and open vanity drawers without hitting opposing walls.
- Shower and Wet Clearances: Enclosed showers must provide at least a 30×30-inch interior footprint by code, but a 36×48-inch interior is ideal for a 7×10 room.
- Plumbing Stack Consolidation: Grouping water supply lines and drain-waste-vent (DWV) pipes along a single wet wall drastically simplifies framing and lowers structural labor expenses.
Four Effective 7×10 Bathroom Layout Options
To help you choose the best arrangement for your home, we have mapped out the four most effective layout configurations. You can explore our spatial efficiency comparison for 10×7 bathroom floor plans alongside the detailed floor plans below.
| Layout Configuration | Primary Wet Fixture | Vanity Size | Best For | Visual Space Rating |
|---|---|---|---|---|
| Single-Wall Walk-In | 36×48″ Walk-In Shower | 36″ Single Floating | Primary suites, modern aesthetic | High (Open sightlines) |
| Classic Alcove Combo | 60×30″ Tub-Shower | 36″–42″ Single Vanity | Families with children, resale | Moderate (Defined tub wall) |
| Double Vanity Suite | 36×36″ Corner Shower | 60″ Double Vanity | Couples sharing morning routines | Moderate (Vanity dominant) |
| Wet Zone Split | 60″ Walk-In with Bench | 36″ Vanity + Linen Tower | High-storage needs, compartmentalized use | High (Dedicated zones) |
The Single-Wall 7×10 Bathroom Layout with Walk-In Shower
This streamlined configuration runs all major plumbing—vanity, toilet, and walk-in shower—along a single 10-foot wall. Placing the 36×48-inch walk-in shower across the far 7-foot wall creates an unbroken sightline directly from the doorway.
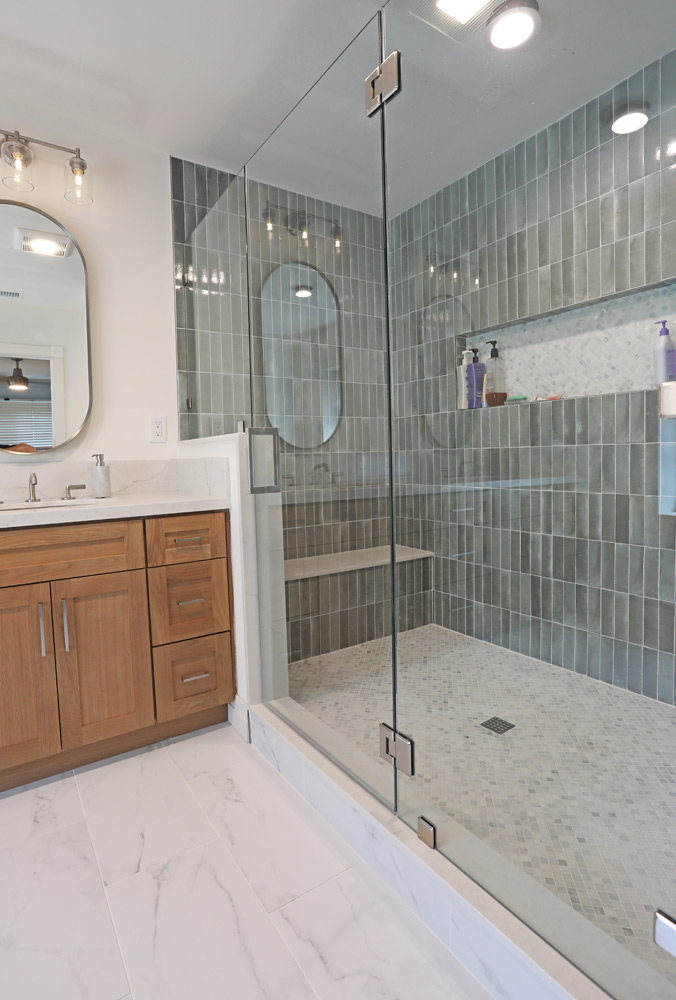
When you pair this arrangement with a 36-inch wall-mounted floating vanity and a frameless glass partition, the visible floor extends seamlessly underneath the cabinetry and into the shower stall. Homeowners who are converting a bathtub to a walk-in shower find that this single-wall layout offers the cleanest aesthetic and the most cost-effective plumbing runs.
The Classic Alcove Tub-Shower Combo Layout
For homes in Placentia or Tustin where family flexibility is essential, the classic alcove arrangement remains a staple. A standard 60×30-inch bathtub fits neatly along the far 7-foot wall. The toilet and a 36-to-42-inch vanity sit along the adjacent 10-foot wall, leaving a generous 3-foot-wide open walkway.
This plan gives you full multi-user versatility. You can bathe small children, soak after a long day, or take a quick morning shower without sacrificing floor space. If you want a more luxurious bathing experience, consider integrating a tub into a shower enclosure to achieve a spa-like finish within standard dimensions.
Double Vanity 7×10 Bathroom Layout for Primary Suites
Sharing a bathroom during busy weekday mornings can be challenging. A double vanity layout places an expansive 60-inch vanity with dual undermount sinks along one 10-foot wall. To make this work inside 70 square feet, the shower is arranged as a 36×36-inch neo-angle or square corner enclosure at the far end of the room, with the toilet positioned alongside it.
While this configuration reduces overall countertop depth and eliminates space for a freestanding linen closet, it streamlines morning routines for couples who need to get ready simultaneously.
The Wet Zone Split Layout with Built-In Storage
The wet zone split divides the 7×10 rectangle into distinct wet and dry areas. The entire back portion of the room (a 3.5×7-foot area) is waterproofed as a dedicated walk-in wet room featuring an overhead rain shower and integrated bench.
The front dry zone accommodates a 36-inch vanity, the toilet, and a floor-to-ceiling built-in linen tower. For more layout ideas, look at these space-maximizing 10×7 floor plan ideas to see how architectural zoning can organize a modest footprint.
Fixture Selection: Walk-In Shower vs. Bathtub vs. Combo
Choosing your primary wet fixture affects everyday comfort, future accessibility, and overall property value.
Walk-In Shower Pros and Cons
Walk-in showers are the top design trend for primary bathroom renovations. By removing the high barrier of a bathtub apron, you create a continuous, curbless transition that makes a 7×10 room look significantly larger.
Pros:
- Visual Expansion: A frameless glass enclosure allows light to travel from wall to wall without visual interruptions.
- Aging in Place: Low-threshold or curbless entries provide universal accessibility.
- Custom Sizing: A 36×48-inch footprint provides ample elbow room for built-in benches and dual showerheads.
Cons:
- Bathing Limitations: Eliminates the ability to take deep soaking baths.
- Initial Investment: Custom glass panels and specialized waterproofing membranes can carry a higher upfront cost. You can learn more by evaluating tub-to-shower conversion costs before finalizing your budget.
Tub and Tub-Shower Combo Considerations
If your household includes infants, toddlers, or pets—or if this is the only bathroom in the house—keeping a bathtub is often essential for resale market appeal.
A standard 60×30-inch alcove acrylic tub balances affordability with easy maintenance. For a more elevated look, modern deep-soaking acrylic models feature thin profiles and steep interior walls, maximizing soaking depth without demanding extra square footage. However, cast-iron tubs can add significant weight to your floor joists, requiring structural checks before installation.
Smart Storage Solutions and Vanity Sizing
Clutter makes any bathroom feel smaller. In a 70-square-foot room, every inch of cabinetry must work hard to keep countertops clear. You can see how these principles come together in real homes by exploring finished bathroom remodeling project galleries.
Sizing Your Vanity: 36-Inch vs. 48-Inch vs. Double Sink
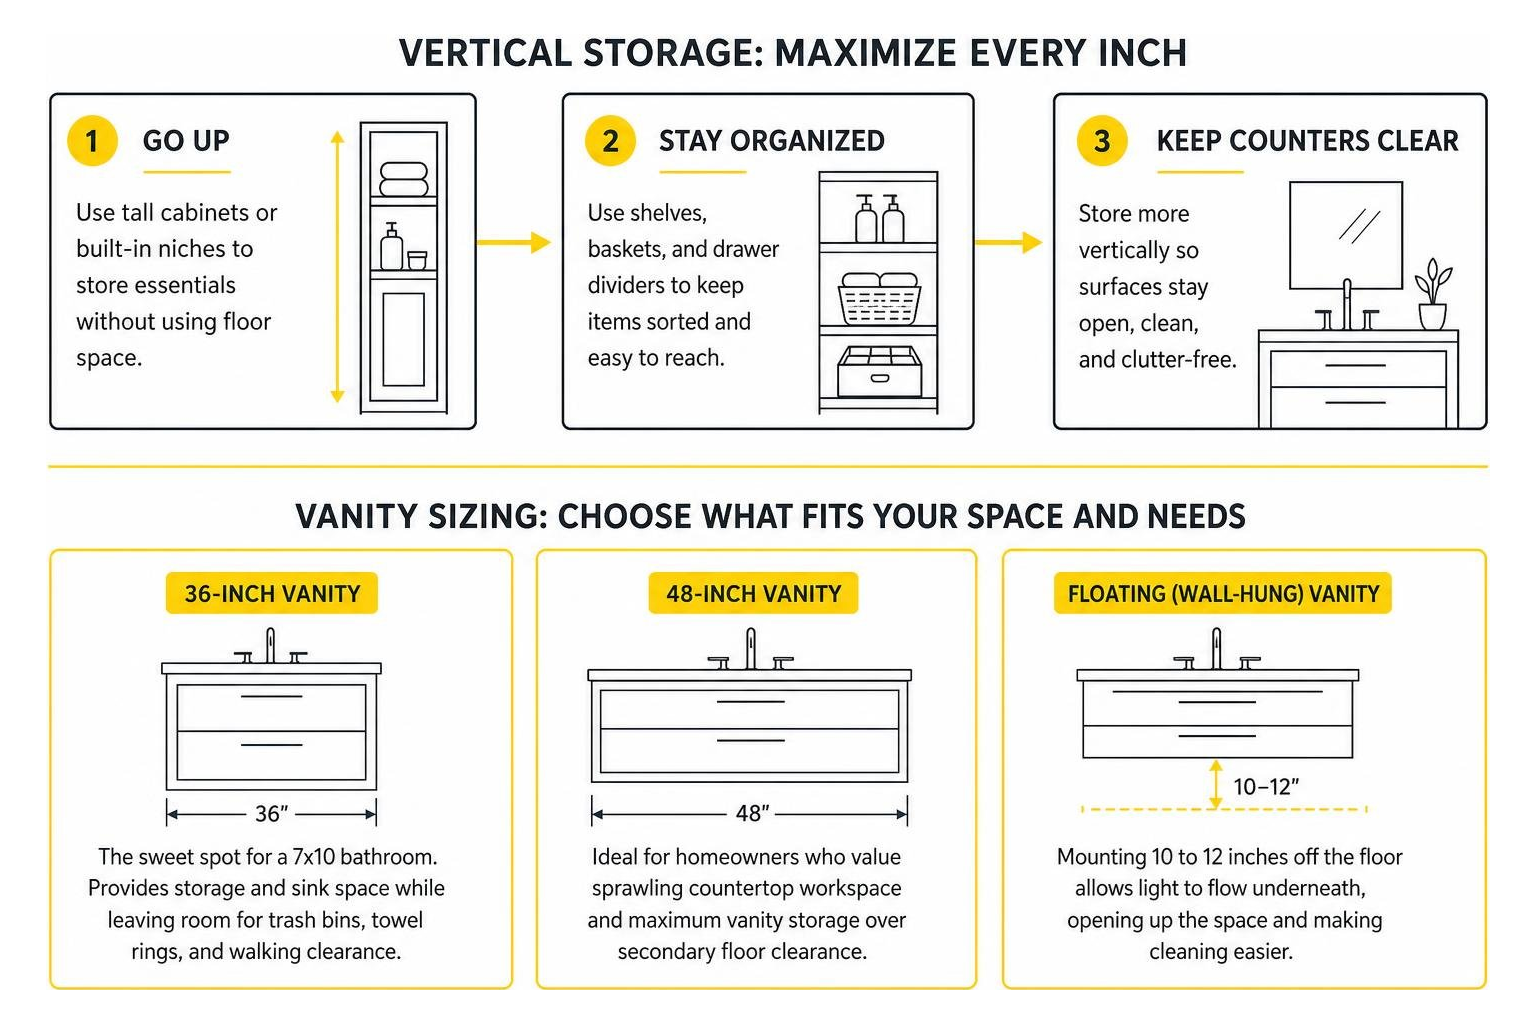
- 36-Inch Vanity: The sweet spot for a 7×10 bathroom. It provides comfortable drawer storage and sink space while leaving room for trash bins, towel rings, and walking clearance.
- 48-Inch Single Vanity: Ideal for homeowners who value sprawling countertop workspace and maximum vanity storage over secondary floor clearance.
- Floating (Wall-Hung) Vanities: Mounting your vanity 10 to 12 inches off the finished floor allows light to flow underneath, tricking the eye into seeing more square footage while simplifying floor cleaning.
Built-In Linen Closets and Recessed Niches
When floor space is at a premium, build into the wall cavities:
- Recessed Medicine Cabinets: Recessing a mirrored cabinet between standard 16-inch-on-center wall studs gives you hidden storage for toiletries without intruding over the sink.
- Shower Niches: Add a 14×24-inch vertical tiled niche within the shower wall to hold shampoo bottles and soaps, eliminating hanging caddies.
- Over-Toilet Built-Ins: Utilize the vertical wall area above the toilet tank for shallow built-in cabinets or floating oak shelves.
Visual Tricks, Lighting, and Ventilation for Windowless 7×10 Bathrooms
Many 7×10 bathrooms in Orange County and Brea floor plans are interior rooms without exterior windows. Proper illumination, balanced materials, and high-performance mechanical ventilation are essential to keep these spaces bright and fresh.
Layered Artificial Lighting and Mirror Strategies
A single overhead dome light casts harsh shadows and makes small rooms feel dim. Instead, use a three-layer lighting strategy:
- Ambient Lighting: Install four recessed LED ceiling cans with a warm 3000K color temperature and a high color rendering index (CRI 90+).
- Task Lighting: Mount vertical wall sconces at eye level on either side of the mirror to distribute even light across your face, avoiding top-down shadows.
- Accent Lighting: Use LED strip lighting beneath a floating vanity or behind a backlit mirror to add visual depth.
Mirror Tip: Installing a large, wall-to-wall mirror over the vanity reflects light across the room, doubling the perceived depth of the space.
Color Palettes and Large-Format Tile Selection
Dark, busy tile patterns visually break up a compact room. To create a continuous, expansive aesthetic:
- Large-Format Tiles: Use 12×24-inch or 24×24-inch porcelain tiles on the floor and shower walls. Larger tiles mean fewer grout lines, resulting in a cleaner, less busy visual grid.
- Tone-on-Tone Palettes: Crisp whites, soft creams, warm greys, and light taupes reflect illumination effectively.
- Continuous Flooring: Running the same floor tile straight into a curbless walk-in shower extends your visual boundary all the way to the back wall.
Moisture Control and High-Efficiency Ventilation
Without a window, you need reliable mechanical ventilation to prevent moisture damage and peeling paint. A 70-square-foot bathroom with standard ceilings requires an exhaust fan rated for 80 to 110 CFM (Cubic Feet per Minute). Pair the fan with a digital humidity-sensing switch that turns on automatically when steam levels rise, keeping the room dry and mold-free.
Common 7×10 Bathroom Remodeling Mistakes to Avoid
- Overcrowding with Oversized Fixtures: Installing a bulky 60-inch vanity in a narrow corridor can restrict your walking clearance below comfortable levels.
- Overlooking Door Swings: Forgetting to calculate how an inward-swinging door interacts with vanity drawers or shower doors is a frequent layout mistake.
- Compromising on Ventilation: Installing an undersized 50-CFM fan in a windowless room leads to persistent moisture problems.
- Neglecting Recessed Storage: Relying solely on under-sink cabinetry creates clutter on your countertops.
- Miscalculating Renovation Budgets: Unexpected plumbing relocations can strain your finances. Review our essential bathroom remodel budget checklists and planning steps to prepare your budget before construction starts.
Frequently Asked Questions About 7×10 Bathroom Floor Plans
Can you fit a separate tub and walk-in shower in a 7×10 bathroom?
Fitting both a standalone bathtub and an independent walk-in shower inside a standard 70-square-foot room is generally not recommended, as it crowds fixture clearances and makes the room difficult to navigate. However, you can achieve this with a Japanese-style wet room layout, where a compact freestanding soaking tub is placed directly inside an open, fully tiled shower zone.
What is the ideal vanity size for a 7×10 master bathroom?
A 36-inch single vanity offers the best balance of drawer storage, countertop area, and open floor space. If you prefer more counter surface and do not require a separate linen cabinet, a 48-inch vanity also fits comfortably.
How can I make a windowless 7×10 bathroom feel brighter and more open?
Use a combination of 3000K LED recessed ceiling lights, eye-level vanity sconces, large-format polished or satin porcelain wall tiles, and an oversized frameless mirror to bounce light throughout the room.
Conclusion
A 7×10 bathroom provides plenty of space to build a bright, highly functional retreat. By establishing clear fixture zones, selecting space-efficient storage, and using smart lighting, you can make your 70-square-foot master or guest bathroom feel twice its size.
At Turn Key Remodel, we specialize in helping Orange County homeowners turn compact spaces into well-planned, beautiful rooms. From initial 3D design concepts through complete construction, our design-build team handles every detail on time and on budget. Explore our custom bathroom design and remodeling services to start planning your renovation today.